|
|
< Day Day Up > |
|
Another very popular middleware architecture that enables development of Enterprise applications is CORBA, which stands for Common Object Request Broker Architecture, a specification designed and maintained by the OMG (Object Management Group). The CORBA framework conceptually works very similarly to the RMI framework and is designed as an open architecture for heterogeneous systems to communicate with one another, while RMI framework is specific to Java technology. Heterogeneous systems means that applications running on different operating systems and developed in different programming languages can communicate with each other. Many Enterprises have implemented CORBA-based middleware as the backbone of their Enterprise systems. It is necessary to understand the concepts outlined here in order to successfully develop and implement Enterprise-class CORBA-based solutions.
An interface definition is to be created containing the list of operations supported by the CORBA server object. The operations are simple method signatures, for all those methods that need to be accessed by the remote clients. This interface definition is created in an Interface Definition Language (IDL) standardized by the Object Management Group (OMG). Although the IDL provides language-independent specification of data types, it is modeled after the C++ language and therefore has similarities with C++ data types. However, its use is not restricted to C++ alone; based on the programming language used to develop the CORBA object, a language-level IDL mapping is defined in the CORBA-specification. Vendors who implement the CORBA framework for specific programming languages provide language converters, which generate CORBA specific helper files for the specific languages such as C++, Delphi, and Java, to name a few. There are a number of languages for which the IDL mappings as well as IDL converters are available. For example, Borland Software Corporation provides the very popular Visibroker™ product, which is an implementation of CORBA specification and supports C++, Delphi, and Java. The Java SDK provides a number of classes consisting of the complete CORBA framework, including the Object Request Broker daemon program.
The IDL interface is implemented by a CORBA object in any of the supported languages. The interface is considered as a contractual agreement between the object and the external world. Every object will have an implementation and an interface reference. The implementation resides on the server side, while the reference is made available to the client, through which the client will make calls on the server object. The object implementation is also known as the servant program. From the perspective of the client, it only interacts with the interface reference and does not know where the object resides or the implementation details, or in what programming language the object is implemented. For this reason, it is very easy to replace the servant object for a specific business scenario without the knowledge of the client, as long as the new object also implements the same interface. When the client looks for the servant object with the specific interface reference, it is the Object Request Broker (ORB) that locates and provides the necessary servant object, with the help of the Portable Object Adapter (POA). The POA performs the job of mediating between the CORBA server application that hosts the servant objects and the ORB runtime; it is called portable because it permits the development of object implementations portable across the ORBs from different vendors. Both the ORB and POA are libraries of objects, whose instances are created during the process of communication between the client and servant objects. In a typical CORBA implementation, the client, servant objects, and server application are custom-developed to the business requirements while the ORB and POA are libraries supplied by vendors’ products such as Borland’s Visibroker, Java CORBA packages contained in the Java SDK, and so on. By defining a set of policies, the functionality offered by the POA can be controlled, including features such as the threading model, implicit activation of servant objects by automatic allocation of object ids, supporting persistent object identifiers, and so on.
As mentioned earlier, the language-independent IDL file is converted to language-specific stub, skeleton, helper, holder, and tie files using the specific language converters. The purpose of these files is discussed in detail in the following sections.
The CORBA framework uses the IIOP (Internet Inter-ORB Protocol) to marshal and unmarshal the method arguments and return values between the client and server applications. Starting from Java 2 SDK Version 1.3 onward, the rmic compiler is capable of supporting the IIOP protocol instead of the standard JRMP protocol used by Java for implementing remote object access. In addition, the rmic compiler can be used to facilitate the generation of CORBA stub and skeleton files directly from a Java remote interface instead of using the IDL style interface. This feature is available from Java 2 SDK Version 1.3 onward and has the associated limitations, which are discussed in later subsections. For earlier versions of the JDK, a language converter is used to create these files. Also, if it is necessary that the Java-based CORBA objects should be accessed by client applications built in other languages—such as C++ and Delphi—it is needed to produce the client-side stubs, helper, and holder files using the language converters for these languages.
The IDL interface is a general-purpose definition that should be converted to useful class or interface definitions specific to the particular language. From JDK 1.3 onward, the idlj compiler is used to create these files. The syntax of the command is specified here.
    $ idlj <options> <idl file>
    $ idlj –fclient IDLIntf
    $ idlj –fserver IDLIntf
    $ idlj –fserver –fclient IDLIntf
    $ idlj –fall IDLIntf
    $ idlj –fallTIE IDLIntf
The first line displays the general syntax of the command and the subsequent lines describe the different ways of creating the associated files automatically, depending on the specified options. When the –fclient option is specified, only the client-side stub and other files are generated. With the –fserver option, only the server-side stub and other files are generated. To generate both the client- and server-side files, both these options should be specified together, or the –fall option alone would do. The last command line displays a different option –fallTIE to generate the additional Tie files to implement the Delegation Model servant objects. The POA architecture permits the servant object to be implemented using the Inheritance Model, as shown in Figure 7.4, or the Delegation Model, as shown in Figure 7.5. At first sight, these figures may look complex, but it is really easy to understand them once we know each of the components displayed in the figure and its role. The following discussion will assist in identifying the component parts of these figures.
The files generated by the IDL compiler are named after the IDL file name with the appropriate suffix associated with the file type. In the above examples, the IDL file is assumed to be IDLIntf; therefore all the generated files will begin with this name and end with the appropriate suffix, with the exception of the stub file, which begins with an underscore character, followed by the IDL file name and ending with the suffix Stub. Thus, in the example, the client-side stub file is named as _IDLIntfStub.java. The stub file extends the org.omg.CORBA.portable.ObjectImpl class and implements the signature interface, which is discussed in the following subsections. The org.omg.CORBA.portable.ObjectImpl class is the default base class for all the client-side stub implementations and provides the default method implementations for the org.omg.CORBA.Object interface, which represents the client-side reference of the remote servant object.
Two other files generated by the IDL compiler are the helper and holder classes, which have the Helper and Holder suffixes, respectively, after the IDL file name, as in IDLIntfHelper.java and IDLIntfHolder.java class files in the current example. Enterprise-class architecture such as CORBA needs to support marshalling and unmarshalling user-defined object types (or classes) in addition to the primitive data types supported by the OMG specification. For this purpose, the Java implementation of CORBA framework provides a general purpose data type known by the org.omg.CORBA.Any class, which serves as a container for any data type that can be defined in the IDL file in addition to the primitive data types. However, while using this data type, it is necessary to set the appropriate data type and value associated with the IDL interface. While the Java CORBA framework contains pre-defined helper (and holder) classes for all the primitive data types supported in the specification and associated methods are provided in the org.omg.CORBA.Any class, the helper class generated by the IDL is an abstract class with all the static methods that are used to insert the IDL-specific data type into an object of the org.omg.CORBA.Any class, extract the IDL-specific data type from an object of the org.omg.CORBA.Any class, read from the input stream, and write to the output stream, and the narrow method to return the appropriate data type the object represents. The static methods defined in the helper class are invoked in the holder class, which has methods that read from the input stream and write to the output stream. The holder class implements the org.omg.CORBA.portable.Streamable interface and contains a field of type specified in the IDL interface, which is initialized with the value specified in the constructor. As the name suggests, the holder class works as a storage to contain the data type being marshalled, so that it can be changed by the servant object when the arguments are passed by value, as in the case of the inout and out type arguments specified in the IDL interface operation definitions. The org.omg.CORBA.portable.Streamable interface ensures that the implementing class can be streamed and therefore supports marshalling and unmarshalling of the method arguments and return values. The helper and holder classes are together used in the data marshalling and unmarshalling on both the client and server sides. Therefore, the client-side proxy is the stub class, which mediates between the client application and the helper and holder classes.
Another file generated by the IDL compiler is the server operations definition file, which is a simple Java interface file created based on the IDL interface definition. This file is named with the Operations suffix after the IDL interface name, as in IDLIntfOperations.java interface file. This interface forms the basis for the skeleton class implementation of the CORBA servant object.
However, because the CORBA interface is more than a simple Java interface, another interface file is generated with the same name as the IDL interface name, as in IDLIntf.java, which is also known as the signature interface. The signature interface is created by extending the operations interface and implementing two more interfaces, the org.omg.CORBA.object and org.omg.CORBA.portable.IDLEntity. The former of these two provides client-side reference of the servant object. As the client accesses the servant object through the client-side reference, the servant object should implement this interface. The latter is a marker interface indicating that the implementing class is a Java IDL type supported by the helper class. As specified earlier, the signature interface forms the basis for the client-side stub class.
The next file generated by the IDL compiler is the server-side skeleton class, which is named with the POA suffix after the IDL interface name, as in IDLIntfPOA.java in the current example. This abstract class extends the org.omg.
CORBA.PortableServer.Servant class and implements two interfaces, the operations interface and the org.omg.CORBA.portable.InvokeHandler interface. As mentioned earlier, there are two ways to implement the servant object from the skeleton, using the Inheritance Model or using the Delegation Model. To the point of creating the skeleton class, the process remains exactly the same as discussed here. At this point, depending on the implementation model, the servant object should be implemented.
The default implementation is the Inheritance Model, in which the servant class should extend the skeleton class and provide implementation to all the methods defined in the IDL interface. The marshalling and unmarshalling support is provided by the skeleton class. However, this model suffers from a drawback. The IDL specification permits multiple inheritance while defining interfaces, which will result in multiple skeleton classes. But as Java does not support multiple inheritance, the servant class should only inherit from one of the skeleton classes and not from all of them. This drawback is addressed by the Delegation Model, also known as the Tie model. While implementing the servant object in this model, another class, known as the Tie class, is created by the IDL compiler (with the –fallTIE command line option), with the name suffixed by POATie to the IDL interface name, as in IDLIntfPOATie.java in the current example. This class extends the skeleton class (e.g., the IDLIntfPOA.java class) and is extended by the servant object. The Tie class wraps the operations interface in the form of a delegate, and the servant object is connected to the skeleton by passing itself to the Tie class’s constructor or by calling the _deletegate() method on the Tie class with the servant class reference as the single argument. This process enables the Tie class to delegate all the incoming method invocations to the servant object.
Apart from the classes generated by the IDL compiler, the developer has to write additional classes in order to implement the object, server, and client functionality, as discussed in this section. The first of these is the servant class, which actually implements all the interface methods based on the signatures in the operations interface. As discussed in the previous subsection, the servant class should extend the skeleton class or the Tie class, depending on whether the object is designed in the Inheritance Model or in the Delegation Model.
Next, we need to build a server application to host the servant object. In a large enterprise application, multiple servant objects can be hosted by a single server module. In Java terminology, this is the module containing the main() method. Apart from the normal business logic, the server module should perform the following set of tasks in order to host the servant objects. A simple outline of tasks presented here is followed by a detailed example application. Figure 7.6 also depicts this sequence of tasks, and the steps outlined here are associated with the task number on the figure for the convenience of the readers. At first glance, it seems to be a long list of tasks; however, this is a very standardized set of tasks to activate any CORBA servant object, and hence can be automated in a custom server module.
Create an initial instance of the ORB (step 1 in the figure). This is done by executing the static init() method and passing the command-line parameters and an ORB properties object as arguments. The ORB properties may be used to specify a particular ORB implementation to be used. For example, if Borland Visibroker ORB is to be used, the properties should be set accordingly. By default, the JDK implementation of ORB is instantiated, in which case the second parameter to the init() method can be null. Creating the initial ORB instance is the starting point in the whole process, and other CORBA framework objects are initialized (or set) with respect to this ORB.
Obtain a reference to the root POA object (first part of step 2 in the figure). A CORBA server application should have a root POA object to create further child POAs in a tree-like structure. This is done by executing the resolve_
initial_references() method on the ORB object, and passing RootPOA as the string argument.
Associate the root POA object with the ORB object (second part of step 2 in the figure). This step establishes the link between the ORB and POA.
Create a child POA object under the root POA (step 3 in the figure). The POA object supports defining policies to have a better control on the object’s activation and lifetime and so on. However, the root POA is created with default policies, which cannot be changed. The child POA object can be created with desired set of policies. Every POA object is associated with a POA manager. While creating the child POA, an existing POA manager may be specified as one of the arguments to the method call, if we desire to associate the new child POA with an existing POA manager. If a null value is passed for this argument, a new POA manager is created automatically and associated with the new child POA object. For the sake of demonstration, the figure shows creating multiple child POAs—one for each servant object; however, the concept can be extended to any number of servant objects. Also, it is not always necessary to create child POAs to control servant objects; even the root POA can be used to control the servant objects, but the root POA is created with default policies, which cannot be changed.
Activate the POA manager associated with the child POA object, which manages the processing state of one or more POAs (step 4 in the figure). When the POA is created, the associated POA manager is in the HOLD state, which means that all the method calls on the servant objects controlled by the associated POAs are in queue. Therefore, it is necessary to activate the POA manager. This is done by executing the activate() method on the POA manager object.
Create the servant objects and register them with the ORB (step 5 in the figure). This can be done by passing the ORB reference as an argument to the constructor for the servant object.
Create the root naming context object by executing the resolve_initial_references() method on the ORB object and passing the NameService as the string argument (step 6 in the figure).
From the root naming context, obtain the NamingContextExt reference by executing the static narrow() method on the NamingContextExtHelper object and passing the root naming context object as the argument (step 7 in the figure). The NamingContextExt is an extension of NamingContext interface and accepts URL-based names for binding and resolving.
Get the object references (to the servant objects) through the child POAs by executing the servant_to_reference() method on the POAs (step 8 in the figure). Execute the narrow() method on the servant’s helper class to obtain the correct object reference type.
Bind the servant object references obtained in step 8 with the naming context reference obtained in step 7. While binding, a name should be provided to each of the servant objects. This name is exactly used by the CORBA client module to retrieve the object reference from the naming context. This is the last step in the process to bind the object references with the naming context, identified as step 9 in the figure. After performing this step, the servant objects are ready to service the client’s requests, once the ORB starts executing.
Finally, the run() method on the ORB object should be executed to make all the instantiated servant objects available for clients.
The JDK package also includes an ORB daemon program orbd, which should be run before executing the CORBA server module. The semantics of executing this command are discussed later while building the example application.
Once the CORBA servant objects are ready to service the clients, it is necessary to know how to develop CORBA client objects. Because CORBA provides a heterogeneous environment for clients and servers, the client applications may be written in any supported language on any supported platform. However, because this chapter is about CORBA development using Java language, we discuss the process of creating CORBA clients in Java. To create CORBA clients in any other language, the stub class (and helper and holder classes, if required for the specific language) should be generated, using the appropriate IDL compiler for that language.
Developing CORBA clients in Java is fairly simple compared to the server module development process, as can be seen from the steps outlined here.
Very similar to the first step in server module development, create an initial instance of the ORB. This is done by executing the static init() method and passing the command line parameters and an ORB properties object as arguments. The ORB properties may be used to specify a particular ORB implementation to be used. For example if Borland Visibroker ORB is to be used, the properties should be set accordingly. By default, the JDK implementation of ORB is instantiated, in which case the second parameter to the init() method can be null. The ORB instance is used by other CORBA framework objects to obtain a reference to the servant objects.
Similar to step 6 in server module development, create the root naming context object by executing the resolve_initial_references() method on the ORB object and passing the NameService as the string argument.
Similar to step 7 in server module development, obtain a reference to the NamingContextExt interface by executing the static narrow() method on the NamingContextExtHelper object and passing the root naming context object as the argument.
By executing the resolve_str() method on the NamingContextExt interface reference and passing the object reference name as the single argument, obtain the servant object reference. The object reference name used in this step is the same name used in the server module to bind the object to the naming context.
Passing the object reference obtained in the previous step as the single argument, execute the narrow() method on the servant helper object to obtain the correct object type reference. Successful execution of this step ensures that the client module has obtained the correct servant object reference from the naming context.
Through the object reference, the client module can now execute methods on the servant object, and the stub, helper, and holder classes together perform the marshalling and unmarshalling of method arguments and return values.
After our initial attempt to understand the full cycle of events involved in the CORBA client and server development, it is now worth our while to walk through the process of building a working example application. This example is presented in two ways. First the entire application is built using standard Java class libraries shipped with the JDK 1.4.1, and then the application is rebuilt using Borland JBuilder and Borland Visibroker development environments. Because both are Borland products, it is natural to build the example using them together.
The example application hosts a CORBA servant object that maintains the names of customers as added by the client module. Every customer name is associated with a customer number (known as CustID), which is generated randomly. The customer numbers and the associated names are internally stored in a java.util.Prop
erties object. The supporting interface defines two methods, AddCustomer() and
GetCustomer(). The first method sends the name of the customer as a string object and gets the newly created customer number as the return value. The second method sends the customer number as an integer value and gets the associated customer name as return value. The IDL definition is displayed in Listing 7.14, which is available on the accompanying CD-ROM.
module CustService {

  interface Customer {
    long AddCustomer(in string CustName);
    string GetCustomer(in long CustId);
  };
};
This IDL file is compiled with the following command line, where idlj is the IDL compiler for Java and is part of JDK 1.4.1.
$ idlj –fall CustService.idl
Successful execution of the above command will produce the following set of files. Because the IDL interface is specified within an IDL module definition, the IDL module is mapped to a Java package, and hence these files are automatically created within a subdirectory CustService in the current home directory. For the sake of conserving space, listings of these files are not provided here; however, the electronic copy can be viewed on the CD-ROM along with the other project source files.
    CustomerOperations.java
    Customer.java
    _CustomerStub.java
    CustomerHelper.java
    CustomerHolder.java
    CustomerPOA.java
From the current directory, compile these programs using the javac compiler and the following command line.
$ javac CustService/*.java
The next step is to implement the servant object and server and client modules. For convenience, these programs are also located in the same subdirectory as part of the same package. The ![]() CustomerImpl.java program implements the servant object by extending the
CustomerImpl.java program implements the servant object by extending the ![]() CustomerPOA.java skeleton file, as shown in Listing 7.15, while the server module that instantiates this servant object is displayed in Listing 7.16. These listings are available on the accompanying CD-ROM.
CustomerPOA.java skeleton file, as shown in Listing 7.15, while the server module that instantiates this servant object is displayed in Listing 7.16. These listings are available on the accompanying CD-ROM.
package CustService;

import java.lang.*;
import java.util.*;
import org.omg.CORBA.*;

/** This program extends the skeleton class generated by the
    IDL compiler idlj, and implements the servant object;
    all the methods defined in the IDL interface are implemented.
*/
class CustomerImpl extends CustomerPOA {
    private ORB orb;
    Properties custList;
    Random rand;

    public CustomerImpl(ORB newOrb) {
        this.orb = newOrb;
        custList = new Properties();
        rand = new Random();
    }

    /* Method to add a new customer name and return customer id */
    public int AddCustomer (String custName) {
        int nextCustID = getNextCustID();
        if (!custList.contains(String.valueOf(nextCustID))) {
            custList.put(String.valueOf(nextCustID), custName);
        }
        return nextCustID;
    }

    /* Method to retrieve the customer name for a customer id */
    public String GetCustomer (int custID) {
        String custName = "";
        custName = (String)custList.get(String.valueOf(custID));
        return custName;
    }

    /* Method to generate a new customer id as a random number */
    private int getNextCustID() {
        int nextCustID = rand.nextInt();
        if (nextCustID < 0)
            nextCustID = -nextCustID;
        return nextCustID;
    }
}
package CustService;

import java.lang.*;
import java.util.*;
import org.omg.CORBA.*;
import org.omg.CosNaming.*;
import org.omg.PortableServer.*;
import org.omg.CosNaming.NamingContextPackage.*;

class CustomerServer {
    public static void main (String[] args) {
        try{
          // Create an initial instance of ORB (step 1).
            ORB orb = ORB.init(args, null);

          // Create the root POA object (step 2).
          // In this example, rootPOA is directly used to
          // control the servant, instead of a child POA.
            POA rootPoa = POAHelper.narrow(
              orb.resolve_initial_references("RootPOA"));

          // Activate the associated POA manager which
          // manages the associated CORBA objects (step 4).
            rootPoa.the_POAManager().activate();

          // Create an instance of teh servant object (step 5).
            CustomerImpl cust = new CustomerImpl(orb);

            // Get the root naming context (step 6).
            org.omg.CORBA.Object objRef =
              orb.resolve_initial_references("NameService");

            // Get NamingContextExt from root naming context (step 7).
            NamingContextExt ncRef =
            NamingContextExtHelper.narrow(objRef);

            // Get object reference from the servant (step 8).
            org.omg.CORBA.Object custObjRef =
              rootPoa.servant_to_reference(cust);
            Customer custIntRef = CustomerHelper.narrow(custObjRef);

            // Bind the object reference to naming context (step 9)
            String name = "Customer";
            NameComponent path[] = ncRef.to_name( name );
            ncRef.rebind(path, custIntRef);
            System.out.println("Customer server started ...");

            // Start the ORB and wait for client invocations (step 10)

            orb.run();
        } catch (Exception e) {
            System.err.println("Exception occured while instantiating
the servant" );
            e.printStackTrace(System.out);
        }
        System.out.println("Exiting the Customer Server ....");

    }
}
The CORBA client is implemented as shown in Listing 7.17, which is available on the accompanying CD-ROM.
package CustService;

import java.lang.*;
import java.util.*;
import org.omg.CORBA.*;
import org.omg.CosNaming.*;
import org.omg.CosNaming.NamingContextPackage.*;

class CustomerClient {
    Vector custIDs;
    ORB orb;
    public CustomerClient(String[] args) {
        try {
          custIDs = new Vector();
          // Create an initial instance of the ORB
            orb = ORB.init(args, null);
          // Obtain the root naming context
          org.omg.CORBA.Object objRef =
                 orb.resolve_initial_references("NameService");

          // Obtain the NamingContextExt from root naming context
          NamingContextExt ncRef =
                NamingContextExtHelper.narrow(objRef);

          // Locate the object reference through the naming context
            String objRefName = "Customer";
            Customer custRef = CustomerHelper.narrow
                  (ncRef.resolve_str(objRefName));
            addCustomers(custRef);
        }
      catch (Exception e) {
                System.out.println("Exception occured while obtaining object reference  ") ;
          e.printStackTrace(System.out);
        }
    }
    public void addCustomers(Customer custRef) {
        try {
            // Add three customer names to the server's list.
            int custId = 0;
            custId = custRef.AddCustomer("John P Smith");
            custIDs.add(String.valueOf(custId));
            custId = custRef.AddCustomer("David Bayer");
            custIDs.add(String.valueOf(custId));
            custId = custRef.AddCustomer("Susan Blackwill");
            custIDs.add(String.valueOf(custId));

            // Now retrieve the customer names that were added earlier,
            // and display them to the screen.
            for (int i=0; i < custIDs.size(); i++) {
                String custIdStr = (String)custIDs.get(i);
                String custName = custRef.GetCustomer
                  (Integer.valueOf(custIdStr).intValue());
                if ((custName != null) && (custName != "")) {
                    System.out.println("Customer "+custName
                        +" has customer id "+custIdStr);
                }
            }
        }
        catch (Exception e) {
              System.out.println("ERROR : " + e) ;
              e.printStackTrace(System.out);
        }
    }
    public static void main(String[] args) {
        CustomerClient custClient = new CustomerClient(args);
    }
}
Compile the servant class, the server module, and the client module using the javac compiler in the same way any other Java program is compiled. Now it is time to test the programs. Before starting the server module, an ORB daemon (or agent) must be running in a different process within the network. The Java 2 SDK comes with the orbd daemon program, which acts as an agent to provide object location services for the client modules. The following command line will start the orbd daemon listening to port 15000.
$ orbd –ORBInitialPort 15000
Next, start the CORBA server module with the following command line from the directory that hosts the package.
$ java CustService.CustomerServer –ORBInitialPort 15000
If everything worked out well, the server module must be up and running, with a message as specified in the program. Finally, start the client module with the following command-line syntax.
$ java CustService.CustomerClient –ORBInitialPort 15000
As the client module does not wait in a loop, it simply adds the three customer names, then retrieves them from the server using the customer ids obtained in the previous step, then it throws these names and ids to the console output, as shown in Figure 7.7, and exits.
The previous subsection discussed CORBA application development using the default programs and libraries provided with the Java 2 SDK, in which the orbd daemon process played the role of locating the servant objects registered with the name service. Because CORBA is an open architecture, vendors such as Borland have developed their own implementation of CORBA framework. In the current context, the Visibroker product from Borland can be used to develop CORBA applications.
Visibroker is part of the Borland Enterprise Server (BES)™, which is designed to provide a comprehensive Enterprise deployment solution. The Borland Enterprise Server is available in three editions—the Web edition, Visibroker edition, and Application Server edition. The Web edition is designed to serve as a Web server and consists of three main components: a Web server enhanced over the open source Apache server, a Web container based on the open source Tomcat reference implementation to serve JSP pages and servlets, and Borland JDataStore database, which is a JDBC-based object relational database entirely in Java. The Visibroker edition provides everything that comes with the Web edition and Borland’s implementation of CORBA framework for Java and C++ languages. The Application Server edition contains all the features supported by the Visibroker edition, and in addition provides the Enterprise Java development tools as per J2EE specifications including Java Server Pages, servlets, Enterprise JavaBeans, deployment of Java-based Web services, and so on. Thus, the Application Server edition provides the highest level of component and tool set, the Web edition provides the lowest set of deployment tools, and the Visibroker edition falls in between.
In this subsection, an attempt will be made to discuss the CORBA development process using Borland JBuilder8 and Enterprise Server 5.2 on Red Hat Linux 9.0, all of which are the most current editions as of writing this book. It appears that some installation-related issues were noticed by several professionals with respect to installing Borland Enterprise Server 5.1 on Red Hat Linux 8.0 and discussed in Borland’s newsgroups related to these topics. However, the Enterprise Server 5.2 installation on Red Hat Linux 9.0 does not pose any problems and gives a good installation, configuration, and usage experience, thus encouraging upgrading the two products to the next editions.
Before building a CORBA application on JBuilder8, it is necessary to perform the steps discussed below. Note that installation of JBuilder8 and Borland Enterprise Server 5.2 is not in the scope of this discussion.
Configure the Borland Enterprise Server 5.2 (either Application Server Edition or Visibroker Edition) to be recognized as CORBA ORB tool from within JBuilder8 environment.
Ensure that JBuilder8 and Borland Enterprise Server 5.2 are properly licensed and registered.
Develop and deploy Java-based CORBA applications.
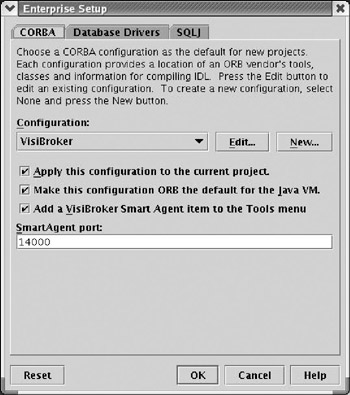
From the JBuilder8 IDE, select the Tools ® Enterprise Setup menu option to invoke the wizard that enables us specify the location and configuration information related to Enterprise products such as CORBA, database drivers, and SQLJ. Figure 7.8 displays the main window of this wizard, which contains three tabbed note pages—one for each of these options.
The first tab page enables us to specify the CORBA-related configuration, the ORB framework that is going to be used for the project, and some other related settings. Because Borland Enterprise Server is equipped with Visibroker, select that option from the combo box selection list. The other settings include three checkboxes; the first one asks whether to apply the CORBA configuration setting to the current project, the second one asks whether to make the current CORBA configuration default for future CORBA applications and the third one asks whether to add Visibroker smart agent in the ‘Tools’ menu. The third checkbox applies only if the Visibroker ORB is selected in the combo box. It will enable us start the Visibroker smart agent (osagent) service from JBuilder menu; otherwise, the smart agent should either be started at the command-line console or through the Borland Enterprise Server console GUI. Finally, it is not just sufficient to select the ORB in the combo box; it is also necessary to tell JBuilder where to find the associated executable and library files. This is done through the ‘Edit Configuration’ dialog, which is invoked by clicking the ‘Edit’ button, and which looks similar to Figure 7.9.
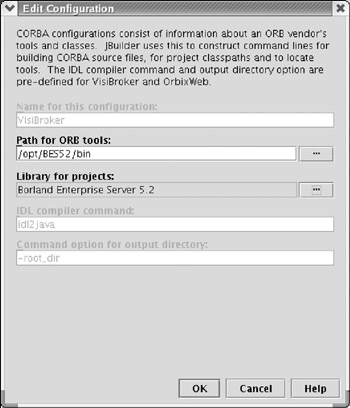
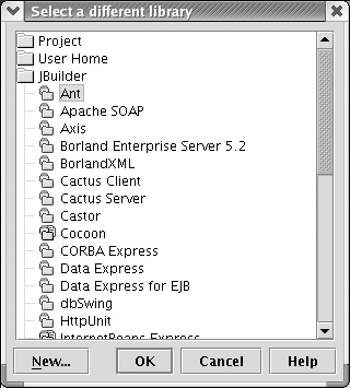
In the ‘Edit Configuration’ page, only two pieces of information need to be entered; the others are automatically filled in based on this information. First, the ‘Path for ORB Tools’ needs to be specified by clicking the ellipsis button and making the selection where the Borland Enterprise Server bin directory is located. The Visibroker executables such as osagent, idl2java, and idl2cpp are located in this directory. Once JBuilder knows this bin directory, the idl2java compiler is identified as the ‘IDL Compiler Command’ in this page. Next, the ‘Library for projects’ needs to be specified by clicking the ellipsis button and selecting the appropriate library name from the ‘Select a different library’ page displayed as shown in Figure 7.10.
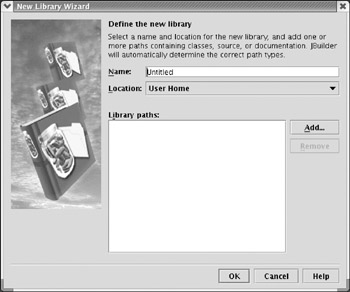
All the libraries that are installed as part of JBuilder8 installation are automatically listed in this page. However, because Borland Enterprise Server is usually installed as a separate product, JBuilder8 does not know where the library files (or jar files) of the Borland Enterprise Server are located. If an appropriate library name appears in this page, it may be selected; otherwise, a new entry should be added by clicking the ‘New’ button in the ‘Select a different library’ page. When the ‘New’ button is clicked, the ‘New Library Wizard’ is displayed, as shown in Figure 7.11.
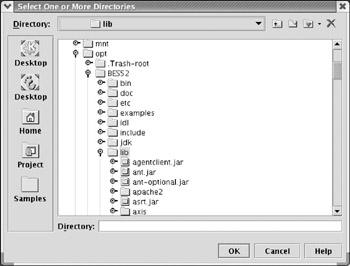
The ‘Name’ field in this page should be used to give a meaningful name to the group of jar files that will be attached in this Wizard; by default the word ‘Untitled’ appears in this edit box; in the current example the name ‘Borland Enterprise Server 5.2’ is given to this new library of jar files. By clicking the ‘Add’ button in this Wizard (Figure 7.11), the ‘Select One or More Directories’ dialog appears as shown in Figure 7.12, where you can choose the Borland Enterprise Server lib directory. When the ‘OK’ button is clicked, all the names of jar files are attached to the descriptive library name specified in the previous Wizard (Figure 7.11). Jar files from multiple locations may be attached in this list, even though this is not shown in this example.
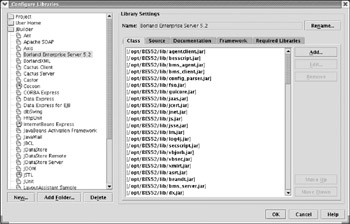
Because Java libraries are distributed in the form of jar files, the ‘New Library Wizard’ can be used to add new jar files to any project, not necessarily to a CORBA project alone. This wizard can also be invoked in a different way. Select the ‘Configure Libraries’ menu choice from the ‘Tools’ menu to display the ‘Configure Libraries’ dialog as shown in Figure 7.13. This Wizard is used to edit the settings of pre-existing library definitions, or delete any of them. In this Wizard, the left pane contains the list of descriptive library names and the right pane contains a bunch of tabbed pages, the first one of which (the class tab) lists all the associated jar file names for the highlighted library name in the left pane. The buttons provided in the right pane indicate that the jar files list is editable, and the order in which these files are listed is also changeable. When the order is changed, it actually changes the order in which JBuilder searches jar files for specific classes. The other tab pages in the right pane are used to specify the source files, documentation, and other information related to the library. The buttons in the left pane are used to add a new library or folder or delete one of the existing ones. When the ‘New’ button is clicked, the ‘New Library Wizard’ is displayed as in Figure 7.11.
Once the CORBA configuration is complete, the next step is to make sure that the serial number and license key are properly entered when JBuilder and the Borland Enterprise Server are installed. Without a valid serial number and license key, neither of these two products works. At the least, an evaluation serial number and license key must be obtained from Borland by properly registering at their community site and making an appropriate request before attempting to test sample programs provided in this chapter. Even after a valid serial number and associated license key are provided, one more step remains. There is a shell script vbroker.sh located in the bin directory of the Enterprise Server, which contains some new environment variables and updates to existing environment variables. This script must be run every time before starting a JBuilder IDE session, or these environment variable updates must be made permanently in the user login shell script or be placed in an appropriate script file in the /etc/profile.d directory as discussed in Chapter 4, Shell Scripting Explored. Restarting Linux after making these changes will make them available to new JBuilder IDE sessions. Without this step, the executable programs, such as IDL compiler (idl2java or idl2cpp), cannot be run either through JBuilder or in the command-line console mode; any attempt to run without these changes will display an error message indicating that an appropriate license does not exist or that the license might have expired. The vbroker.sh file runs in bash shell, and there is a corresponding csh (C shell) script, vbroker.csh. Finally, the Korn shell (ksh) must also installed in the system, as some of Visibroker scripts are written for Korn shell. The standard Korn shell package used on most Linux systems is the pdksh package and is available in Red Hat as well as SuSE Linux systems, in addition to the other Linux clones.
Assuming that the CORBA is configured on JBuilder, appropriate serial number and license keys are installed, the Visibroker-specific environment variables are in place, and the Korn shell is installed on the Linux system, we are now ready to start building CORBA applications in JBuilder8.
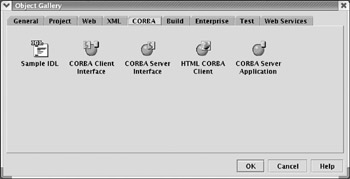
Create a new project in JBuilder8 in an appropriate directory. Save the project with a name of your choice. Then select File®New menu option to display the Object Gallery as shown in Figure 7.14. The displayed dialog contains several tab pages supporting creation of template source program files for different application types. The CORBA tab page contains icons supporting files required in CORBA application development.
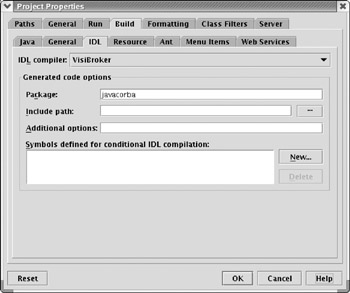
The first icon is used to create a template IDL file. Double-click this icon to create a new IDL file, and enter a name for the IDL file in the displayed dialog. For the sake of simplicity, the example program that was discussed in the previous section is reused in this example also. Therefore, name the IDL file as ‘Customer.idl’ and save the project files. When the IDL file is compiled with Project ® Make ![]() Customer.idl menu option, all the CORBA framework files (stub, skeleton, helper, holder, and other files) are created automatically. It should be noted at this point that the compiler used to create these files is Visibroker’s idl2java compiler and not the idlj compiler supplied with the Java 2 SDK. The idl2java option –tie indicates that the Tie file should be created and hence the Delegation Model servant object should be built; this is the default model in Visibroker. However, the idl2java option –no_tie may be specified to indicate that the Tie file should not be created, in which case we should implement the Inheritance Model servant object. Similarly the default –servant option tells the compiler to generate the skeleton code (POA file), while the –no_servant option tells the compiler not to generate the skeleton code. There are many more command-line options that can be used to tune the idl2java compiler to the requirement and the readers are recommended to explore these options on their own. The IDL options are specified through the Project Properties page, which is displayed by selecting the Project ® Project Properties menu option and looks similar to Figure 7.15.
Customer.idl menu option, all the CORBA framework files (stub, skeleton, helper, holder, and other files) are created automatically. It should be noted at this point that the compiler used to create these files is Visibroker’s idl2java compiler and not the idlj compiler supplied with the Java 2 SDK. The idl2java option –tie indicates that the Tie file should be created and hence the Delegation Model servant object should be built; this is the default model in Visibroker. However, the idl2java option –no_tie may be specified to indicate that the Tie file should not be created, in which case we should implement the Inheritance Model servant object. Similarly the default –servant option tells the compiler to generate the skeleton code (POA file), while the –no_servant option tells the compiler not to generate the skeleton code. There are many more command-line options that can be used to tune the idl2java compiler to the requirement and the readers are recommended to explore these options on their own. The IDL options are specified through the Project Properties page, which is displayed by selecting the Project ® Project Properties menu option and looks similar to Figure 7.15.
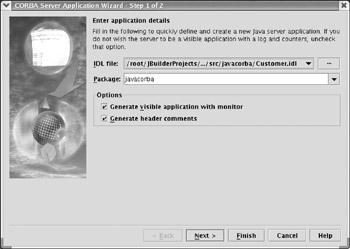
Most of the contents of the files generated by Visibroker’s IDL compiler are very similar to those generated by Java 2 SDK, with a very few differences; hence these files are not displayed here to avoid repetition. These files are generated in the ‘Generated Files’ subdirectory under the ‘Classes’ subdirectory of the Main Project directory. The next step is to build the servant object derived from the skeleton class and build the server application that hosts this servant object. In JBuilder, these two steps can be done together. Invoke the ‘Object Gallery’ Wizard again, and double-click the CORBA Server Application icon from the CORBA tab page to display the CORBA Server Application Wizard, as shown in Figure 7.16.
On this screen, select the IDL file and package name, and JBuilder creates a number of classes automatically, among which two files are most necessary to examine—one of them is the servant object and the other is the server application. Figure 7.17 displays a typical screenshot of JBuilder8 showing the current example project on a Red Hat Linux 9.0 system.
Listing 7.18 shows the ![]() CustomerImpl.java file, which represents the servant object. In this program, most of the code is automatically generated by JBuilder, except the actual implementation of methods and associated variable declaration and instantiation, which are copied from the earlier example program to make the server object complete in its implementation. For the benefit of the readers to distinguish between the generated code and manually added code, commented lines are provided. This listing is available on the accompanying CD-ROM.
CustomerImpl.java file, which represents the servant object. In this program, most of the code is automatically generated by JBuilder, except the actual implementation of methods and associated variable declaration and instantiation, which are copied from the earlier example program to make the server object complete in its implementation. For the benefit of the readers to distinguish between the generated code and manually added code, commented lines are provided. This listing is available on the accompanying CD-ROM.
/**
 * Copyright (c) 2003
 * Template File
 *   InterfaceServerImpl.java.template
 * IDL Object
 *   javacorba.CustService.Customer
 * Generation Date
 *   Sunday, April 27, 2003 6:05:08 AM CDT
 * IDL Source File
 *   /root/JBuilderProjects/JavaCorba/src/javacorba/Customer.idl
 * Abstract
 *   Provides default implementation for the server side of a CORBA
         interface.
 * @version 1.0
 */

package javacorba.CustService.server;

import java.sql.*;
import java.util.*;

import org.omg.PortableServer.*;

public class CustomerImpl
    extends javacorba.CustService.CustomerPOA {
  String _name = "Customer";
  public static ServerMonitorPage monitor = null;

  // lines added manually - begin
  Properties custList = new Properties();
  Random rand = new Random(System.currentTimeMillis());
  // lines added manually - end

  private void init() {
    if (monitor == null) {
      monitor = ServerMonitor.addPage(this, "Customer");
      monitor.showObjectCounter(true);
    }
    monitor.updateObjectCounter(1);

  }

  public CustomerImpl(java.lang.String name,
                      java.lang.String creationParameters) {
    this._name = name;

    init();
  }

  public CustomerImpl(java.lang.String name) {
    this._name = name;
    init();
  }

  public CustomerImpl() {
    init();
  }

  public int AddCustomer(String CustName) {
    ServerMonitor.log("(" + _name + ") CustomerImpl.java
        AddCustomer()");
    // lines added manually - begin
    int nextCustID = 0;
    try {
      ServerMonitor.log("Customer Name : "+CustName);
      nextCustID = getNextCustID();
      if (!custList.contains(String.valueOf(nextCustID))) {
        custList.put(String.valueOf(nextCustID), CustName);
      }
    }
    catch (Exception ex) {
      ServerMonitor.log("Exception while generating new customer
          number");
    }
    return nextCustID;
    // lines added manually - end
  }

  public String GetCustomer(int CustId) {
    ServerMonitor.log("(" + _name + ") CustomerImpl.java
        GetCustomer()");
    // lines added manually - begin
    String custName = "";
    try {
      custName = (String)custList.get(String.valueOf(CustId));
    }
    catch (Exception ex) {
      ServerMonitor.log("Exception while retrieving customer name for a
          customer ID");
    }
    return custName;
    // lines added manually - end
  }

  // lines added manually - begin
  public int getNextCustID() {
    int nextCustID = 0;
    try {
      nextCustID = rand.nextInt();
      ServerMonitor.log("Next Cust ID is " + nextCustID);
      if (nextCustID < 0)
        nextCustID = -nextCustID;
      ServerMonitor.log("Next Cust ID is " + nextCustID);
    }
    catch (Exception ex) {
      ServerMonitor.log("Exception while generating new customer
          number");
    }
    return nextCustID;
  }
  // lines added manually - end
}
Listing 7.19 is the server application code generated by JBuilder8. It should be noted that JBuilder creates a sample console style monitor window for the server application by default and therefore creates a few Java Swing-based classes for this purpose. Because they are all generated files, they are not displayed here in order to conserve space; however, they are all provided on the accompanying CD-ROM. This listing is also available on the accompanying CD-ROM.
/**
 * Copyright (c) 2003
 * Template File
 *   ServerApp.java.template
 * IDL Object
 *   javacorba.CustService
 * Generation Date
 *   Sunday, April 27, 2003 6:05:08 AM CDT
 * IDL Source File
 *   /root/JBuilderProjects/JavaCorba/src/javacorba/Customer.idl
 * Abstract
 *   CORBA server application.
 * @version 1.0
 */

package javacorba;

import javacorba.CustService.server.*;
import javax.swing.UIManager;
import java.awt.*;
import org.omg.PortableServer.*;

public class CustServiceServerApp {

  boolean packFrame = false;

  public CustServiceServerApp() {
    ServerFrame frame = new ServerFrame();

    if (packFrame) {
      frame.pack();
    }
    else {
      frame.validate();

    }
    Dimension screenSize = Toolkit.getDefaultToolkit().getScreenSize();
    Dimension frameSize = frame.getSize();
    if (frameSize.height > screenSize.height) {
      frameSize.height = screenSize.height;
    }
    if (frameSize.width > screenSize.width) {
      frameSize.width = screenSize.width;
    }
    frame.setLocation( (screenSize.width - frameSize.width) / 2,
                      (screenSize.height - frameSize.height) / 2);
    frame.setVisible(true);
  }

  public static void main(String[] args) {
    try {
      UIManager.setLookAndFeel("javax.swing.plaf.metal.MetalLookAnd
          Feel");
      //UIManager.setLookAndFeel(UIManager.getSystemLookAndFeelClass
          Name());
      //UIManager.setLookAndFeel("javax.swing.plaf.metal.MetalLookAnd
          Feel");
      //UIManager.setLookAndFeel("com.sun.java.swing.plaf.motif.Motif
          LookAndFeel");
      //UIManager.setLookAndFeel("com.sun.java.swing.plaf.windows.
          WindowsLookAndFeel");
    }
    catch (Exception ex) {
    }
    new CustServiceServerApp();

    try {
      java.util.ResourceBundle res = java.util.ResourceBundle.
          getBundle(
          "javacorba.CustService.server.ServerResources");
      String name;

      //(debug support)System.getProperties().put("vbroker.agent.
          debug", "true");
      //(debug support)System.getProperties().put("vbroker.orb.warn",
          "2");
      if (System.getProperties().get("vbroker.agent.port") == null) {
        System.getProperties().put("vbroker.agent.port", "14000");
      }
      if (System.getProperties().get("org.omg.CORBA.ORBClass") ==
          null) {
        System.getProperties().put("org.omg.CORBA.ORBClass",
                                   "com.inprise.vbroker.orb.ORB");
      }
      if (System.getProperties().get("org.omg.CORBA.ORBSingletonClass")
          == null) {
        System.getProperties().put("org.omg.CORBA.ORBSingletonClass",
                                   "com.inprise.vbroker.orb.ORB");
      }

      org.omg.CORBA.ORB orb = org.omg.CORBA.ORB.init(args, System.get
          Properties());

      POA poaRoot = POAHelper.narrow(orb.resolve_initial_references
          ("RootPOA"));

      name = "Customer";
      org.omg.CORBA.Policy[] CustomerPolicies = {
          poaRoot.create_lifespan_policy(LifespanPolicyValue.
              PERSISTENT)
      };
      POA poaCustomer = poaRoot.create_POA(name + "_poa",
                                           poaRoot.the_POAManager(),
                                           CustomerPolicies);
      poaCustomer.activate_object_with_id(name.getBytes(), new
          CustomerImpl());
      ServerMonitor.log(ServerResources.format(res.getString
          ("created"),
          "CustServiceServerApp.java Customer"));

      poaRoot.the_POAManager().activate();
      ServerMonitor.log(ServerResources.format(res.getString("isReady"),
          "CustServiceServerApp.java CustService"));
      orb.run();
    }
    catch (Exception ex) {
      System.err.println(ex);
    }
  }
}
The last step in the whole process is to build the client application to test the service provided by the server application. For the sake of simplicity, a console-based client application is built on the same grounds of the previous example. However, a more complex Java Swing-based GUI application may also be built if desired. Listing 7.20, which is available on the companion CD-ROM, displays the sample client application, and Figure 7.18 displays an overlapped image showing the output of the server module as well as the client module.
package javacorba;

import javacorba.CustService.*;
import java.lang.*;
import java.util.*;
import org.omg.CORBA.*;
import org.omg.CosNaming.*;
import org.omg.CosNaming.NamingContextPackage.*;

/**
 * <p>Title: </p>
 * <p>Description: </p>
 * <p>Copyright: Copyright (c) 2003</p>
 * <p>Company: </p>
 * @author not attributable
 * @version 1.0
 */

public class CustomerClientApp {
  Vector custIDs;
  ORB orb;

  public CustomerClientApp(String[] args) {
      try {
          custIDs = new Vector();
          Properties prop = new Properties();
          prop.put("vbroker.agent.port","14000");
          prop.put("org.omg.CORBA.ORBClass","com.inprise.vbroker.
              orb.ORB");
          prop.put("org.omg.CORBA.ORBSingletonClass","com.inprise.
              vbroker.orb.ORB");

          // Create an initial instance of the ORB
          orb = ORB.init(args, prop);
          String _name = "Customer";

          javacorba.CustService.Customer custRef = javacorba.
              CustService.CustomerHelper.bind(orb,
              "/" + _name + "_poa", _name.getBytes());

            addCustomers(custRef);
      }
      catch (Exception e) {
          System.out.println("Exception occured while obtaining object
              reference  ") ;
          e.printStackTrace(System.out);
      }
  }
  public void addCustomers(Customer custRef) {
      try {
              // Add three customer names to the server's list.
              int custId = 0;
              custId = custRef.AddCustomer("John P Smith");
              custIDs.add(String.valueOf(custId));
              custId = custRef.AddCustomer("David Bayer");
              custIDs.add(String.valueOf(custId));
              custId = custRef.AddCustomer("Susan Blackwill");
              custIDs.add(String.valueOf(custId));

              // Now retrieve the customer names that were added
                    earlier,
              // and display them to the screen.
              for (int i=0; i < custIDs.size(); i++) {
                  String custIdStr = (String)custIDs.get(i);
                  String custName = custRef.GetCustomer
                      (Integer.valueOf(custIdStr).intValue());
                  if ((custName != null) && (custName != "")) {
                      System.out.println("Customer "+custName
                              +" has customer id "+custIdStr);
                  }
              }
        }
        catch (Exception e) {
        System.out.println("ERROR : " + e) ;
              e.printStackTrace(System.out);
      }
  }
  public static void main(String[] args) {
        CustomerClientApp custClient = new CustomerClientApp(args);
  }

}
From these listings, it should be noted that the significant difference between writing a CORBA client and server using core Java 2 SDK and using the JBuilder and Visibroker combination is that in the former case, the naming service provided by Java 2 SDK, orbd is used to get access to the servant object, while in the latter case, the Visibroker osagent is used for the same purpose. Another important point to remember when developing CORBA client server applications is that usually any uncaught exceptions on the server side would be reported as org.omg.CORBA.UNKNOWN exception types on the client side. Therefore, whenever these types of exceptions do occur on the client side, it is always recommended to check the server-side code (servant program or server program) and make sure that the code is protected within the try . . . catch blocks.
CORBA is a vast and robust architecture offering many features to the industry. However, it is not possible to include all the features in a book of limited scope. With respect to CORBA, the last topic that will be discussed in this subsection is the implementation of POA policies to obtain a fine-grain control of the servant processes. Interfaces derived from org.omg.CORBA.Policy interface permit the server module to have better control over the servants they manage. There are seven different policies that are provided for this purpose, as discussed here.
The Thread Policy governs the threading model that should be used with the POAs created to control the servants and has two possible values: ORB_CTRL_MODEL permits multiple threads to serve multiple requests concurrently, while the SINGLE_THREAD_MODEL ensures that all the client requests are processed sequentially and therefore the application doesn’t have to be thread-safe.
The Object ID Uniqueness Policy governs whether the servant objects should have unique ids when registered with their POAs. There are two possible values for this policy: the value MULTIPLE_ID is used when the servants should support more than one id, and the value UNIQUE_ID is used to make the servants support a single id.
The Object Lifespan Policy governs whether the objects outlive their server restarts or not. There are two possible values for this policy: the value PERSISTENT indicates that the objects can outlive the server restart (or POAs created in a different process address space), and the value TRANSIENT indicates that objects will not outlive their POAs.
The Servant Retention Policy governs whether the associated POA should retain the active servant objects in an object map. There are two possible values: the value RETAIN indicates that the POA should retain the active servants in an object map, and the value NON_RETAIN indicates that the active servants should not be retained.
The ID Assignment Policy governs whether the objects ids are assigned by the application or by the POA. There are two possible values for this policy: the value SYSTEM_ID indicates that the POA assigns the object ids, and the value USER_ID indicates that the object ids are assigned by the application.
The Implicit Activation Policy governs whether the implicit activation of servants is supported by the POA. There are two possible values: IMPLICIT_ACTIVATION and NO_IMPLICIT_ACTIVATION—with their meaning self-explanatory.
The Request Processing Policy governs the feature that determines how the requests are processed by the POA, particularly when the object is not found in the object map. There are three possible values for this policy: the value USE_DEFAULT_SERVANT indicates that the request should be processed by the default servant object if an active object is not found in the object map for the specified object id or if the NON_RETAIN server retention policy is set; the value USE_SERVANT_MANAGER indicates that the servant manager should try to locate the object or raise an exception if the object is not found; and the value USE_ACTIVE_OBJECT_MAP indicates that if the active object is not found in the object map, then an exception should be raised.
The following sample code illustrates how to set one or more of these policies. The code is taken from the server application built in the previous subsection and modified with additional policy definitions, while the example application defined only one custom policy setting.
    name = "Customer";

    org.omg.CORBA.Policy CustomerPolicies[] = new    org.omg.CORBA.
         Plolicy[2];
    CustomerPolicies[0] =     poaRoot.create_lifespan_plicy
        (LifespanPolicyValue.PERSISTENT);
    CustomerPolicies[1] =   poaRoot.create_thread_policy
        (ThreadPolicyValue.ORB_CTRL_MODEL);
    CustomerPolicies[2] = poaRoot.create_id_assignment_policy
                          (IdAssignmentPolicyValue.SYSTEM_ID);
    POA poaCustomer = poaRoot.create_POA(name + "_poa",
                                         poaRoot.the_POAManager(),
                                         CustomerPolicies);
|
|
< Day Day Up > |
|