The GridView control is the official successor to the popular DataGrid control of ASP.NET version 1.x. While the DataGrid control is still supported for compatibility reasons, it isn't listed in the Toolbox anymore. So don't use it in any new projects. Anyway, why go with the old control if the newer GridView offers the same features and a good deal more? In particular, it works excellently with the new Data Source Provider concept.
| Note |
In some documentation or in Microsoft examples, you'll probably encounter something called a SmartGrid control. No, it's not a new, tricky control; it's just another name for the GridView control. The name hasn't been finalized, because of an obvious conflict with the product name of a third-party vendor. |
The function set of the control includes the following:
Binding to any flat or hierarchical (first level only) Data Source controls
Built-in sorting
Selection of data records
Capability to edit and delete data records
Support of multiple key fields
Support of multiple fields to create hyperlinks
Visual adjustability by Themes and Styles
Adaptive rendering to different (mobile) devices
Specification of a background picture
The previous example demonstrated how easy it is to bind a data source to the GridView control. Instead of using the wizard, you can drag the data that you want displayed right out of the Data Explorer. For that purpose, open a new connection, choose a table, and select the desired rows. After that, drag the columns onto an empty page. Visual Studio .NET creates a GridView control and an appropriate SqlDataSource automatically. Press F5 and the data is displayed in the browser immediately.
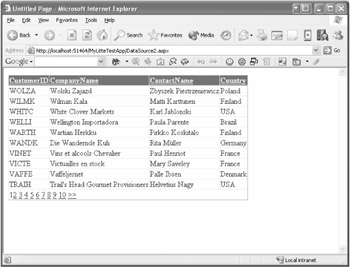
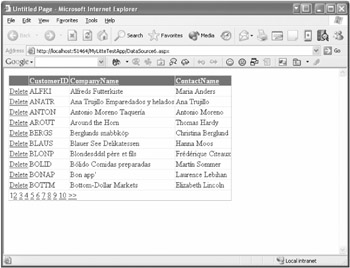
If you have selected a table like Northwind's Customers table or similar, the returned list will be very long. To decrease the view, enable the AllowPaging property. As usual, you can specify how many records should be displayed at one time and how the pagers, like the ones you'd find on Google, should look. A new feature enables you to assign your own pictures to a pager. You want to see more? Well, enable the AllowSorting property, then. By the way, both properties are available in the Task List of the control. Run the revised example—paging and sorting work immediately (see Figure 3-3).
Similar to the existing DataGrid control, with GridView you have the choice to generate columns you intend to display at run time (by using AutoGenerateColumns) or to specify them manually. According to the latest vocabulary, the columns are now called Fields or ColumnFields.
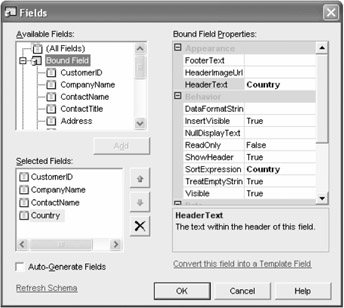
You define columns through a clearly organized dialog box that is a little bit tiny. You can reach this Fields dialog box via the Edit Columns command in the Task List or the ColumnFields property of the control. Figure 3-4 shows the Fields dialog box, which allows you to add, delete, and move fields. A Properties grid enables you to edit the properties of each field separately. If the schema of the data source is known, all available fields will be displayed. Reload the schema by using the Refresh Schema link when necessary.
Currently you have the following field types to choose from:
BoundField: Displays a database field
CheckBoxField: Displays logic values
ButtonField: Includes LinkButton controls
HyperLinkField: Includes HyperLink controls
CommandField: Enables the use of several integrated commands like select, delete, or edit
TemplateField: Defines individually designed columns
The different column types behave almost the same as those you know from the DataGrid. But some new properties like TreatEmptyStringAsNull and NullDisplayText are provided. In the latter, you can specify text that will be displayed if the related column contains no value.
As in the older versions of ASP.NET, in ASP.NET 2.0 an individual template can be defined for each field. And existing fields can also be converted to a template (using the link Convert this field into a Template Field).
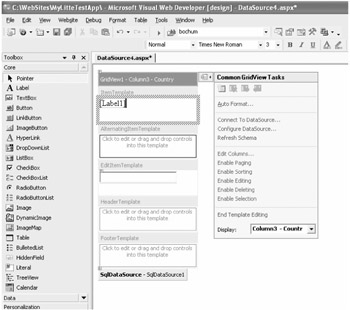
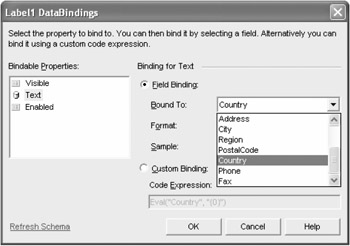
What is new is the possibility to design these templates visually (as shown in Figure 3-5), like I explained while introducing the controls in VS .NET. Assigning a data binding to a particular control within a template is very easy. Open the DataBindings dialog box by using the Task List, and it will show all available data fields after refreshing the schema (see Figure 3-6).
| Tip |
Currently the dialog box uses the old DataBinder.Eval expression if you select manual data binding. Just replace it with the new and shorter Eval. |
Besides the individually created fields, the GridView control offers two integrated templates, PagerTemplate and NullTemplate. The latter is used if the assigned data source returns an empty list of data records. In this case, you may want to provide a message to the user. Append the following suffix to the SELECT query to try this out:
WHERE 1=0
| Tip |
To simply return text if no data records have been passed back, just use the NullText property. You don't have to change your template in that case. |
Deleting data records isn't more difficult than displaying them. Activate the AutoGenerateDeleteButton property and open the page by using F5 in the browser window. Has anything changed? Right, the table now contains some Delete links that allow you to remove customers from the Northwind database. This works as long as it doesn't violate any related integrity rules of the database.
It works because the development environment did a good job of auto-generating queries while you selected and dragged the columns to display. It has generated not only a SELECT statement, but also a DELETE statement:
<asp:sqldatasource id="SqlDataSource1" runat="server"
     providername="System.Data.OleDb"
     connectionstring="..."
     selectcommand="..."
     deletecommand="DELETE FROM Customers WHERE (Customers.CustomerID = ?)"
      ...
</asp:sqldatasource>
As you see, a regular DELETE query has been defined, and it only expects a key field of the table to be passed. Here the query contains a question mark because the OLE DB Data Provider is used, whereas the SQL Server Providers allow named parameters.
The key field has to be assigned in the GridView control. Therefore, you pass the field name—CustomerID in this case—to the DataKeyNames property. Separate field names by commas if more than one column is defined as a primary key in your table.
<asp:gridview id="GridView1" runat="server"
     autogeneratecolumns="False"
     datasourceid="SqlDataSource1"
     allowpaging="True"
     allowsorting="True"
     autogeneratedeletebutton="True"
        datakeynames="CustomerID">
     ...
</asp:gridview>
You want to create the Delete LinkButton controls yourself instead of using the AutoGenerateDeleteButton property to generate link buttons like the ones shown in Figure 3-7? OK, simply add a Button or LinkButton control and specify Delete as the CommandName property.
Many users prefer a confirmation before finally deleting a data record (see Figure 3-8). This is a matter of three easy steps:
Create a new CommandField column and activate ShowDeleteButton.
Convert the column to a TemplateField column.
Change to HTML view and assign a client-side method to the click event of the generated LinkLabel:
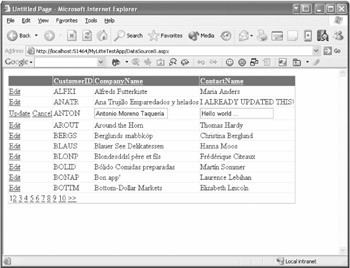
You probably expect editing of data to be child's play—for example, simply displaying and item and deleting it. So, you'll be happy to hear that you can easily edit data with GridView.
The GridView control already contains all functions necessary to edit data. And this is, not surprisingly, based on the abstract generic approach of the data source concept. For this purpose, it uses the assigned source to edit data records. That means you'll have to add an additional query to the SqlDataSource control, which you saw used in the previous example.
In case you've chosen the Data Explorer in the development environment, it will have generated all the required commands already. Of course, this will work for simple queries only. Just check the AutoGenerateEditButton option, hit the F5 key, and start editing (see Figure 3-9).
The listing that follows shows the extended SqlDataSource control. Here the required SQL query has been assigned to the UpdateCommand property. Every single field is passed as an unnamed parameter.
<asp:sqldatasource id="SqlDataSource1" runat="server"
     providername="System.Data.OleDb"
     connectionstring="..."
     selectcommand="..."
     deletecommand="..."
     updatecommand="UPDATE Customers SET CompanyName = ?, ContactName = ?
                                  WHERE (Customers.CustomerID = ?)">
</asp:sqldatasource>
Because this example uses OLE DB, and thereby includes unnamed parameters, the order of the parameters is important. The selection in the GridView control determines the order. In this case, three fields are displayed: CustomerID, CompanyName, and ContactName. Because the primary key, CustomerID, is marked as read-only, it becomes the last parameter that is passed (see Listing 3-2).
<asp:gridview id="GridView1" runat="server" autogeneratecolumns="False"
                    datasourceid="SqlDataSource1"
   ...
   <columnfields>
      <asp:boundfield nulldisplaytext="D"
                      sortexpression="CustomerID" datafield="CustomerID"
                      readonly="True" headertext="CustomerID">
      </asp:boundfield>
      <asp:boundfield sortexpression="CompanyName"
                      datafield="CompanyName" headertext="CompanyName">
      </asp:boundfield>
      <asp:boundfield sortexpression="ContactName"
                      datafield="ContactName" headertext="ContactName">
      </asp:boundfield>
   </columnfields>
   ...
</asp:gridview>
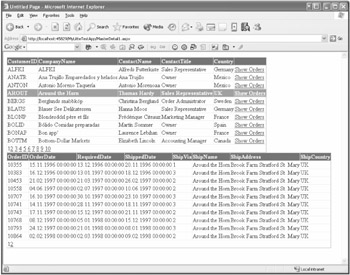
In real life, a requirement that developers and customers frequently ask for is the visualization of Master/Detail data records. A classic example of this can be reproduced by using the Northwind database. Try to display customers and their orders hierarchically. To create a view like this has become quite easy in ASP.NET 2.0. All you need are two GridView controls and an adequate data source.
Figure 3-10 demonstrates a possible result of this kind of view.
It takes just a few steps to get there:
Drag the desired columns of the Customers table from the Data Explorer to your page. A GridView that includes an appropriate SqlDataSource is generated automatically. Add a Command column to the existing columns and set its command to Select.
Drag the columns of the Orders table below those of the Customers table. Here the GridView and the SqlDataSource are also being created without your assistance.
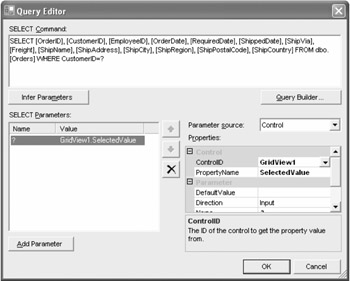
Open the Task List of the second GridView control, click the Configure DataSource button, then the Next, button, and finally the Edit Query button to modify the SELECT query.
Add the following WHERE clause to the SELECT statement and click the Infer Parameters button (see Figure 3-11):
WHERE CustomerID=?
A new entry is generated in the Parameters list. Select the new one and choose Control as the source. Specify GridView1 as ControlID and SelectedValue as PropertyName.
Confirm your changes when asked, close the wizard, and hit F5 to start the page. Now if you select a customer, you'll get a list of all of the orders for that customer right away.
The Query Editor dialog box in Figure 3-11 allows you to edit the control parameters easily even for complex scenarios. It provides a way to define any named or unnamed parameters and to directly get their values. Here is a list of the supported sources:
Control to query a property of any control on the current page
Cookie for a temporarily or persistently saved cookie
Form for a (hidden) form field
QueryString for a value that is contained in the URL
Session for a session variable
Optionally, you can specify a default value and a data type for every parameter. Usually the Object type will be adequate.
Here's how the parameters are listed in the source code:
<asp:sqldatasource id="SqlDataSource2" runat="server"
   ...
   <selectparameters>
      <asp:controlparameter name="?"
          propertyname="SelectedValue" controlid="GridView1">
      </asp:controlparameter>
   </selectparameters>
</asp:sqldatasource>
With the exception of the SiteMapDataSource controls, all the Data Source controls provide built-in caching. Depending on the type of data, this feature can be very helpful and it will increase the performance of your application.
If you would like to try caching, then activate the EnableCaching property and assign the desired time span in seconds to CacheDuration. The CacheExpirationPolicy property gives you the choice to use either absolute or sliding caching. The default is Absolute. While you work with Sliding , the caching duration is set back to the initial value on every request.
<asp:sqldatasource id="SqlDataSource1" runat="server"
   ...
   enablecaching="True"
   cacheduration="60">
</asp:sqldatasource>
| Note |
Please notice that caching with the SqlDataSource control will only work if the option DataSourceMode is set to DataSet, which is the default value. This property allows you to define how the data is accessed internally. DataReader is the second possible value. |
| Tip |
SqlDataSource supports the new SQL Server Cache Invalidation feature described in Chapter 11, which covers the enhanced Page Framework. If you want to use it, you must assign the name of the database (which is defined in the web.config file) followed by a colon and the name of the table on which the caching will depend to the SqlCacheDependancy property. |
An important advantage of the DataGrid control was its extensibility. If the built-in mechanisms were not suitable for a particular requirement, you could easily step into the process by using the ItemCreated and the ItemDataBound events.
The GridView control offers two analogous events: RowCreated and RowDataBound. Because most of the common functions are completely integrated now, a number of additional events have been implemented that provide some new ways to customize operations. Many functions fire two events, one before execution (these end in ". . .ing") and one after execution (these end in ". . . ed"):