ASP.NET version 2.0 provides you with an API through which you can administrate your users without knowledge of the underlying membership providers. The Membership and MembershipUser classes (from the System.Web.Security namespace) form the core of the API. The first class basically offers a range of static methods to create, update, or delete users. The instance of the second class represents an individual user and gives access to that user's data.
The creation of a new user is done through the overloaded Membership.CreateUser method. The overload that is recommended allows passing of the desired username, password, e-mail address, and finally status as an out parameter. If successful, an instance of the MembershipUser class or null will be returned.
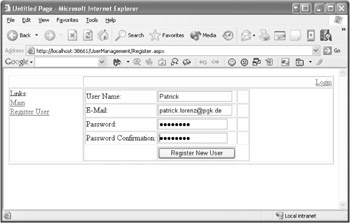
I've expanded the existing example by including a new page for the registration of new users in Listing 6-6. The page basically consists of four input boxes for username, e-mail address, password, and password confirmation. Next to the input controls you can find various validation controls, a label for potential error messages, and a button. A click of this button initiates the creation of a new user based on the entered data.
<%@ page language="C#" master="~/MasterPage.master" %>
<script runat="server" language="c#">

void Button1_Click(object sender, System.EventArgs e)
{
    if (this.IsValid)
    {
        MembershipCreateStatus status;
        MembershipUser user = Membership.CreateUser(this.TB_Username.Text,
            this.TB_Password.Text, this.TB_Email.Text, out status);

        switch (status)
        {
            case MembershipCreateStatus.Success:
                FormsAuthentication.RedirectFromLoginPage(user.Username, false);
                break;

            case MembershipCreateStatus.DuplicateEmail:
                this.LB_CreateError.Text = "The email address is " +
                    "already registered.";
                break;

            case MembershipCreateStatus.DuplicateUsername:
                this.LB_CreateError.Text = "The username is already registered.";
                break;

            case MembershipCreateStatus.InvalidEmail:
                this.LB_CreateError.Text = "This email address is invalid.";
                break;

            case MembershipCreateStatus.InvalidPassword:
                this.LB_CreateError.Text = "This password is invalid.";
                break;

            case MembershipCreateStatus.UserRejected:
                this.LB_CreateError.Text = "The user was rejected " +
                    "for an unknown reason.";
                break;
        }
    }
}

</script>

<asp:content id="Content1"
    contentplaceholderid="ContentPlaceHolder1" runat="server">
    <table cellspacing="1" cellpadding="1" border="1">
        <tr>
            <td>User Name:</td>
            <td>
                <asp:textbox id="TB_Username" runat="server">
                </asp:textbox>
            </td>
            <td>
                <asp:requiredfieldvalidator
                    id="RequiredFieldValidator1"
                    runat="server"
                    controltovalidate="TB_Username"
                    setfocusonerror="True">*
                </asp:requiredfieldvalidator>
            </td>
        </tr>

        ...

        <tr>
            <td>
            </td>
            <td>
                <asp:button id="Button1"
                    runat="server"
                    text="Register New User"
                    onclick="Button1_Click" />
            </td>
            <td>

            </td>
        </tr>
    </table>
</asp:content>
If successful, the Membership.CreateUser method returns the newly created user in the form of an instance of the MembershipUser class. The method delivers the status of the creation as an out parameter in any case. The enumeration value allows you to determine in a sophisticated way if the creation succeeded and, if not, how it happened. If the method has not been accepted, an error message will be displayed in the Label control. If everything goes well, the user will be directly logged in by Forms Authentication. Figure 6-14 shows the newly created registration page in action.
| Note |
The behavior of the CreateUser method depends on other adjustments you've made during the configuration of Membership Management as depicted earlier in this chapter. This way you can define, for example, whether the entered e-mail address must be unique or can be used by several users. |
Normally the Login control shown previously is used to authenticate users. Of course, you may handle this manually as well. The Membership class therefore offers the ValidateUser method, which when it receives a username and password returns a Boolean value. By the way, this method is used internally by the Login control as well.
if (Membership.ValidateUser(username, password))
{
    // ...
    // FormsAuthentication.RedirectFromLoginPage(username, false);
}
Please note that this method does not return the associated MembershipUser object. However, you can manually request this object afterward by using the GetUser() method. This method is overloaded in multiple ways and returns the actual user if called without parameters. Alternatively, you may specify the desired name explicitly. The GetAllUsers() method returns a list of all users.
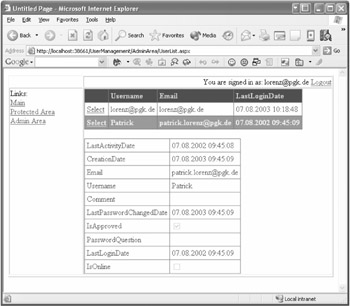
The example in Listing 6-7 is used in the protected area for administrators. An abstract of all users registered in the system is shown within a GridView control. If a user is selected, that user's complete data will appear in a DetailsView control placed directly below the GridView.
<asp:gridview id="GV_UserList" runat="server"
    autogeneratecolumns="False"
    datakeynames="Username"
    onselectedindexchanged="GV_UserList_SelectedIndexChanged">

    ...

    <columnfields>
        <asp:commandfield showselectbutton="True">
        </asp:commandfield>
        <asp:boundfield datafield="Username" headertext="Username">
        </asp:boundfield>
        <asp:boundfield datafield="Email" headertext="Email">
        </asp:boundfield>
        <asp:boundfield datafield="LastLoginDate" headertext="LastLoginDate">
        </asp:boundfield>
    </columnfields>
</asp:gridview><br />

<asp:detailsview id="DV_User" runat="server">
    ...
</asp:detailsview>
Unlike previous examples, I'm not talking about a zero-code scenario here! But the required source code is absolutely kept to a limit. It consists only of the two event handlers, Page_Load and SelectedIndexChanged, provided by the GridView control.
<script runat="server" language="c#">

    void Page_Load(object sender, System.EventArgs e)
    {
        this.GV_UserList.DataSource = Membership.GetAllUsers();
        this.GV_UserList.DataBind();
    }

    void GV_UserList_SelectedIndexChanged(object sender, System.EventArgs e)
    {
        string userName = (this.GV_UserList.SelectedValue as string);
        MembershipUser user = Membership.GetUser(userName);
        this.DV_User.DataSource = new MembershipUser[] { user };
        this.DV_User.DataBind();
    }

</script>
Both event handlers are self-explanatory. A little trick, however, is necessary to allocate the data source to the DetailsView control, which only accepts enumerable data sources. An array is quickly generated from the instance of MembershipUser.
Figure 6-15 shows the sample page in action. The DetailsView control displays the properties being offered by the MembershipUser class.
User data changes now and then. Therefore, it is useful to offer users the option of editing their own data. You can reflect these changes directly with the help of the properties of the MembershipUser class. However, many properties such as Username are write-protected and can't be changed.
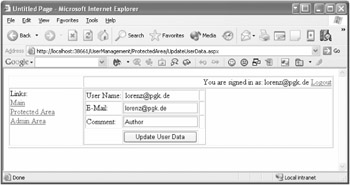
I've added the sample page in Listing 6-8 to the protected area. By means of a parameterless overload of the GetUser method, the actual user will be acquired. The corresponding user data will be displayed in a label and two input boxes. Now users have the option to modify their data and store it afterward with a button click (see Figure 6-16). The event treatment of the button acquires the corresponding instance of the MembershipUser class again. The event values are newly assigned and stored using the Membership.UpdateUser method.
<%@ page language="C#" master="~/MasterPage.master" %>
<script runat="server" language="c#">
void Page_Load(object sender, System.EventArgs e)
{
if (this.IsPostBack == false)
{
MembershipUser user = Membership.GetUser();
this.LB_Username.Text = user.Username;
this.TB_Email.Text = user.Email;
this.TB_Comment.Text = user.Comment;
}
}
void Button1_Click(object sender, System.EventArgs e)
{
if (this.IsValid)
{
MembershipUser user = Membership.GetUser();
user.Email = this.TB_Email.Text;
user.Comment = this.TB_Comment.Text;
Membership.UpdateUser(user);
}
}
</script>
<asp:content id="Content1"
contentplaceholderid="ContentPlaceHolder1"
runat="server">
<table cellspacing="1" cellpadding="1" border="1">
<tr>
<td>User Name:</td>
<td>
<asp:label id="LB_Username"
runat="server"/>
</td>
<td> </td>
</tr>
...
<tr>
<td>
</td>
<td>
<asp:button id="Button1"
runat="server"
text="Update User Data"
onclick="Button1_Click" />
</td>
<td>
</td>
</tr>
</table>
</asp:content>
| Note |
Are you curious about how to edit other personal data for users in this example? Again, you must exercise some patience! This will be a topic covered in the next chapter. |
| Tip |
If you don't know the name of certain users, you can identify them through their e-mail addresses, too. Naturally, this will only work if the address is unique. The Membership class offers the GetUserNameByEmail() method for this purpose. |
The previously mentioned example doesn't offer the capability to change the password of the user. I've enhanced the example by including three input boxes that will enable users to input the current and new password and provide a confirmation. The new password as well as the old one is transferred to the MembershipUser.ChangePassword method.
void Button1_Click(object sender, System.EventArgs e)
{
    if (this.IsValid)
    {
        MembershipUser user = Membership.GetUser();

        user.Email = this.TB_Email.Text;
        user.Comment = this.TB_Comment.Text;
        Membership.UpdateUser(user);

        if ((this.TB_OldPassword.Text.Length > 0) &&
                 (this.TB_NewPassword.Text.Length > 0))
        {
            user.ChangePassword(this.TB_OldPassword.Text,
                this.TB_NewPassword.Text);
        }
    }
}
Please be aware that the ChangePassword() method always requests the old and the new password; null or an empty string won't be accepted. You have two choices if you want to skip the input of the old password.
You may use the GetPassword method to acquire the existing password. This solution turns out to be difficult because it will only work depending on the configuration of the chosen membership providers. If the passwords are being saved as hash values, readout of the password is virtually impossible.
if (this.TB_NewPassword.Text.Length > 0)
{
    string oldPassword = user.GetPassword();
    user.ChangePassword(oldPassword, this.TB_NewPassword.Text);
}
Therefore, I recommend resetting the password with ResetPassword() instead. This method delivers a new automatically generated password in return, which can be modified immediately.
if (this.TB_NewPassword.Text.Length > 0)
{
    string oldPassword = user.ResetPassword();
    user.ChangePassword(oldPassword, this.TB_NewPassword.Text);
}
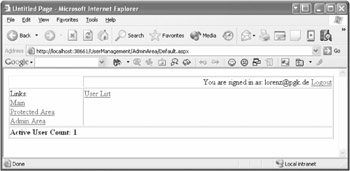
Communities often commonly request that the number of active users be shown. In the future, you can identify this number easily with Membership.GetNumberOfUsersOnline.
With this in mind, I've adapted the Master Page of the example web site in a way that the number of active users is displayed on each page. As you can see in Figure 6-17, it would be nice to have more visitors.
void Page_Load(object sender, System.EventArgs e)
{
    if (this.IsPostBack == false)
    {
        Membership.ApplicationName = "test";
        this.LB_ActiveUsers.Text = Membership.GetNumberOfUsersOnline().ToString();
    }
}
| Caution |
In the current Alpha version, the retrieval of the active user count fails because of a bug within AccessMembershipProvider. This will be fixed for the Beta version. |
| Note |
Please note that authenticated as well as anonymous users are counted if they have been activated. For details see the "Managing Anonymous Users" section earlier in this chapter. |