| [ Team LiB ] |
|
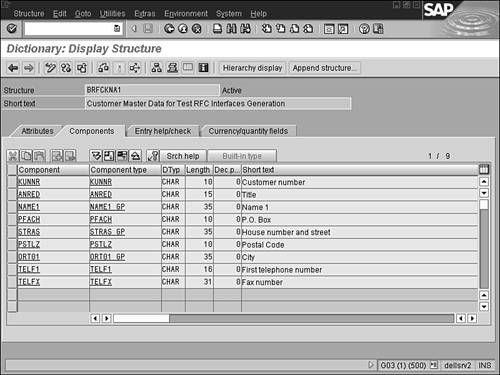
Server Programming in JCoJCo provides the capability not only for the Java side to call SAP, but also the other way around, so that SAP can call Java. This would be very useful in cases in which immediate notification is necessary. For instance, when a special condition is applied in SAP, email must be sent to all Web-based customers residing on an external database. In this section, we discuss how to set up a JCo server and listen for incoming calls. The code for this section is located in the /server directory on the companion CD. A complete working version plus sources is included. Creating a JCo ServerA JCo server must be configured internally in SAP. An SAP system cannot just call an external program without having the skeleton of the import, export, and table parameters defined within the system. Instead of creating our own custom RFC for this example, let's use an RFC that has already been defined: RFC_CUSTOMER_GET. This function can be accessed through SAP transaction SE37. It contains two optional input parameters and one table parameter. Figure 32.2 is a screenshot of the table dictionary object needed for our function. This information must be created within our server as a repository. Figure 32.2. SAP data dictionary screen.
Earlier in this chapter, we discussed how JCo automatically creates the repository object and populates it with the correct metadata. However, when implementing the JCo server, we have to define our own repository. This information should be defined as static and usually can be an inner class. In our example, I've defined a wrapper class with two internal classes:
The wrapper class implements JCO.ServerExceptionListener to handle any exceptions that might be thrown. It also contains a simple main() method that calls the runServer() method to start the server. The following code shows how this works: public class JCoServer implements JCO.ServerExceptionListener{ protected static IRepository repository; //define my Repository JCO.Server server = null; //define my Server ... public static void main(String[] argv) { JCO.setTraceLevel(0); JCoServer myserver = new JCoServer(); myserver.runServer(); } Creating a RepositoryNext we define the inner class for our repository. This class is defined as static because we don't need to instantiate the data more than once. We need this class because we're defining our own repository for the server, and cannot use JCO.Repository, which is specifically used in client programs. //Create a static repository to hold all metadata for our functions. static public class Repository extends JCO.BasicRepository implements com.sap.mw.jco.IRepository { public Repository(String repname) { super(repname); } } With the inner class Repository defined, we must now create the data for the repository. For performance reasons, we use a static block within the wrapper class. This code will be run only once: when the class is instantiated. The important JCo class needed to add the metadata is JCO.MetaData. This class has an overloaded addInfo() method that's used to add different types of metadata. In our case, we need to define two types of metadata:
The addInfo() method for adding our function interface data contains these arguments:
When creating data for the structure, we do not need the flags or the table metadata. So, the addInfo() method has an overloaded method without these parameters added. The final step is storing the JCO.MetaData objects in the repository. The repository object has two methods for this:
Now that we know what each function does, let's look at the code. Listing 32.3 is the static block within our wrapper class used to define our repository data. Listing 32.3 Defining the JCo Repository//for performance reasons, define a singleton for repository static { repository = new Repository("serverRepository"); JCO.MetaData functionMetaData = new JCO.MetaData("RFC_CUSTOMER_GET"); functionMetaData.addInfo("KUNNR", JCO.TYPE_CHAR, 10, 0, 0, JCO.IMPORT_PARAMETER , null); functionMetaData.addInfo("NAME1", JCO.TYPE_CHAR, 35, 0, 0, JCO.IMPORT_PARAMETER, null); functionMetaData.addInfo("CUSTOMER_T", JCO.TYPE_TABLE, 0, 0, 0, 0, "BRFCKNA1"); repository.addFunctionInterfaceToCache(functionMetaData); JCO.MetaData structureMetaData = new JCO.MetaData("BRFCKNA1"); structureMetaData.addInfo("KUNNR", JCO.TYPE_CHAR, 10, 0, 0); structureMetaData.addInfo("ANRED", JCO.TYPE_CHAR, 15, 10, 0); structureMetaData.addInfo("NAME1", JCO.TYPE_CHAR, 35, 25, 0); structureMetaData.addInfo("PFACH", JCO.TYPE_CHAR, 10, 60, 0); structureMetaData.addInfo("STRAS", JCO.TYPE_CHAR, 35, 70, 0); structureMetaData.addInfo("PSTLZ", JCO.TYPE_CHAR, 10, 105, 0); structureMetaData.addInfo("ORT01", JCO.TYPE_CHAR, 35, 115, 0); structureMetaData.addInfo("TELF1", JCO.TYPE_CHAR, 16, 150, 0); structureMetaData.addInfo("TELFX", JCO.TYPE_CHAR, 31, 166, 0); repository.addStructureDefinitionToCache(structureMetaData); } Notice how the offset length has to be specified in the structure metadata and not in the parameters. The offset is very important; if it's incorrect, the values will be populated incorrectly. With the repository created and stored, we're ready to create the JCO.Server objects and ultimately receive messages from SAP. Creating the JCO.Server ObjectsThe JCO.Server object must be extended to do anything useful with SAP. In our example, we create an inner class for extending the JCo server and create a constructor. The constructor takes a very specific set of arguments. The list of arguments in our example is as follows: TIP If you aren't familiar with these terms, contact your SAP basis administrator to help you set them up. //Create a server to take requests from SAP static public class Server extends JCO.Server { public Server(String gwhost, String gwserv, String progid, IRepository repository) { super(gwhost,gwserv,progid,repository); } ... } Now that we have the basic object taken care of, let's look at the handleRequest() method that must be overridden (it's empty { } by default). The handleRequest() method is called every time the SAP system contacts JCo. The lone argument passed is a JCO.Function object. At this point, the programmer is free to do whatever he wants. I suggest checking for each function your application supports, and then minimally writing a separate method for each function. To keep the example readable, our sample application only contains one function and populates a table if the customer is correctly matched. Let's examine the code shown in Listing 32.4. Listing 32.4 Handling a Request from SAP
// The default method handles nothing. override for all functions that are needed
    protected void handleRequest(JCO.Function function)
{

  System.out.println("function " + function.getName() + " called from SAP");

  if (function.getName().equals("RFC_CUSTOMER_GET")) {
    JCO.Table tables =
    function.getTableParameterList().getTable("CUSTOMER_T");
    System.out.println(
    function.getImportParameterList().getString("KUNNR"));
  if("1234567890".equals(function.getImportParameterList().getString("KUNNR"))){
    tables.appendRow();
    tables.setValue("1234567890", "KUNNR");
    tables.setValue("Michael Jordan", "NAME1");
    tables.setValue("91607", "PSTLZ");
    tables.setValue("USA", "STRAS");
    tables.setValue("CALIFORNIA", "ORT01");
    tables.setValue("818-555-5555", "TELF1");
   }
   else{
    throw new JCO.AbapException(
        "NO_RECORD_FOUND","No Current Record could be found!!!");
   }
  }
}//handleRequest
The code in Listing 32.4 could be separated into a separate method, but for this short example, there's no need to do so. Using the same methods we learned about on the client side, we first check the customer number KUNNR. If it matches the required value, we return a row of data to SAP. If it doesn't match, we throw an ABAP exception. TIP The first argument in the exception thrown has to match one of the exceptions in the RFC interface within SAP. If it doesn't, a short dump will occur in SAP. You can verify this by looking at transaction SE37, entering the program name, and clicking on the Exceptions tab. SAP RFC Setup (SM59)Without setting up the RFC destination within SAP, programs cannot call your Java application. There are some very specific instructions for setting up the RFC destination to work with your program. First, it must be a TCP/IP connection type. Second, the activation type must be Registration and the program ID must match the program ID given when the Java server was started. This is the link that registers your server to the SAP RFC. To set up an RFC, either you or a SAP basis person must log on to SAP and go to transaction SM59. Figure 32.3 shows the screen. Figure 32.3. SAP RFC setup screen.
Running the Server ApplicationTo run the server application, simply follow these steps:
Figure 32.4 shows the testing screen in SE37. Figure 32.4. Testing the Java server from inside SAP.
|
| [ Team LiB ] |
|