|
|
< Day Day Up > |
|
C.2 Practical ExamplesIn the rest of this appendix we'll describe how to use phpMyAdmin to accomplish some common tasks. C.2.1 User MaintenanceUser maintenance in phpMyAdmin functions much as it does in command-line MySQL operation. The administrator can deal with global as well as database and table-level privileges. To administer global privileges, select Privileges from the start page, which then displays something similar to Figure C-4. Once you have chosen a user to add or remove privileges from, click the "edit" link, which will present you with a user editing interface, as shown in Figure C-5. Figure C-4. phpMyAdmin global privileges interface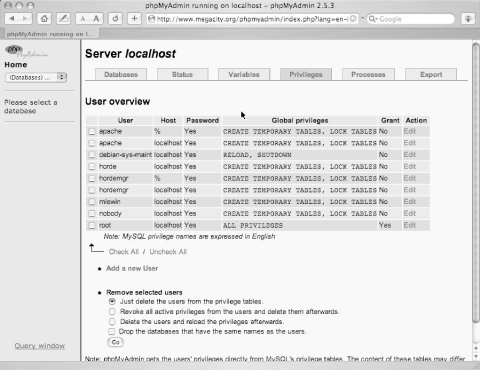 Figure C-5. phpMyAdmin user edit interface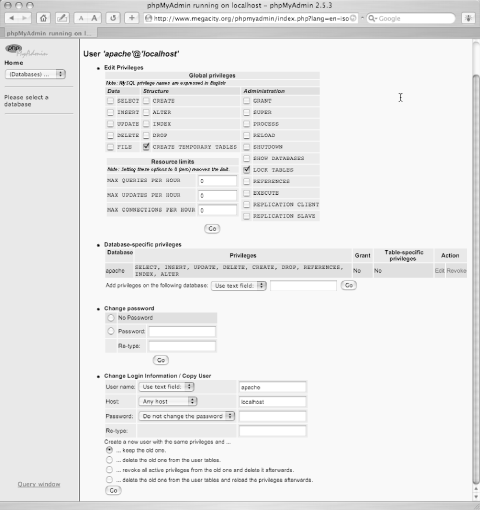 From here, most of the functions are self-explanatory; they allow administrators to add or remove global privileges, edit any table-specific privileges the user may have, or change the user's password. You can also clone the user, creating one with the same privileges as the original user, but a different username. This can be handy for adding new database administrators or other users who have complicated privileges. Perhaps you wish to see which users have access to a particular database. From the databases list, select Check Privileges next to the database you want to check for access on. A list of all users and the privileges granted to them will be displayed (along with links for editing those privileges), as shown in Figure C-6. Figure C-6. phpMyAdmin database level privileges interface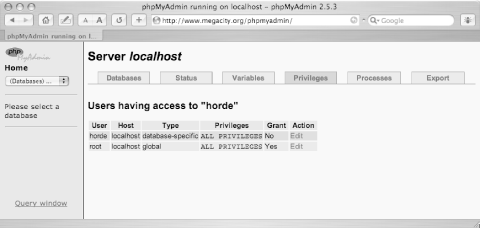 C.2.2 Simple SQL CommandsOften, as an administrator, you will want to give users the ability to issue simple SQL commands against the database, but you don't necessarily want to open up the server to login accounts in general or to give a "non-sysadmin" user the ability to get a login shell. In these types of situations, allowing the user in question to use the phpMyAdmin interface may be the ideal solution. There are two basic interfaces available to the user for issuing SQL commands. One of these is a very simple, raw text area that allows the users to type in the SQL command they wish to execute. Simply click on the SQL tab after selecting a table to work with. There is some helpful JavaScript magic on this page that allows the user to select column names from a select element to the right of the free-form text area, so that the user can minimize his typing, as shown in Figure C-7. Figure C-7. phpMyAdmin SQL interface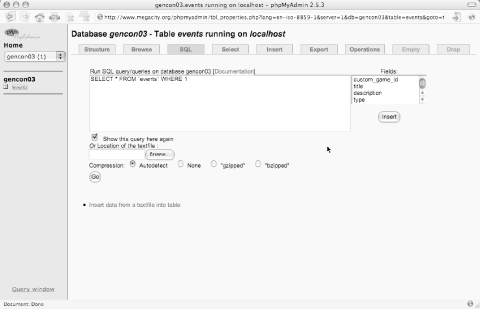 Once executed, the resulting records is displayed as returned by the user's query. It is possible to edit, or delete an entry by clicking the note-pad button or the trash-can button, respectively, next to the record you wish to edit or delete. The other basic record selection method is the Select tab. This is designed for simple queries and allows you to impose simple restrictions on the query being performed, as shown in Figure C-8. The results of that query are displayed in the same format as the results of the SQL query, and likewise allow the user to edit or delete specific entries returned by the query. Figure C-8. phpMyAdmin select interface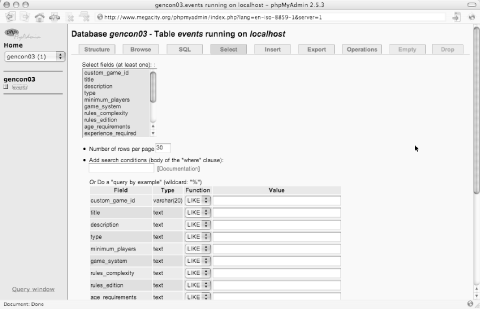 C.2.3 Exporting and Downloading DataThe phpMyAdmin interface makes retrieving remote dumps of the database as easy as clicking some buttons on a web form. There are two different Export tabs, one if you are viewing the database as a whole, the other if you are looking at a selected table. They are virtually identical except that the database-wide version also includes a select item for which tables in the database you wish to export. The table-wide interface can be seen in Figure C-9. Figure C-9. phpMyAdmin export interface As you can see, there are several export options available to the user. If you are looking for a mysqldump-style export for possible import into another MySQL installation, you can select that option. There are CSV options for "normal" use as well as customized CSV output to make Microsoft Excel happy. The different export options each enable different options in the panel just to the right, specific to the export style in question. Once you select Go, the data will be formatted per your selection and output to your browser via the Web, where you can copy and paste it or save it to your local disk. Alternatively, you may check the "Save as file" checkbox and simply save the downloaded file to disk. Note that you might see slightly odd behavior, though, if you use this feature to export as XML. Your browser of choice may decide to try to "handle" the XML by displaying it, instead of allowing you to simply save it to disk. |
|
|
< Day Day Up > |
|