Because high-interaction honeypots can be fully compromised by an attacker, we need to think very carefully about the possible consequences of a compromise. In many cases, adversaries use compromised machines — your honeypots — as platforms for further attacks against other people and organizations. They could, for example, use a compromised honeypot as a stepping stone to attack another system or to instrument it to participate in a Distributed Denial of Service (DDoS) attack. A DDoS attack is an attack on a computer system or network that causes a loss of service to users, typically the loss of network connectivity and services by consuming the bandwidth of the victim network or overloading the computational resources of the victim system. These attacks are most often carried out with the help of botnets, a network of compromised machines that can be remotely controlled by an attacker. We will introduce the mechanisms behind them in more detail in Chapter 11.
For now, we will focus on the problem of how to safeguard our honeypots. We want to mitigate the risk that is involved when running a high-interaction honeypot: an attacker abusing one of our honeypots.
In the rest of this section we introduce the most important approach to safeguarding your honeypots; the Honeywall. This system is developed by the Honeynet Project as part of Gen III and Gen IV honeynets. We give an overview of the Honeywall design and describe the installation and configuration process.
The easiest approach to protect your honeypots from malicious abuses by an attacker is the Honeywall. It offers a complete and easy-to-administrate solution to safeguarding your honeypots. The development of this systems is part of the Gen III and Gen IV architecture of the Honeynet Project, which also maintains it. You can download the current release of the Honeywall at http://honeynet.org/tools/cdrom/. In the following, we present the concepts behind the Honeywall and guide you through the installation process. Afterward, we show briefly how to use the Honeywall efficiently and also how to interpret the collected data.
The Honeywall is the heart of a GenIII honeynet, since it enables all the following main tasks of a honeynet:
Data Capture: All activity within the honeynet and the information that enters and leaves the honeynet should be captured without attackers knowing they are monitored.
Data Control: To control suspicious traffic entering or leaving the honeynet. Moreover, this mechanism must ensure that once a honeypot within the honeynet is compromised, all malicious activity must be contained within the honeynet.
Data Analysis: To help you as the operator of a honeynet to simplify the analysis of all captured data and help in computer and network forensics.
From a deployment point of view, only the first two tasks are necessary to safeguard your honeypots. But once you have a high-interaction honeynet up and running, you will also benefit from the data analysis capabilities of the Honeywall, which make your daily analysis much easier.
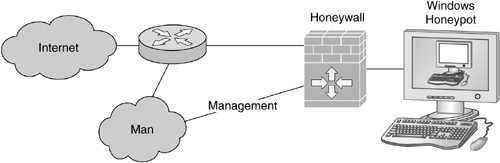
A schematic overview of the deployment setup is shown in Figure 2.5. The Honeywall is normally set up as a transparent bridge — that is, a network device that operates on the data link layer. Transparent in this case means that the Honeywall has no IP address on the two interfaces that connect the honeypots with the Internet, so an attacker cannot easily detect that there is a network device in between. Optionally, you can also use a third network interface for management and maintenance access to the Honeywall (Management interface in Figure 2.5). This network interface has an IP address so that you can also access it remotely. Preferably, you set up a separate management network for this access.
This setup helps to capture important data (Data Capture) and to control all traffic entering and leaving the honeynet (Data Control). As already defined, Data Control means that we want to have control over which packets are allowed to enter the honeynet and especially which packets are allowed to leave it. Imagine that an attacker successfully compromises a honeypot. If he then attacks further systems on the Internet, we could have legal or ethical problems. To mitigate risks, we want to control the incoming and outgoing traffic. Using the netfilter/iptables subsystem of the Linux kernel, we can set an upper limit of allowed connections to mitigate the risk of denial of service (DoS) attacks against other hosts. To prevent DoS attacks, outgoing TCP traffic is limited to a certain amount of connections per day, and, similarly, only a specific number of outgoing ICMP packets are allowed. The values have to be chosen with care. On the one hand, they should make sure that an attacker can connect to other systems on the Internet. He should be able to retrieve tools from other machines and connect to an IRC server to communicate to other people. On the other hand, he should not be able to generate lots of harm due to an attack against another host. As a best practice value, we allow 20 TCP connections, 20 UDP packet exchanges, 50 ICMP packets, and 20 other connections (all other non-IP protocols number 1, 6, and 17) per hour in our honeynet, which consists of two virtual Linux honeypots running within VMware.
But connection limiting does not help to mitigate all risks posed by a successful compromise. For example, connection limiting does not help if the attacker uses a specific exploit against another host. To help in this case, the Intrusion Prevention System (IPS) snort_inline [84] is used. This tool is based on the popular Snort [83] Intrusion Detection System (IDS) but has been extended to allow rules that modify or drop packets passing by. Via the netfilter/iptables functionality, all outgoing traffic is passed through snort_inline. While snort_inline might be called an Intrusion Prevention System, we deploy it as an "Extrusion" Prevention System. Since the aim of Data Control is to reduce the risk of intruders using your honeypots to successfully mount outgoing attacks on other systems, we use the tool to examine outgoing traffic and block outgoing attacks. This is achieved by rewriting outgoing traffic with a known attack payload in a way that the payload will fail. As an example, the following listing depicts a snort_inline rule that modifies packets that contain a specific byte sequence that indicates malicious content:
Snort_inline rule that modifies suspicious packets:

alert ip $HONEYNET any -> $EXTERNAL_NET any
    (msg:"SHELLCODE x86 stealth NOOP";
     content:"|EB 02 EB 02 EB 02|";
replace:"|00 00 99 99 00 00|";) |
This rule has the following meaning: All IP packets leaving the honeynet on any port (ip $HONEYNET any ->) with an external destination at any port (-> $EXTERNAL NET any) are examined. If a suspicious packet is detected (content:"|EB 02 EB 02 EB 02|"), the content is replaced (replace:"| 00 00 99 99 00 00|") and a message is written to the log file (msg:"SHELL-CODE x86 stealth NOOP"). This sterilization of attacks gives us the ability to allow an intruder to attack other systems because we can assume that all of his attacks will fail. Given the difficulties of making exploits work in the wild and the limited sophistication of many intruders, there is a high probability that intruders would not detect the presence of the Honeywall for some time and therefore continue to try different forms of attacks, allowing us to observe them to a greater extent and for a longer period of time.
Besides Data Control, another task of the Honeywall is Data Capture — that is, to collect as much data about the actions of an attacker as possible. The simplest mechanism for Data Capture is to just capture all incoming and outgoing traffic. This can be achieved with tools like tcpdump or Wireshark / Tshark. These tools simply log all packets passing through the network interfaces and write them into a database for later analysis. Moreover, all events that are logged by installed IDS or IPS are also logged into a database. Argus [89], a tool for IP network traffic auditing, and p0f (http://lcamtuf.coredump.cx/p0f.shtml), a tool for passive fingerprinting of the remote operating system, help to further collect data for later forensic analysis. Since all data is aggregated in a central database, an analysis is easier to carry out [3].
However, only capturing information about network traffic is not enough. Imagine that the attacker uses an encrypted communication channel to connect to other hosts. Since we do not know any of the keys used for the encrypted channel, we are not able to decrypt the data. Our tcpdump logs then show us only with whom the attacker communicated, but they do not reveal any information about the content. Moreover, we also want to learn more about the procedures of the attacker. We want to observe his keystrokes and collect more information about his behavior. One of the main software tools for Data Capture is the monitoring system Sebek [99], which tries to capture all system activities on a honeypot. Sebek is a client/server system. All honeypots run the Sebek client, which closely monitors and logs all user activity in a manner meant to be undetectable. As we will see in Chapter 9, this is not completely possible, but the average attacker will presumably not detect the presence of the monitoring mechanism. To achieve monitoring, Sebek replaces several system calls with its own version and can thus observe all data accessed via these system calls. This is an example of the dual use principle in IT security, since we use the same techniques an attacker does when he attacks a system. In its current version, it can, among others, trace the following system calls:
read()/readv()/pread() to keep track of all data read by processes
open() to keep track of all files opened by processes
socketcall() to keep track of all socket system calls
fork()/vfork() to keep track of processes that fork
clone(), similarly to fork(), to keep track of processes creating a child process
This collected data helps you in Data Analysis and simplifies the analysis after a successful compromise. Sebek can, for example, log all SSH-sessions, even if they are encrypted. Furthermore, it enables us to recover files copied via secure copy (scp) and record all passwords used by intruders. The logged information is sent over the network to the Sebek server — usually the Honeywall — which stores the data and allows Data Analysis. Sebek achieves (almost) undetectable communication by sending all logged data directly to the device driver and thus bypassing all logging mechanisms on a host. This means that the average attacker cannot easily detect that extensive logging is going on while he attacks a honeypot. In addition, Sebek uses a technique borrowed from the rootkit Adore to hide its presence from an adversary. It unlinks itself from the list of installed kernel modules and thus makes detection of its presence harder. More detailed information on the workings of Sebek can be found in a whitepaper from the Honeynet Project [99].
Finally, the third task of the Honeywall is Data Analysis. This mechanism enables the operator of a honeypot to quickly analyze what is currently happening on the honeypot or what has happened before and during a compromise. Since we focus in the section on safeguarding the virtual high-interaction honeypots, we refer you to a detailed introduction to the Data Analysis capabilities of the current Roo CD-ROM, which you can find in a paper by Balas and Camino [3] and online at the website of the Honeywall CD-ROM (http://honeynet.org/tools/cdrom/).
Setting up a Honeywall is very easy. The Honeynet Project provides a bootable CD-ROM that helps you through the installation and configuration process. With the help of this tool, you can set up a Honeywall within a few minutes.
As hardware requirements, you need a PC with the following specifications: It should have at least 512MB of RAM, a 1GHz processor, more than 10GB of hard disk space, and three network interfaces. With this configuration you can work fluently with the Honeywall. However, if you install more RAM on the machine, the analysis of collected packet dumps and other information will be easier and faster. If the Honeywall has collected lots of data (e.g., due to many SSH brute-force scanning or large data transfers), it can become somewhat slow with only a limited amount of RAM.
Before continuing, make sure that you also know the IP addresses that you have used for your high-interaction honeypots set up earlier. You need to know this information, since the Honeywall must be configured to allow network connections from and to these honeypots.
Once you have a machine ready that you want to use as the Honeywall, the installation process can start. Download the latest release of the Honeywall from http://www.honeynet.org/tools/cdrom/. Once you have downloaded the ISO image, burn it to a CD-ROM so that it is bootable. Now it is only necessary to boot from the CD-ROM, and then a headless installation of a Linux-based system starts. Please read the warning message during the bootup process carefully! During the installation process, the CD-ROM will set up a new Linux-based system on your machine, and you will lose all data currently stored on the hard disk. Make sure that no data is left on your hard disk before you start the installation process, since all old data will be overwritten. Once you accept the warning message, the installation process will start. A Fedora Core–based system will be installed, and all necessary packages to enable Data Capture, Data Control, and Data Analysis are set up. Depending on your hardware, the installation process will take between 5 and 20 minutes.
Once the bootable CD-ROM has set up the basic system, it will reboot and the configuration process starts. Log in to your new system with username roo and password honey. The installation process is now finished and now you can configure the Honeywell to your needs.
For all versions of the Honeywall, switch to superuser mode with the help of the command su, and use the password honey. Now you can configure the Honeywall to your custom needs. The program /usr/sbin/menu will automatically start and guide you through the configuration process. With an interview-like process, you can configure all parameters and complete the setup of your Honeywall. For each menu point, there is a brief help section available. Basically, you configure the Data Control and Data Capture capabilities of the Honeywall during these steps.
Please consult the documentation available at http://www.honeynet.org/tools/cdrom/roo/manual/ if you are unsure how to answer a particular question. Normally it is safe to choose the proposed values from the configuration process. However, you need to adjust especially the information regarding the IP addresses of your honeypots and the Honeywall to your environment.
Now your Honeywall is set up, and you can use it. From the console of the Honeywall or a system reachable from the management interface open the URL https://<IP-of-Management-interface>/. There you see the login page, at which you can log in with the default username admin and password honey. Now you can administrate your Honeywall with the help of a web browser and also examine all logfiles collected by your honeypots. The tab "Data Analysis" gives you an overview of the collected network activity. You can browse the different network flows, search for specific connections, or analyze a given packet trace in more detail. You will use these features for your day-to-day analysis of collected data. The tab "System Admin" allows you to configure the Honeywall and to get an overview of the current system status. For extensive information about the manifold possibilities to examine the logfiles and to use the Honeywall, please consult the online documentation available at http://www.honeynet.org/tools/cdrom. The Honeywall contains so many features that attempting to explain them would go beyond the scope of this book.