|
|
< Day Day Up > |
|
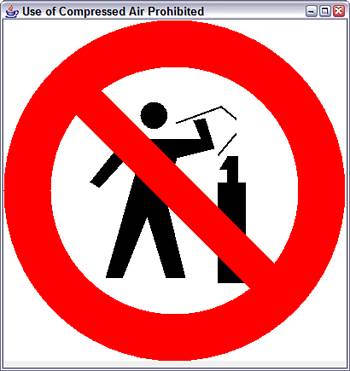
Drawing Lines and ShapesFigure 23.1 shows a Java application that illustrates the different things you'll be learning to draw during this hour: lines, rectangles, ellipses, and polygons. Figure 23.1. Displaying a sign using Java2D graphics.
With the exception of lines, all of the shapes you can draw can be filled or unfilled. A filled shape is drawn with the current color completely filling the space taken up by the shape. Unfilled shapes just draw a border with the current color. Before you create an application to draw this sign, we'll describe each of the drawing methods. The comp2D object will be used as the Graphics2D object throughout this section.
Drawing LinesA 2D drawing operation in Java requires two steps:
The objects that define shapes all are part of the java.awt.geom package of classes. There are two classes that can be used to create lines: Line2D.Float and Line2D.Double. These classes differ only in the way they are created: One is created using floating-point numbers to specify the beginning (x,y) point and ending (x,y) point of the line, and the other uses double values. The following statement creates a line from the point (40,200) to the point (70,130): Line2D.Float ln = new Line2D.Float(40F, 200F, 70F, 130F); Each of the arguments to the Line2D.Float constructor is a number followed by an F, which indicates that the number is a floating-point value. This is necessary when creating a Line2D.Float object. After you create a drawing object of any kind, whether it's a line, ellipse, rectangle, or another shape, it is drawn by calling a method of the Graphics2D class. The draw() method draws the shape as an outline and the fill() method draws it as a filled shape. The following statement will draw the ln object created in the previous example: comp2D.draw(ln); Drawing RectanglesRectangles can be filled or unfilled, and they can have rounded corners or square ones. They can be created using the Rectangle2D.Float class and specifying the following four arguments:
The following statement draws an unfilled rectangle with square corners:
Rectangle2D.Float rr = new

    Rectangle2D.Float(245F, 65F, 20F, 10F);
This statement creates a rectangle with its upper-left corner at the (x,y) coordinate of (245,65). The width of the rectangle is 20 and the height is 10. These dimensions are expressed in pixels, the same unit of measure used for coordinates. To draw this rectangle as an outline, the following statement could be used: comp2D.draw(rr); If you want to make the rectangle filled in, use the fill() method instead of draw(), as in this statement: comp.fill(rr); You can create rectangles with rounded corners instead of square ones by using the RoundRectangle2D.Float class. The constructor to this class starts with the same four arguments as the Rectangle2D.Float class, and adds the following two arguments:
These distances are used to determine where the rounding of the rectangle's corner should begin. The following statement creates a rounded rectangle:
RoundRectangle2D.Float ro = new RoundRectangle.Float(

    10F, 10F,

    100F, 80F,

    15F, 15F);
This rectangle has its upper-left corner at the (10,10) coordinate. The last two arguments to drawRoundRect() specify that the corner should begin rounding 15 pixels away from the corner at (10,10) as well as the other three corners. As with other rectangle methods, the third and fourth arguments specify how wide and tall the rectangle should be. In this case, it should be 100 pixels wide and 80 pixels tall. After the rounded rectangle is created, it is drawn using the draw() and fill() methods of a Graphics2D object. Drawing Ellipses and CirclesEllipses and circles can both be created with the same class: Ellipse2D.Float. This class takes four arguments: the (x,y) coordinates of the ellipse and its width and height. The (x,y) coordinates do not indicate a point at the center of the ellipse or circle, as you might expect. Instead, the (x,y) coordinates, width, and height describe an invisible rectangle that the ellipse fits into. The (x,y) coordinate is the upper-left corner of this rectangle. If it has the same width and height, the ellipse is a circle. The following statement creates a circle at (245,45) with a height and width of 5 each:
Ellipse2D.Float cir = new Ellipse2D.Float(

    245F, 45F, 5F, 5F);
Drawing this object requires a call to draw(cir) or fill(cir). Drawing ArcsAnother circular shape you can draw in Java is an arc, a partial ellipse or circle. Arcs are created using the Arc2D.Float class, which has a constructor method with many of the same arguments. You draw the arc by specifying an ellipse, the portion of the ellipse that should be visible (in degrees), and the place the arc should begin on the ellipse. To create an arc, specify the following integer arguments to the constructor:
The arc's starting point and size range from 0 to 359 degrees in a counterclockwise direction, beginning with 0 degrees at the 3 o'clock position, as shown in Figure 23.2. Figure 23.2. How arcs are defined in degrees.
The type of arc is specified by using one of three class variables from the Arc2D.Float class: PIE if the arc should be drawn as a slice of a pie graph, CLOSED if the endpoints of the arc should be connected with a straight line, and OPEN if the endpoints should not be connected. The following statement draws an open arc at (100,50) that is 120 degrees long, begins at the 30-degree mark, and has a height and width of 75 each:
Arc2D.Float smile = new Arc2D.Float(100F, 50F, 75F, 75F,

    30F, 120F, Arc2D.Float.OPEN);
You will work more with arcs later in this hour's workshop. Drawing PolygonsPolygons are the most complicated shape to create because they have a varying number of points. The first step in creating a polygon is to create a GeneralPath object that will hold it. This object starts off without any points in the polygon being defined: GeneralPath polly = new GeneralPath(); Once this object is created, its moveTo() method is used to define the first point in the polygon. For a closed polygon, such as an octagon, this can be any of the points. You can also define open polygons, and, in this case, your first point should be one of the end points of the polygon. The moveTo() method takes two arguments: an x and a y coordinate. This (x,y) coordinate defines the point on the polygon. The following statement is an example: polly.moveTo(100F, 20F); After you have established the initial point in this manner, each successive point is added with the lineTo() method. This method also takes an x coordinate and y coordinate as arguments, as in the following statement: polly.lineTo(80F, 45F); You can call lineTo() as often as needed to create the sides of the polygon. When you have added the last point, you can close off the polygon by calling the closePath() method with no arguments: polly.closePath(); If you don't call closePath(), the polygon will be open. When you have finished creating the shape, it can be drawn with the draw() and fill() methods like any other drawn object. Drawing Lines of Different WidthsIf you tried out all of the drawing operations you have learned about up to this point, you would see that they draw lines that are one pixel wide. You can change the size of the line by using the BasicStroke class, part of the java.awt package. Objects of this class represent the width of the "drawing pen," and you can create one by calling the BasicStroke(int) constructor, as in the following example: BasicStroke pen = new BasicStroke(12); The integer specified in the constructor represents the width of the pen in pixels. Using BasicStroke objects is similar to working with fonts and colors. To draw with a pen you have created, call the setStroke() method of the Graphics2D class with the pen as an argument. The following example creates a 3-pixel wide stroke and assigns it to a Graphics2D object called comp2D: BasicStroke brush = new BasicStroke(3); comp2D.setStroke(brush); Everything you draw will use the pen until you select a different one. Creating the SignTo put all of these shapes together, load your word processor and create a new file called Sign.java. Enter Listing 23.1 into the file and save it when you're done. Listing 23.1. The Full Text of Sign.java
 1: import java.awt.*;

 2: import javax.swing.*;

 3: import java.awt.geom.*;

 4:

 5: public class Sign extends JFrame {

 6:     public Sign() {

 7:         super("Use of Compressed Air Prohibited");

 8:         setSize(410, 435);

 9:         setDefaultCloseOperation(JFrame.EXIT_ON_CLOSE);

10:         SignPanel sp = new SignPanel();

11:         add(sp);

12:         setVisible(true);

13:     }

14:

15:     public static void main(String[] arguments) {

16:         Sign sign = new Sign();

17:     }

18: }

19:

20: class SignPanel extends JPanel {

21:     public void paintComponent(Graphics comp) {

22:         super.paintComponent(comp);

23:         Graphics2D comp2D = (Graphics2D) comp;

24:         comp2D.setColor(Color.white);

25:         comp2D.fillRect(0, 0, 400, 400);

26:

27:         // draw sign

28:         comp2D.setColor(Color.red);

29:         Ellipse2D.Float sign1 = new Ellipse2D.Float(0F, 0F, 400F, 400F);

30:         comp2D.fill(sign1);

31:         comp2D.setColor(Color.white);

32:         Ellipse2D.Float sign2 = new Ellipse2D.Float(55F, 55F, 290F, 290F);

33:         comp2D.fill(sign2);

34:

35:         // draw man

36:         comp2D.setColor(Color.black);

37:         Ellipse2D.Float head = new Ellipse2D.Float(160F, 96F, 32F, 32F);

38:         comp2D.fill(head);

39:         GeneralPath body = new GeneralPath();

40:         body.moveTo(159F, 162F);

41:         body.lineTo(119F, 303F);

42:         body.lineTo(139F, 303F);

43:         body.lineTo(168F, 231F);

44:         body.lineTo(190F, 303F);

45:         body.lineTo(213F, 303F);

46:         body.lineTo(189F, 205F);

47:         body.lineTo(203F, 162F);

48:         body.lineTo(247F, 151F);

49:         body.lineTo(236F, 115F);

50:         body.lineTo(222F, 118F);

51:         body.lineTo(231F, 140F);

52:         body.lineTo(141F, 140F);

53:         body.lineTo(101F, 190F);

54:         body.lineTo(112F, 197F);

55:         body.lineTo(144F, 162F);

56:         body.closePath();

57:         comp2D.fill(body);

58:

59:         // draw can

60:         comp2D.setColor(Color.black);

61:         comp2D.fillRect(251, 191, 33, 118);

62:         comp2D.fillRect(262, 160, 13, 31);

63:         GeneralPath nozzle = new GeneralPath();

64:         nozzle.moveTo(252F, 176F);

65:         nozzle.lineTo(262F, 160F);

66:         nozzle.lineTo(262F, 176F);

67:         nozzle.closePath();

68:         comp2D.fill(nozzle);

69:

70:         // draw lines

71:         comp2D.setColor(Color.black);

72:         BasicStroke pen = new BasicStroke(2F);

73:         comp2D.setStroke(pen);

74:         Line2D.Float ln1 = new Line2D.Float(203F, 121F, 255F, 102F);

75:         comp2D.draw(ln1);

76:         Line2D.Float ln2 = new Line2D.Float(255F, 102F, 272F, 116F);

77:         comp2D.draw(ln2);

78:         Line2D.Float ln3 = new Line2D.Float(272F, 134F, 252F, 158F);

79:         comp2D.draw(ln3);

80:

81:         // finish sign

82:         comp2D.setColor(Color.red);

83:         GeneralPath sign3 = new GeneralPath();

84:         sign3.moveTo(110F, 78F);

85:         sign3.lineTo(321F, 289F);

86:         sign3.lineTo(290F, 317F);

87:         sign3.lineTo(81F, 107F);

88:         sign3.closePath();

89:         comp2D.fill(sign3);

90:     }

91: }
After compiling the program successfully, run it at the command line. The end result was displayed in Figure 23.1. |
|
|
< Day Day Up > |
|