|
|
< Day Day Up > |
|
8.3 Handling User Interface EventsWhen the user clicks a button or a link, chances are good that backend code should be asked to do something, like adding a report entry to the current report when the Add button is clicked in the sample application. Occasionally, though, an event affects only the user interface. For instance, clicking a button or changing the value of an input control may expose additional options or display more information. As an example of user interface changes triggered either by a button click or a value change, let's add a feature to the sample application, namely an extendable expense types list. Initially, only the most common expense types are listed, but the user can extend the list with more uncommon choices. 8.3.1 Triggering an Event by Clicking a Button or a LinkIn the first version of the extendable expense types feature, I use a button to switch between the standard and the extended list. Figure 8-3 shows what it looks like. Figure 8-3. The report entry form area with a button for extending the type choices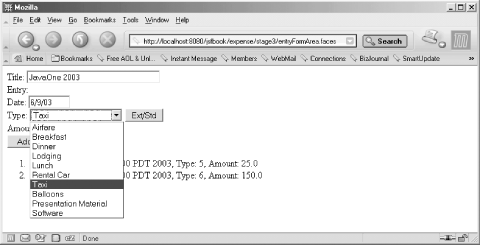 The JSP page for this version of the entry form area is shown in Example 8-4. Example 8-4. Entry form area JSP page with a button for extending the type choices (expense/stage3/entryFormArea.jsp)<%@ page contentType="text/html" %>
<%@ taglib uri="http://java.sun.com/jsf/html" prefix="h" %>
<%@ taglib uri="http://java.sun.com/jsf/core" prefix="f" %>
<f:view>
<h:form>
Title:
<h:inputText id="title" size="30" required="true"
value="#{reportHandler.currentReport.title}" />
<h:message for="title" />
<br>
Entry:
<br>
Date:
<h:inputText id="date" size="8" required="true"
value="#{entryHandler.currentEntry.date}">
<f:convertDateTime dateStyle="short" />
</h:inputText>
<h:message for="date" />
<br>
Type:
<h:selectOneMenu id="type" required="true"
value="#{entryHandler.currentEntry.type}">
<f:selectItems value="#{entryHandler.currentChoices}"/>
</h:selectOneMenu>
<h:commandButton value="Ext/Std" immediate="true"
action="#{entryHandler.toggleTypes}" />
<h:message for="type" />
<br>
Amount:
<h:inputText id="amount" size="8" required="true"
value="#{entryHandler.currentEntry.amount}">
<f:convertNumber pattern="#,##0.00" />
<f:validateDoubleRange minimum="1"/>
</h:inputText>
<h:message for="amount" />
<br>
<h:commandButton value="Add"
disabled="#{reportHandler.addEntryDisabled}"
action="#{entryHandler.add}" />
</h:form>
<h:messages globalOnly="true" />
<%-- Loop to verify that it works --%>
<%@ taglib uri="http://java.sun.com/jsp/jstl/core" prefix="c" %>
<ol>
<c:forEach items="${reportHandler.currentReportEntries}" var="e">
<li>Date: ${e.date}, Type: ${e.type}, Amount: ${e.amount}</li>
</c:forEach>
</ol>
</f:view>
As you can see in Example 8-4, I've added a button with the label "Ext/Std" for toggling between the standard choices list and the extended list. I've also replaced the value binding expression for the entry type list with one that gets the current choices, i.e., with or without the extension choices. The one thing that's different about the <h:commandButton> element for the Ext/Std button compared to the one for the Add button is the immediate attribute. Setting this attribute to true means that the ActionEvent is processed in the Apply Request Values phase and that the processing then jumps directly to the Render Response phase, without doing any validation or updating model values. That's exactly how we want a pure user interface event to be handled, because we don't want error messages about missing or invalid values to be shown just because the user asks for more options. The action attribute for the <h:commandButton> action element contains a method binding expression that points to the toggleTypes( ) method in the entryHandler. Example 8-5 shows how it's implemented in the corresponding EntryHandler class. Example 8-5. Additions for extendable types in EntryHandlerpackage com.mycompany.expense;
import java.util.ArrayList;
import java.util.Iterator;
import java.util.List;
import java.util.Map.Entry;
import java.util.Map;
...
public class EntryHandler {
private Map specialTypes;
private List specialChoices;
private boolean includeSpecial;
...
public String toggleTypes( ) {
includeSpecial = !includeSpecial;
return "success";
}
...
The toggleTypes() method simply sets a variable named includeSpecial to the reverse of its previous value, alternating between true and false. The other changes to the EntryHandler class that this new feature requires are pretty mundane: we need to configure it with the list of extension choices and implement a getCurrentChoices() method that takes the includeSpecial flag into consideration. Both of these tasks are very similar to what we did in Chapter 7 for the list of standard choices. The extension choices are defined in the faces-config.xml file as a new Map property named specialTypes: <faces-config>
<managed-bean>
<managed-bean-name>specialTypes</managed-bean-name>
<managed-bean-class>java.util.TreeMap</managed-bean-class>
<managed-bean-scope>application</managed-bean-scope>
<map-entries>
<value-class>java.lang.Integer</value-class>
<map-entry>
<key>Presentation Material</key>
<value>100</value>
</map-entry>
<map-entry>
<key>Software</key>
<value>101</value>
</map-entry>
<map-entry>
<key>Balloons</key>
<value>102</value>
</map-entry>
</map-entries>
</managed-bean>
<managed-bean>
<managed-bean-name>entryHandler</managed-bean-name>
<managed-bean-class>
com.mycompany.expense.EntryHandler
</managed-bean-class>
<managed-bean-scope>session</managed-bean-scope>
...
<managed-property>
<property-name>specialTypes</property-name>
<value>#{specialTypes}</value>
</managed-property>
...
</managed-bean>
...
</faces-config>
No surprises here. The new specialTypes property is configured exactly like the expenseTypes property described in Chapter 7. The third and final addition is a new method for getting the list of selection items. Note that the <h:selectItems> element in Example 8-4 is bound now to the currentChoices property instead of the expenseTypeChoices property: public List getCurrentChoices( ) {
List choices = new ArrayList( );
choices.addAll(getExpenseTypeChoices( ));
if (includeSpecial) {
choices.addAll(getSpecialChoices( ));
}
return choices;
}
}
The getCurrentChoices() method uses the getExpenseTypeChoices() method described in Chapter 7. If includeExtensions is true, it calls a similar method to include the extension types in the list along with the standard types. Finally, we must implement the setter method for the specialTypes property and the getSpecialChoices() method that returns a List containing SelectItem instances for the extension types: public void setSpecialTypes(Map specialTypes) {
this.specialTypes = specialTypes;
}
private List getSpecialChoices( ) {
if (specialChoices == null) {
specialChoices = new ArrayList( );
if (specialTypes != null) {
Iterator i = specialTypes.entrySet( ).iterator( );
while (i.hasNext( )) {
Map.Entry me = (Map.Entry) i.next( );
specialChoices.add(new SelectItem(me.getValue( ),
(String) me.getKey( )));
}
}
}
return specialChoices;
}
This should also look familiar from Chapter 7. JSF calls the setSpecialTypes() method with the Map created from the faces-config.xml managed bean declaration, and the getSpecialChoices() method creates a List with SelectItem instances based on the Map values and returns it. The effect of all this is that when the user clicks the Ext/Std button, the default ActionListener associated with the button handles the event in the Apply Request Values phase (because the immediate attribute is set to true) by invoking the toggleTypes( ) method and asking JSF to redisplay the same page without going through the Process Validations and Update Model Values phases. When the UISelectOne component for the expense types list evaluates its value binding in the Render Response phase, it invokes the getCurrentChoices() method, which includes or excludes the extension types depending on the value of the includeSpecial flag. 8.3.2 Triggering an Event by Changing a ValueWhen the user changes the value of an input component, a ValueChangeEvent is fired when the form is submitted. You have similar options for handling a ValueChangeEvent as you have for an ActionEvent: use a value change listener method binding or attach one or more ValueChangeListener to the component: <!-- Using a method binding expression -->
<h:selectBooleanCheckbox valueChangeListener="#{myBean.handleNewValue}" />
<!-- Using one or more listeners -->
<h:selectBooleanCheckbox>
<f:valueChangeListener type="com.mycompany.LogEventListener" />
<f:valueChangeListener type="com.mycompany.HandleNewValueListener" />
</h:selectBooleanCheckbox>
Two things make the JSF ValueChangeEvent less important than similar events in a traditional GUI framework: it fires only when the form is submitted (because that's when the server can detect the change), and JSF's mechanisms for validation and automatic model updates handle most of the typical use cases. That said, it's still useful for some features, especially if you know that your users use JavaScript-enabled browsers and are connected to the server via a high-speed connection so frequent requests don't cause performance problems. In this section, we look at how to use a ValueChangeEvent triggered by a change in a checkbox value to switch between the standard and extended report entry type choices. Example 8-6 shows the entry form page modified for this purpose. Example 8-6. Entry form area JSP page with a checkbox for extending the type choices (expense/stage4/entryFormArea.jsp)<%@ page contentType="text/html" %>
<%@ taglib uri="http://java.sun.com/jsf/html" prefix="h" %>
<%@ taglib uri="http://java.sun.com/jsf/core" prefix="f" %>
<f:view>
<h:form>
Title:
<h:inputText id="title" size="30" required="true"
value="#{reportHandler.currentReport.title}" />
<h:message for="title" />
<br>
Entry:
<br>
Date:
<h:inputText id="date" size="8" required="true"
value="#{entryHandler.currentEntry.date}">
<f:convertDateTime dateStyle="short" />
</h:inputText>
<h:message for="date" />
<br>
Type:
<h:selectOneMenu id="type" required="true"
value="#{entryHandler.currentEntry.type}">
<f:selectItems value="#{entryHandler.currentChoices}"/>
</h:selectOneMenu>
Extended Choices:
<h:selectBooleanCheckbox immediate="true" onchange="this.form.submit( );"
valueChangeListener="#{entryHandler.toggleTypes}" />
<h:message for="type" />
<br>
Amount:
<h:inputText id="amount" size="8" required="true"
value="#{entryHandler.currentEntry.amount}">
<f:convertNumber pattern="#,##0.00" />
<f:validateDoubleRange minimum="1"/>
</h:inputText>
<h:message for="amount" />
<br>
<h:commandButton value="Add"
disabled="#{reportHandler.addEntryDisabled}"
action="#{entryHandler.add}" />
</h:form>
<h:messages layout="table" globalOnly="true" />
<%-- Loop to verify that it works --%>
<%@ taglib uri="http://java.sun.com/jsp/jstl/core" prefix="c" %>
<ol>
<c:forEach items="${reportHandler.currentReportEntries}" var="e">
<li>Date: ${e.date}, Type: ${e.type}, Amount: ${e.amount}</li>
</c:forEach>
</ol>
</f:view>
The <h:commandButton> element is replaced with an <h:selectBooleanCheckbox> element in Example 8-6. Its immediate attribute is set to true, causing the ValueChangeEvent to fire in the Apply Request Values phase instead of in the Process Validations phase. This means that we can handle the event without causing any validation error messages to be displayed. The onchange attribute contains JavaScript that submits the form the checkbox belongs to when its value is changed, so that the user doesn't have to click on any button for the change to take effect. Finally, the valueChangeListener attribute binds the component to a value change listener method in the entryHandler bean. This method looks almost the same as the toggleTypes() method used for the Ext/Std button in Example 8-4, but it has a different signature: package com.mycompany.expense;
import javax.faces.context.FacesContext;
import javax.faces.event.ValueChangeEvent;
...
public class EntryHandler {
...
public void toggleTypes(ValueChangeEvent event) {
includeSpecial = !includeSpecial;
FacesContext.getCurrentInstance( ).renderResponse( );
}
...
}
A value change listener method is a method with a ValueChangeEvent as its single parameter and a void return type. The toggleType( ) method used here doesn't use the event at all. It just flips the includeSpecial flag, the same as the method used in the previous section. What's different is that it also tells JSF to jump straight to the Render Response phase by calling the FacesContext renderResponse() method. For an action method, this happens automatically, but for all other method binding method types you must do so explicitly when needed. The rest remains the same as when we used a button to trigger the type list changes. The event handling concepts and mechanisms that I've described in this chapter may take some time to truly understand, but when you do, they make sense given the nature of a web application with the client separated from the server. In the next chapter, we'll add to what you've learned here, looking at how to tell JSF to switch to a new view depending on the event-handling outcome. |
|
|
< Day Day Up > |
|