The nice thing about kickstart is that if you've ever installed Red Hat on a machine, you've created a kickstart config file without even knowing it. This file contains all the options that you entered during the install. After any Fedora Core- or Red Hat-based install, you should see your new kickstart config file (called anaconda-ks.cfg) in the root user's home directory /root/:
   # ls -la /root/an*
   -rw-r--r--    1 root root 1877 Dec 16 12:12 /root/anaconda-ks.cfg
You can also use Red Hat's GUI config tool to create a kickstart config file from scratch (see the Using the Red Hat Kickstart Configuration Tool section later in this chapter for details).
A kickstart or ks.cfg file is divided into four main parts:
The Install Command Area-This portion of the file has the configuration information and commands, such as the new system's settings, the install media source (CD, network, or hard drive based), the new system's firewall settings, root password, authentication configuration, new install versus upgrade, and so on. This area also contains information such as whether the drive is to be wiped clean before starting the install, what partition types and sizes are to be set up, whether the system will use the MBR for booting, and if you're setting up drive/partition level options like software RAID or LVM.
The New System Packages Area-This portion of the file lists all the RPM packages or metapackages (groups of packages) that are to be installed.
The Pre-Install Script-This portion contains shell or programming commands that you want to run before the install begins.
The Post-Install Script-This portion contains the shell or programming commands that run after the basic install, but before the end of the install or the reboot.
In short, this file has all the installation settings covered in Chapter 2. In fact, if you did an install on your machine, you should now have your own /root/anaconda-ks.cfg file that will enable you to install the same configuration settings on other machines. This anaconda-generated file is, essentially, your first kickstart template file. The next step is to back up your anaconda-ks.cfg file so that you can easily identify the original file and so that it won't be overwritten later:
   #  cd /root
   #  cp -a anaconda-ks.cfg ks-my-first-install.cfg
| Tip |
You can name these kickstart config files anything you want, but when you create boot disks later that will use them, by default anaconda looks for the file name ks.cfg on the media that you point it to. If you are running several different kickstart config files, it is wise to break away from the ks.cfg standard naming and use something such as ks-workstation-date.cfg so that you'll know exactly what file you're about to apply to a given system. |
Take a look at the following /root/anaconda-ks.cfg config file generated when I did a server load from CD. My added comments appear in boldface italics (# - The Install Command Area):
# Kickstart file automatically generated by anaconda.
# - The Install Command Area
# -----------------------------------------
Install
cdrom                                  #- <--- The install source
lang en_US.UTF-8
langsupport --default en_US.UTF-8 en_US.UTF-8

keyboard us
mouse alpsps/2 --device psaux --emulthree
xconfig --card "S3 ProSavage KM133" --videoram 31680 --hsync 1.5-48.5 -
vsync 40-70 --resolution 1024x768 --depth 16 --startxonboot --
defaultdesktop gnome                   # - <--- xconfig all one line...
network --device eth0 --bootproto dhcp # - <--- Network setup
rootpw --iscrypted $1$td8M3NHj$1S.0kU.Pz.rGT2VzZpRND/
firewall --enabled --port=http:tcp --port=ssh:tcp
authconfig --enableshadow --enablemd5
timezone America/Winnipeg
bootloader --location=mbr --append hdc=ide-scsi rhgb
# The following is the partition information you requested
# Note that any partitions you deleted are not expressed
# here so unless you clear all partitions first, this is
# not guaranteed to work
#clearpart --linux --drives=had
#part /boot --fstype ext3 --size=100 --ondisk=had
#part / --fstype ext3 --size=1024 --grow -asprimary
#part swap --size=514 -asprimary

#-Notice above that even if you do a fresh install, wipe all the
#-existing partitions and create new partitions, that this area gets
#-commended out in your anaconda-ks.cfg file. This is for safety
#-reasons. If someone tests their new ks.cfg file and doesn't quite
#-understand what they're doing, this will save them from nuking
#-their own system. DO NOT FORGET TO UNCOMMENT THESE IN
#- YOUR FINAL TEST INSTALL

# - New System Packages Area
# ---------------------------------------
%packages
@ kde-software-development  #- These are all meta packages
@ office                    #- or logical groupings of packages
@ kde-desktop
@ network-server
@ web-server
@ engineering-and-scientific
@ x-software-development
@ mail-server
@ dns-server
@ server-cfg
@ dialup
@ sound-and-video
@ sql-server
@ editors
@ admin-tools
@ system-tools
@ authoring-and-publishing
@ base-x
@ gnome-desktop
@ gnome-software-development
@ graphics
@ ftp-server
@ kernel-development
@ smb-server
@ development-tools
@ ruby
@ printing
@ games
@ text-internet
@ graphical-internet
vnc-server            #-These are the individual RPM
7squirrelmail          #- packages that were added on
postfix                #- through the GUI installer when I
tsclient               #- set up this server load.
elinks
vim-XII
xpdf
ethereal-gnome
xmms-skins
dhcp
mailman
xcdroast
shapecfg
redhat-config-boot
tftp-server
koffice
gtkam-gimp
grip
nmap-frontend
kdepim
kdegraphics
rdesktop
gnomemeeting
kernel-pcmcia-cs
mysql-server
grub
abiword
spamassassin
fsh
kernel
talk-server
kdemultimedia
php-mysql
amanda-server
ncftp
vnc
amanda-client
imap
quanta
telnet-server
redhat-switch-mail

#-Pre Install Script
#-----------------------t
%pre
echo Pre-Install bash commands go here...

#-Post Install Script
#--------------------------
%post
echo Post-Install bash commands go here...
echo
| Tip |
Sometimes manually adding RPMs to the Packages section will lead to dependency issues and can cause your automatic install to fail from dependency errors. To handle this and automatically install any required subdependency packages, you can add the --resolvedeps switch to the packages header like this: %packages --resolvedeps For more information on this topic, see Chapter 9 of Red Hat's online RH-EL3 Administration Guide documentation at www.redhat.com/docs/manuals/enterprise/RHEL-3-Manual/sysadmin-guide/ch-kickstart2.html. |
| Note |
Notice this file has no mention of the terms server or workstation, as in the original interactive Fedora Core installer. This is because these terms are just abstractions of the metapackages and RPMs or that define "groupings of groupings" of RPMs. The listing of packages in the config file example is the standard Server load, with a number of metapackages and RPMs added. These metapackages are all grouped logically and defined in the base comps XML file located on CD 1 in Fedora/base/comps.xml. You can see all of these metapackage names with the following command (typed as one line) while Fedora Core CD 1 is mounted: $ cat /mnt/cdrom/Fedora/base/comps.xml | grep \ <id | grep -v '\ -support' In these metapackages and groupings you see groups such as games and office as well as our groups of groups server and workstation-common. |
Now that you have an idea of what a kickstart config file looks like, the next step is to make this config file usable as a part of a network install boot disk.
| Note |
At Rackspace Managed Hosting, one "Geek Rites of Passage" for all new Linux system administrators is to load their own workstation without using any CDs. This is done by downloading a Red Hat boot disk image from the one-line Red Hat mirror content images directory, using dd to write it out to a floppy, and then performing a CD-less network-based install from our Red Hat mirror server. Many people do not realize that they can install most Linux distros totally over the Internet or a LAN with nothing more than a network boot floppy or other network-aware boot environment (such as a PXE NIC/LAN setup). For more information on using dd to write out floppy disk images, see the Creating Customized Boot Floppies section. |
Here are the lines in the ks.cfg file that we need to change to make the install pull the CD files from the network:
   install
   cdrom
   lang en_US.UTF-8
   langsupport --default en_US.UTF-8 en_US.UTF-8
   keyboard us
   .
   .
   .
   network --device eth0 --bootproto dhcp
   rootpw --iscrypted $1$td8M3NHj$1S.0kU.Pz.rGT2VzZpRND/
The following block of code shows the changes required to have the install look to a network-based ftp kickstart server:
   # TWW: 2004-02-22, Network install of the Fedora CD Media
   # files from my FTP server...
    install
    url --url ftp://ftp.example.com/pub/fedora/core/l/i386/os/
   lang en_US.UTF-8
   langsupport --default en_US.UTF-8 en_US.UTF-8
   keyboard us
   .
   .
   .
   network --device eth0 --bootproto dhcp
   rootpw --iscrypted $1$td8M3NHj$1S.0kU.Pz.rGT2VzZpRND/
Notice that first we've changed the type of install from a CD-ROM-based to a URL or network install. Also notice that we've defined the URL from which the new machine is to get its install files. (We have not yet set up that FTP file share, but will do so in the Creating a Kickstart Provisioning Server section later in this chapter.)
| Tip |
If you want to do your own network install of Fedora Core Linux from the Internet with nothing but a floppy and a PC, just go out to a Fedora mirror site, download the bootdisk.img and drvnet.img (or just the bootdisk.iso CD image), copy them to the correct media (more on this in the Creating Your Kickstart Provisioning Boot Media section), and boot off that media. You simply follow the prompts to do an FTP, HTTP, or NFS-based install, and point the install to one of the mirror sites, including the full path to the directory above the Fedora directory. For example, the full path to the Fedora directory (case matters, and all on one line) is Then point your manual floppy/CD network install to Whatever directory path you give it, it will expect to find the Fedora directory inside it. The same goes for Red Hat wanting the directory that houses the RedHat directory. |
The other "easy way" of creating a kickstart template file is via the Red Hat kickstart configuration GUI tool: redhat-config-kickstart. This tool is nice in that it gives you a GUI front end to that comps.xml file. Just take a peek inside that file and you'll want some form of abstraction. Trust me.
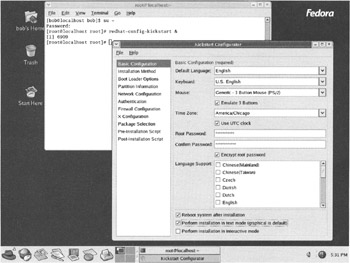
You can start Red Hat's kickstart configuration tool either from the command line (as shown in Figure 4-1) or by the clicking on Red Hat⇨System Tools⇨Kickstart.
| Note |
You do not have to be root to run the config file generation tool. It just is not in the $PATH of nonroot users, so Figure 4-1 shows how to start it after becoming root with su -. I also could have run it as user bob by simply running it by its absolute path of /usr/sbin/redhat-config-kickstart, or via the desktop menu Red Hat⇨System Tools⇨Kickstart. |
Although redhat-config-kickstart tool looks like the solution to all the headaches of manually playing with raw ks.cfg files, don't be fooled. This GUI utility has its shortcomings. First, it's not that stable and has problems reading existing ks.cfg files. GUI tools are nice to look at and occasionally handy for whipping up something quickly, but be careful.
| Caution |
Some Red Hat GUI tools do not work well, have problems reading existing config files, or in the worst cases (as with the apache config tool) can even overwrite your existing config file. Just be careful when using them and back up your original flat files before trying them out. |
With this caveat noted, this tool is very convenient for throwing together a base ks.cfg file without having to do a full install on a box. After using the tool to get started, you can open the new ks.cfg file in your favorite text editor and further refine and tweak it.
Although learning to use the tool is fairly easy, a complete breakdown of its usage is available online at Red Hat's EL3 Admin Guide documentation, Chapter 10, at www.redhat.com/docs/manuals/enterprise/RHEL-3-Manual/sysadmin-gulde/ch-redhat-conflg-kickstart.html.
Now that you have the base kickstart template file(s) set up and network ready, take a moment to name them accurately and organize them for easy retrieval. I've used my first template and the config tool to create a few specific OS loads (for example, desktops, workstations, and servers) for use throughout my company. Typically a directory of these ks.cfg files should be neatly organized to look something like this:
  ks-everything.cfg
  ks-IT-desktop_2004-02-16.cfg
  ks-IT-desktop_2004-02-20.cfg
  ks-my-first-install_2004-02-21.cfg
  ks-server-laptop-install_2004-02-22.cfg
  ks-workstation_2004-02-19.cfg
  ks-workstation_2004-02-20.cfg
| Tip |
Besides naming your files with descriptive names and date stamps, you should also consider keeping an internal comment-based change log so that you can track down problems to specific changes made to your ks.cfg file on specific dates. |
The next section shows you how to lock down your desktop and server loads by modifying these ks.cfg files to include some common "lock down best practices" settings. This will empower you to secure your OS loads by guaranteeing that all machines that you provision with this system will have your exact configuration settings.