The next few pages cover the basic tools and concepts that a Linux system administrator and troubleshooter needs, to get around the shell command-line interpreter-or just shell for short. If you are a Linux pro, you can probably skip ahead to some of the less common administration tools.
Knowing your way around the shell, for typing commands and traversing the file system, will make it possible for you to do most of the tasks laid out in the rest of this book. There are a few tricks you can use to get to and work with Linux through shell interfaces. I go through some ways of starting up, switching to, and working with shells in this section.
To troubleshoot a Linux system, you won't be able to stay with the graphical interfaces. Being able to get to a shell command-line interface, or more likely several interfaces at once, is a critical component of Linux system administration.
On a Linux system that has no graphical interface (or boots to runlevel 3), the shell is all you will have to start with. Login from your text-based login screen and the next thing you will see is a shell prompt. From a graphical user interface (GUI) desktop, however, there are lots of different ways of accessing shells and tricks for using shells efficiently.
The most common way to get to a shell from any Linux desktop is to open a terminal emulator window. Back in the old UNIX days, before graphical interfaces (or Linux) even existed, a character-based terminal was the only way to access UNIX-like systems. A terminal emulator, as the name implies, emulates one of those old character terminals when you open a terminal emulator window on the desktop. As an alternative, you can open a virtual terminal to get to a shell.
In Fedora Linux, a terminal emulator running on the desktop is simply referred to as a Terminal window. Unlike early editions of Red Hat Linux, Fedora and other recent Red Hat Linux systems don't have an icon on the desktop or panel for opening a Terminal window. However, there are still lots of ways to get to one.
Here are a few ways to open the default Terminal window from a KDE (konsole) or GNOME (gnome-terminal) desktop:
Ctrl+t- From the KDE desktop, click anywhere on the desktop background, then press Ctrl+t.
Desktop menu- Right-click on the GNOME desktop background to see the desktop menu. Then select Open Terminal.
Red Hat menu- Click on the Red Hat menu, then select System Tools⇨Terminal.
Figure 6-1 shows two Terminal windows. The top one is the Konsole window (konsole command) and the lower one is the GNOME Terminal window (gnome-terminal command).
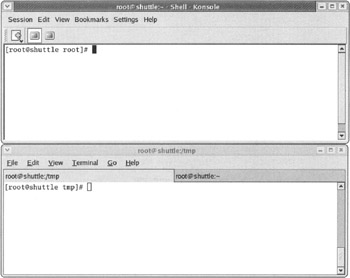
Each of the Terminal windows shown currently has two shell interfaces open. On the Konsole window, the small terminal icons each represent a different shell, while the GNOME Terminal window has a tab representing each shell. The prompt in each window shows the user you are logged in (as root), the name of your local computer (shuttle, in this case), and the name of the current directory (/root and /tmp, respectively).
There are other terminal windows that are less commonly used. The xterm command launches the classic X terminal emulator window. The KDE kterm terminal window offers additional multilingual support. Both xterm and kterm allow many options for changing colors, fonts, and other attributes. However, those features are not selectable from menus on the window, as they are with Konsole and GNOME Terminal windows.
Tips on using Terminal windows are described a bit later. Besides the default bash shell, there are other different shells available (which are also described a bit later in this chapter).
Another way to get to a shell from Linux is by using virtual terminals. When you first boot Linux, six virtual terminals are started, offering you six text-based login screens. If you start Linux in graphical mode (the default runlevel 5), it will typically use a seventh virtual terminal.
You can switch to different virtual terminals from any Linux desktop, using the Ctrl+Alt+function key sequences or one of several virtual-terminal-switching commands (such as chvt or switchto). The number of the virtual terminal corresponds to the function key you use to switch, such as Ctrl+Alt+F1 (virtual terminal 1), Ctrl+Alt+F2 (virtual terminal 2), Ctrl+Alt+F3 (virtual terminal 3), and so on. From any nongraphical virtual terminals (1 to 6), you can drop the Ctrl key. For example, you could use Alt+F7 to get back to your X desktop.
| Note |
Use the Alt key from the left side of the keyboard. |
To use either the chvt or switchto commands to change to another virtual terminal, follow the command with the number of the virtual terminal. For example:
# chvt 3
This changes to virtual terminal 3. The chvt and switchto commands are most useful at times when some application may have taken over your function keys.
The programs run in virtual terminals need not be purely text based. Programs that have been implemented using the new curses (ncurses) library routines can offer menu-driven interfaces that run in virtual terminals and Terminal windows. You can use Tab and arrow keys to move around and make selections. Examples include redhat-config-printer-tui and redhat-config-network-tui (the tui stands for text user interface) to see text-based interfaces for printers and network interfaces.
In this chapter, I'm focusing on the gnome-terminal and konsole terminal emulation windows because these are the two default Terminal windows used with GNOME and KDE desktop environments, respectively. Of course, once a Terminal window is open, you can just type the commands you want and not fuss about it. However, here are a few tips that might make using your Terminal window more pleasant:
Multiple shells-You can have multiple shells running in the same Terminal window. Figure 6-1 shows a Konsole window with terminal icons representing multiple shells and a GNOME Terminal window with a tab displayed for each open shell.
Multiple shells in one Terminal window can provide a convenient way to keep track of a lot of programs running at the same time. You might want separate shells open to compile software, read a man page, tail a log file, and edit a text document, for example. Here's how to open multiple shells in GNOME and KDE Terminal windows:
GNOME-With the GNOME Terminal window selected, press Shift+Ctrl+t to open a shell in a new tab. Click the tab you want, to go back and forth between the tabs. Press Shift+Ctrl+n to open a new Terminal window.
| Note |
There are also keyboard shortcuts to move among tabs in the GNOME Terminal window. Use the Alt key plus a number to go to a particular tab (such as Alt+1, Alt+2, or Alt+3 to go to tabs 1, 2, or 3, respectively). To step through tabs, press Ctrl+PageUp to go to the previous tab or Ctrl+PageDown to go to the next tab. |
KDE-In the KDE Konsole Terminal window, click the plus sign (+) icon in the menu bar. A new terminal icon appears, representing the new shell. Click the different icons to go between these shells.
Scrolling settings-If you have ever had an output that you wanted to read scroll past you on the screen, you might be interested in the Scrollback feature. For the GNOME Terminal window, you can edit your profile (click Edit⇨Current Profile, then select the Scrolling tab) to set the number of lines of output that you can scroll back in the Terminal window. The more lines that are saved for scrollback, the more memory in kilobytes is needed to store that information. Setting the scrollback value in lines or kilobytes will automatically change the amount of the other value (the more lines you save, the more memory is required).
In the Konsole window, you can search back through all scrolled output, to find the text you are looking for. Click Edit⇨Find in History and type the text you are looking for into the search box.
Changing font size-If you are having trouble reading some text, you can change the font size in the Terminal window. In the GNOME Terminal, press Shift+Ctrl++ to zoom in to a larger font or Ctrl+- (Ctrl and a minus sign) to zoom out to a smaller font. In Konsole, click Settings⇨Font, then select the font size you want (Normal, Tiny, Small, Medium, Large, or Huge). Or, in Konsole, choose Custom to select a particular font style and size.
Changing colors-You can change the default black text on white background in both Konsole and GNOME Terminal windows. In Konsole, click Settings-Schema, then choose a color combination. In GNOME Terminal, click Edit⇨Current Profile, then select the Colors tab. By default, GNOME Terminal will use colors for the Terminal window, based on the current system color scheme. As an alternative, you can select from among several built-in schemes or create your own.
When it comes to performance, a single GNOME Terminal will consume more memory than a single Konsole Terminal. However, the GNOME Terminal will use the same process for each new window and increase memory usage only slightly, while each new Konsole window starts a new process and consumes the same amount of memory again.
To improve performance of GNOME Terminal, reduce the scrollback buffer. Not only do large scrollback buffers consume memory, but a process that is doing a lot of text scrolling in a Terminal window (such as a kernel build or listing a large file) can greatly harm overall performance. Listing a large text file to the screen on a virtual terminal (no X or Terminal window overhead) might take only one-tenth the amount of time to complete. On an xterm, text scrolling will be done in about half the time of that required on a Konsole or GNOME Terminal window.
Features that drain performance in the GNOME Terminal window include using background images or transparent backgrounds (see the Effects tab on the GNOME Terminal Current Profile window). A plain, solid-colored background will yield best performance.
While bash is the default shell used in Fedora Linux, it is not the only one available. There are more than a half dozen different types of shells included with Fedora. Each shell includes some different features and different configuration files. Shells that come with Fedora and most Red Hat Linux systems include the following:
ash-The ash shell is a copy of the Bourne shell (sh) that was part of the Berkeley UNIX distribution. While ash includes many features that are in the sh shell, it is more lightweight than sh.
bash-The bash shell is the default shell used with Fedora and most Linux systems. It was originally created to be compatible with the Bourne shell (sh), but has since added features from C shell (csh) and Korn shell (ksh), as well as some features of its own. Bash configuration files include $HOME/.bashrc (for each user) and /etc/bashrc (for all users).
ksh-The Korn shell (ksh) was created at AT&T and became the command predecessor to the Bourne shell (sh). In Linux, the pdksh shell (which is linked to ksh) is the open source version of ksh. When ksh is started as a login shell, shell settings are read from the user's $HOMF/.profile, as well as from the system /etc/profile file.
csh-The C shell (csh) was the default shell commonly used with Berkeley UNIX systems (including early UNIX versions from Sun Microsystems). The tcsh shell is the open source version of csh that comes with most Linux systems (although you can call it from csh as well). Configuration settings for the C shell are stored in $HOME/.tcshrc (for each user) and /etc/csh.cshrc and /etc/csh.login files (system wide).
sh-The Bourne shell (sh) was the standard shell used in early UNIX systems. In Linux, the sh command actually runs the bash command in sh compatibility mode.
| Note |
The sh-compatibility mode in bash is not completely compatible with sh. If you request a bash feature that is not in sh, the feature will not fail (as it would in sh) if bash is able to provide it. Also, some sh features, such as how braces are handled, are done differently in bash. Start sh with the +B option if you need to use the Linux sh in a way that is completely compatible with the traditional sh shell. |
zsh-The Z shell (zsh) is similar to the Korn shell, with many enhancements added. Extra features in zsh include spelling correction, programmable command completion, autoloading of shell functions, loadable modules, and an FTP client, to name a few. To add setting to be used by zsh, you can use several files in the user's home directory (.zshrc.zwc, .zshrc, .zshenv, .zproflie, .zlogin, and .zlogout) and in /etc (zshenv, zprofile, zshrc, zlogin, and zlogout).
When you add a user in Fedora Linux, bash is assigned as the default shell. You can change the default shell for a particular user, by running usermod with the -s option. For example:
# usermod -s /bin/tcsh jjones
This example changes the default shell (the one that starts when you open a Terminal window or virtual terminal) to /bin/tcsh for the user jjones. When you first add a user, you can also indicate that the user be assigned a particular default shell. The following example adds a user named tsmith and assigns the ash shell to this user.
# useradd -s /bin/ash tsmith
To change the default shell (for example, to csh) for all users that you add in the future, type the following.
# useradd -D -s /bin/csh
Because bash is the default shell (and used by most people with Linux), for a quick review of how to tune your shell to suit the way you work, I focus on the bash shell.
Each time a bash shell starts up, it reads several configuration files. If there are any options you want to add to bash, you can add them to one of those files. In order, it reads the following files and directories (assuming they exist):
/etc/bashrc-System-wide bash configuration file, read by shells started by anyone on the system. This file sets the default umask to 022, so files created from the shell have 644 permissions and directories have 755 permissions). It also sets the terminal to an appropriate value (such as xterm or linux) and the command-line prompt (to [user@host curr_dir], showing the user name, host name, and current directory). You can override any of these values in your personal .bashrc file.
/etc/profile.d-This directory contains files that set configuration information for different applications that are needed for each type of shell you run. For example, the colorls.csh and colorls.sh define the colors in which different objects appear when you type an Is from the screen. You can add your own files, or modify existing files if you don't like the way certain features are handled.
$HOME/.bashrc-Each home directory can contain its own .bashrc file (notice the leading dot in the filename). The file is the best place to put any personal settings you want to use for your shell environment.
Here are some examples of the kinds of settings you might want to add to your personal .bashrc, system-wide /etc/bashrc, or application-specific /etc/profile.d/ file.
   set -o vi
   set -o notify
   alias rm-"rm -i"
   alias c="tput clear"
   alias la="ls -Al"
   export D="/home/chris/documentation/book1"
Each of the commands just shown is an example of the type of command you can add to a shell configuration file (permanent) or type directly into the shell (temporary). The first two set commands assign the vi command to be used to edit your command lines and history (emacs is the default) and cause the shell to notify you immediately when a background job completes (the default is to tell you at the next command prompt).
The alias commands rm, c, and la set what happens when those commands are run. The rm -i causes you to be prompted before removing each file, tput clear clears your screen, and ls -Al prints a long listing of files, including dot(.) files. The export example is simply used here to set a long path name to a single variable. You could then type cd $D to go to the /home/chris/documentation/book1 directory or the command vi $D/index.html to edit the index.html file from that directory.
There are many other options you might want to set to configure your shell. I recommend that you refer to the bash man page for details on built-in commands and options you can use.
Again, if you are not familiar with a shell from Linux, you should really get an introductory Linux book to learn the basic commands to use. Those commands should include cat, chgrp, chmod, chown, cd, ls, pwd, mv, rm, cp, mkdir, rmdir, ln, touch, less, and probably a few dozen others, as suits the job you need to do with Linux.
Here are a few commands that you as a system administrator engaged in troubleshooting Linux will find invaluable.
With most configuration and log files still stored as plain text in Linux, the ability to search, sort, and list information from these files is a critical skill for Linux troubleshooters. The sort, grep, tail, head, and find commands are valuable tools for troubleshooting text files in Linux.
The sort command can be used to sort lines of text in alphabetical order. For example, to alphabetically sort the users on your system, you could type the following.
# sort /etc/passwd | less
You can also sort by fields in a file, by identifying the field separator and the field you want to sort by. In the following example, the /etc/passwd file is sorted by the contents of the third field (the UID field).
# sort -t :--key=3 /etc/passwd | less
The grep command is a handy troubleshooting tool because it provides a very powerful means of searching through a large number of text files for particular text. For example, let's say that 1 just removed a computer from the network named duck and want to find all of my configuration files that have a reference to it. The following command suppresses error messages (-s) and recursively (-r) checks all the files beneath the /etc directory for the string duck.
# grep -s -r duck /etc
Options that I commonly use with grep include -i (ignore case), -n (list the line number on which the term occurs), and -w (list only if term appears as a separate word). I also commonly use regular expressions to more precisely define what I am looking for. For example, ^duck or duck$ would find only those lines in which the word duck appears at the beginning or end of a line, respectively.
A period is another handy character for indicating to match on any character. For example, let's say that you have done such a good job troubleshooting your Linux systems that you have time to do a crossword puzzle. Here's how you could search the dictionary for a five-letter word beginning with l and ending with ty:
   # grep ^l..ty$ /usr/share/dict/words
   lofty
   lusty
A lot of times when you are looking at log files or, for that matter, any file that is getting new information all the time, you might want to watch information being added to that file in real time. The tail command is a great way to do that. I often use the tail command when I am troubleshooting a particular feature (with debugging turned on) and want to watch log messages as they progress. Here's an example:
# tail -f /var/log/messages
Without the -f option, the default of the tail command is to just list the last ten lines of the selected file. With the -f, this command waits for more lines to be written to the file and lists them as they arrive. Conversely, if you want to see only the first ten lines of a file, you can use the head command.
# head /var/log/messages
The find command is useful for finding files by their name, rather than by content. After finding the files you want, based on the parameters you choose, you can also act on the files you find, by executing (-exec) another command on the find command line. Here are some examples.
The previous example finds all files in the /var/log directory and its subdirectories. Next, the command line searches (grep) the files that are found for the string "ip_forward" and lists the results. If you are troubleshooting disk space problems, you can use find to look for files over a particular size. For example:
   # find /home -size +1024000k -exec du -h '{}' \ ; -print
   1.1G /home/chris/movie1.avi
   1.3G /home/chris/movie2.avi
In the previous example, find searches the /home directory for files over 1,024,000KB. Then it executes the du -h command. This allows you to see any files that are over about 1GB and print that information in a human-readable output. By following this format you can also substitute any command you want for the du -h to act on the files found. For example, you could remove (rm), move (mv), or change permissions (chmod) of the files found.
There are many other useful options you could use with the find command. To check for a certain type of file, use -type followed by f (file), d (directory), l (symbolic link), b (block special device), c (character special device), or s (socket). The -xdev prevents the find command from searching directories on other file systems (which is useful if you have NFS files systems or CDs mounted, which you don't want to search).
If you are coming on to troubleshoot a system that you didn't set up, it's a good idea to do just a few quick checks to find out basic information about the system. Here are a few commands you can run.
The uname command can tell you the name of your kernel (Linux), name of your computer, the kernel release it is running, the date the kernel was created, the processor type and hardware platform on the computer, and the name of the computer operating system:
   # uname -a
   Linux shuttle.linuxtoys.com 2.4.22-1.2115.nptl #1 Wed Oct 29
        15:42:51 EST 2003 1686 i686 i386 GNU/Linux
To see the amount of disk space available on all your mounted partition, type the df -h command as follows.
   # df -h
   Filesystem       Size    Used    Avail    Use%    Mounted on
   /dev/hda6         59G     52G     4.1G     93%    /
   /dev/hda1         99M    6.3M      88M      7%    /boot
   /dev/hda2        9.7G    7.4G     1.8G     81%    /mnt/backup
   /dev/hda5        4.9G    1.2G     3.5G     25%    /mnt/isos
   none             252M       0     252M      0%    /dev/shm
To see all the partitions available on all the hard disks (including those that are not currently mounted), use the fdisk -l command.
   # fdisk -l

   Disk /dev/hda: 80.0 GB, 80026361856 bytes
   255 heads, 63 sectors/track, 9729 cylinders
   Units = cylinders of 16065 * 512 = 8225280 bytes
      Device   Boot    Start     End     Blocks     Id   System
   /dev/hda1     *         1      13     104391     83   Linux
   /dev/hda2              14    1288   10241437+    83   Linux
   /dev/hda3            1289    1364     610470     82   Linux swap
   /dev/hda4            1365    9729   67191862+     f   Win95 Ext'd (LBA)
   /dev/hda5            1365    2001    5116671     83   7Linux
   /dev/hda6            2002    9729   62075128+    83   Linux
To tell if the computer was booted into graphical mode (runlevel 5), text mode (runlevel 3), or some other run level, type the runlevel command. This example shows that the previous state was N (none) and the current state is 5 (graphical). Since there was no previous run level, the computer most likely booted to runlevel 5.
   # runlevel
   N 5
To take a quick check of your hardware, run the lspci command. This will show you what PCI hardware is installed on your computer.
   # lspci
   00:00.0 Host bridge: Intel Corp. 82845G/GL [Brookdale-G]
        Chipset Host Bridge (rev 03)
   00:01.0 PCI bridge: Intel Corp. 82845G/GL [Brookdale-G]
        Chipset AGP Bridge (rev 03)
   00:ld.0 USB Controller: Intel Corp, 82801DB USB (Hub #1)
        (rev 02)
   00:1d.1 USB Controller: Intel Corp. 82801DB USB (Hub #2)
        (rev 02)
   00:1d.2 USB Controller: Intel Corp. 82801DB USB (Hub #3)
        (rev 02)
   00:1d.7 USB Controller: Intel Corp. 82801DB USB2 (rev 02)
   00:1e.0 PCI bridge: Intel Corp. 82801BA/CA/DB/EB PCI Bridge
        (rev 82)
   00:1f.0 ISA bridge: Intel Corp. 82801DB LPC Interface
        Controller (rev 02)
   00:1f.1 IDE interface: Intel Corp. 82801DB Ultra ATA Storage
        Controller (rev 02)
   00:1f.3 SMBus: Intel Corp. 82801DB/DBM SMBus Controller
        (rev 02)
   00:1f.5 Multimedia audio controller: Intel Corp. 82801DB
        AC'97 Audio Controller (rev 02)
   01:00.0 VGA compatible controller: nVidia Corporation NV34
        [GeForce FX 5200] (rev a1)
   02:06.0 Ethernet controller: Realtek Semiconductor Co., Ltd.
        RTL-8139/8139C/8139C+ (rev 10)
   02:07.0 FireWire (IEEE 1394): VIA Technologies, Inc. IEEE
        1394 Host Controller (rev 46)
   02:08.0 Multimedia video controller: Brooktree Corporation
        Bt878 Video Capture (rev 11)
   02:08.1 Multimedia controller: Brooktree Corporation Bt878
        Audio Capture (rev 11)
As an alternative, you can use the dmesg command. Besides showing your PCI devices, dmesg also shows information about other hardware and drivers as they are detected and accessed by the kernel.
   # dmesg | less
   Linux version 2.4.22-1.2115.nptl
   (bhcompile@daffy.perf.redhat.com) (gcc version 3.2.3 20030422
   (Red Hat Linux 3.2.3-6)) #1 Wed Oct 29 15:42:51 EST 2003
   BIOS-provided physical RAM map:
   BIOS-e820: 0000000000000000 - 000000000009fc00 (usable)
   BIOS-e820: 000000000009fc00 - 00000000000a0000 (reserved)
   BIOS-e820: 00000000000f0000 - 0000000000100000 (reserved)
        .
        .
        .
   PCI: PCI BIOS revision 2.10 entry at Oxfb5d0, last bus=2
   PCI: Using configuration type 1
   PCI: Probing PCI hardware
   PCI: Probing PCI hardware (bus 00)
   PCI: Ignoring BARO-3 of IDE controller 00:1f.1
   Transparent bridge - Intel Corp. 82801BA/CA/DB/EB PCI Bridge
   PCI: Using IRQ router PIIX/ICH [8086/24c0] at 00:1f.0
   PCI: Found IRO 11 for device 00:1f.1
   PCI: Sharing IRO 11 with 00:1d.2
   PCI: Sharing IRO 11 with 02:06.0
         .
         .
         .
A recommended technique for debugging problems with hardware detection is to direct the output of dmesg to a file (dmesg > boot.msg), so that the contents of this file can be e-mailed or posted to someone who can help you figure out the problem.
You can find out about your current user environment, using some of the following commands.
Using the set command (piped to less), you can step through the environment variables set for shell environment.
   # set | less
   BASH=/bin/bash
   BASH_ENV=/root/.bashrc
   BASH_VERSION='2.05b.0(1)-release'
   COLORS=/etc/DIR-COLORS.xterm
   COLORTERM=gnome-terminal
   COLUMNS=110
   DISPLAY=:0.0
   HISTFILE=/root/.bash_history
   HISTFUESIZE=1000
   HISTSIZE=1000
   HOME=/root
   HOSTNAME=shuttle.linuxtoys.com
The previous code example shows only a small part of the output from the set command. Here you can see information about your bash shell, definitions of how colors are used in terminal windows, the width of your Terminal window (in columns), and your X display number (0.0). It also shows information about your command-line history, your home directory, and host name.
You can type the groups command to see what groups you are in.
   # groups
   chris wheel
You can use the who command to find out about your current session. The output of who am i shows your username, the terminal where you are logged in (a terminal window in this case), the date and time the terminal session started, and (if applicable) the display screen you are currently on (:0.0).
   # who am i
   chris   pts/2 Mar   19 14:30 (:0.0)
To see more information about your user and group accounts, type the id command.
   # id
   uid=500(chris) gid=500(chris) groups=500(chris)
If you are troubleshooting a computer that has multiple users with login accounts, you might want to list information about those users. Here are some suggestions on how to do that.
With the lastlog command you can see when a person last logged into the computer and the terminal device they used to login on. Many of the users should be listed as Never logged in because they are administrative logins that don't have valid shell accounts. So a login date listed for lp or bin accounts would probably indicate a break-in.
   # lastlog | less
   Username           Port    From            Latest
   root               pts/3   duck Sun Mar 21 21:24:22 -0800 2004
   bin                                        **Never logged in**
   daemon                                     **Never logged in**
   adm                                        **Never logged in**
   lp                                         **Never logged in**
   sync                                       **Never logged in**
   chris              tty4         Fri Mar 19 15:41:46 -0800 2004
   robby              :0           Fri Jan 23 22:15:03 -0800 2004
   two                tty1         Thu Jan 22 16:24:26 -0800 2004
Using the finger command, you can see who is logged in and actively working at the moment. Notice that jimh has been inactive for 2 days. There are two root logins that have been inactive for over 3 and 6 hours respectively. The other two root logins are currently active. (You can run the pinky command to get similar output.)
   # finger
   Login     Name      Tty     Idle   Login Time   Office Office Phone
   jimh      Jim Hall  tty4     2d    Mar 19 15:41
   root      root      tty2    3:36   Mar 19 14:29
   root      root      *:0            Mar 18 12:10
   root      root      pts/2          Mar 19 14:30 (:0.0)
   root      root      pts/3   6:38   Mar 21 21:24 (duck)
Again, there are hundreds of commands you will want to use over time. I recommend getting a basic text on Linux or UNIX use and administration, to get more information on how to use the shell and shell commands.