Journaling file systems, excellent hardware probing, and sensible shutdown procedures have gone a long way toward taking the adventure out of managing your hard disks and the file systems that are stored on them in Linux. There are times, however, when something goes wrong or you want to do more than just sit back and let Linux run the show alone.
You might not be happy just sticking with the defaults when there are some performance gains to be had. Or you might want to get that extra bit of life out of your laptop's battery by better controlling when idle disks are spun down or when nonessential services are turned off. This chapter will help you look for trouble (and opportunities) when it comes to tuning and working with your hard disks, file systems, and battery power.
Much of what was once done manually to set up file systems in Linux can now be done automatically when you install most major Linux distributions. During installation, your hard disks are probed and configured based on:
Hard disk type-Linux determines the type of hard disk you are using and tries to set appropriate parameters for operation (data transfer modes, read or write-caching, 16- or 32-bit I/O support, and so on). Linux usually chooses workable hard disk settings, but allows you to change those settings if you like. (Ways of checking and changing hard disk settings are described in the Checking and Tuning Your Hard Disk section later in this chapter.)
Partitioning-The Linux installation process can automatically divide your hard disk into appropriate partitions or give you the opportunity to divide your hard disk yourself. During installation, Fedora and other Red Hat Linux systems offer Disk Druid to partition your disk. After your computer is installed, you can use tools such as fdisk to add, delete, and modify partitions.
File system types-Each disk partition is assigned a file system type and is structured in such a way that Linux can access the files, directories, devices, and other components that make up the file system. The ext3 file system is the default for Fedora and other Red Hat Linux systems, while Windows systems typically contain FAT, VFAT, or NTFS file systems. There are also a handful of specialty file systems you can use, such as iso9660 (the standard for CD-ROM file systems).
Instead of stepping through how to partition your disk and assign file systems during installation, we will go through different methods of troubleshooting problems that can arise later with your disks and file systems. Assuming that you are starting with an installed Fedora or Red Hat Linux system and you want to fix some problems with it, we're going to start by taking a look at what you have installed on your system.
To see what partitions and file systems are configured on your computer, with Linux running perform the following steps from a Terminal window:
Run the fdisk command to list information about your hard disk partitions, as follows:
#fdisk -1
Disk /dev/hda: 6505 MB, 6505/12640 bytes
255 heads, 63 sectors/track, 790 cylinders
Units = cylinders of 16065 * 512 = 8225280 bytes

   Device Boot    Start    End   Blocks   Id   System
/dev/hda1   *         1     13   104391   83   Linux
/dev/hda2            14    766  6048472+  83   Linux
/dev/hda3           767    790   192780   82   Linux swap
This example shows a relatively small (6505MB or about 6GB) IDE hard disk (/dev/hda). That disk is partitioned into three parts: /dev/hda1 is an ext3 file system (Id 83) that starts at cylinder 1 and ends at cylinder 13 (104,391 blocks). The asterisk shows that it is a bootable file system. The next partition (/dev/hda2) is a much larger ext3 partition (6,048,472 blocks). The final partition is a swap partition (Id 82) that consists of 192,780 blocks.
Your fdisk output will almost surely be of a different size. Here are some other ways that it might vary:
Disk name-The type of hard disk you have will be reflected in the disk device names you see. The hda stands for the first (1) IDE hard disk (hd). Other IDE hard disks would be named hdb, hdc, and so on. SCSI disks are named /dev/sda, /dev/sdb, and so on. A RAID device would look something like this when displayed from fdisk:
  Device  Boot    Start    End   Blocks   Id   System
/dev/hda1   *         1     13   104391   fd   Linux raid autodetect
File system types-In most cases, you will see ext3 (Id 83) and swap (82) file systems assigned to partitions. If you have a system where you can dual boot with Windows, you might also see HPFS/NTFS (Id 7), WIN95 FAT32 (Id b), FAT, or DOS 16-bit (Id 6). To see a complete list of available file system types, you can type the l option within fdisk as follows:
#  fdisk /dev/hda
Command (m for help): 1
 0 Empty         1c Hidden Win95 FA   70 DiskSecure Mult  bb Boot Wizard hid
 1 FAT12         1e Hidden Win95 FA   75 PC/IX            be Solaris boot
 2 XENIX root    24 NEC DOS           80 Old Minix        c1 DRDOS/sec (FAT-
 3 XENIX usr     39 Plan 9            81 Minix / old Lin  c4 DRDOS/sec (FAT-
 4 FAT16 <32M    3c PartitionMagic    82 Linux swap       c6 DRDOS/sec (FAT-
 5 Extended      40 Venix 80286       83 Linux            c7 Syrinx
 6 FAT16         41 PPC PReP Boot     84 OS/2 hidden C:   da Non-FS data
 7 HPFS/NTFS     42 SFS               85 Linux extended   db CP/M / CTOS / .
 8 AIX           4d ONX4.x            86 NTFS volume set  de Dell Utility
 9 AIX bootabl   4e QNX4.x 2nd part   87 NTFS volume set  df BootIt
 a OS/2 Boota    4f QNX4.x 3rd part   8e Linux LVM        e1 DOS access
 b Win95 FAT32   50 OnTrack DM        93 Amoeba           e3 DOS R/O
 c Win95 FAT32   51 OnTrack DM6 Aux   94 Amoeba BBT       e4 SpeedStor
 e Win95 FAT16   52 CP/M              9f BSD/OS           eb BeOS fs
 f Win95 Ext'd   53 OnTrack DM6 Aux   a0 IBM Thinkpad hi  ee EFI GPT
10 OPUS          54 OnTrackDM6        a5 FreeBSD          ef EFI (FAT-12/16/
11 Hidden FAT1   55 EZ-Drive          a6 OpenBSD          f0 Linux/PA-RISC b
12 Compaq diag   56 Golden Bow        a7 NeXTSTEP         f1 SpeedStor
14 HiddenFAT16   5c Priam Edisk       a8 Darwin UFS       f4 SpeedStor
16 HiddenFAT16   61 SpeedStor         a9 NetBSD           f2 DOS secondary
17 HiddenHPFS/   63 GNU HURD or Sys   ab Darwin boot      fd Linux raid auto
18 AST SmartSl   64 Novell Netware    b7 BSDI fs          fe LANstep
1b HiddenWin95   65 Novell Netware    b8 BSDI swap        ff BBT
Command (m for help): q
After you exit from fdisk, you can try listing the file systems that are in use or currently available on the system by typing cat/proc/filesystems. Note that this doesn't necessarily mean that a file system of that type is currently mounted. Also, many other file system types may be available as loadable modules. You can find some of those file system type modules in the directories in Fedora: /lib/modules/*/kernel/fs and /lib/modules/*/unsupported/fs.
Check the size of each partition and how it is mounted on the file system with the df command:
# df -h
Filesystem      Size   Used Avail Use% Mounted on
/dev/hda2       5.7G   3.3G  2.2G  61 % /
/dev/hda1        99M   6.6M   88M    8% /boot
none             30M      0   30M    0% /dev/shm
Notice here that the /dev/hda2 partition is mounted at the root of the file system (/). The /dev/hda1 partition is mounted on /boot. The swap partition is represented by the /dev/shm device. It is possible that some partitions listed from fdisk are not shown by df. That's because partitions are only mounted if they are configured to mount automatically at boot time, configured to mount when inserted (such as with a CD), or if they were mounted manually later. For example, if you installed Fedora on a hard disk that contains a Windows partition (so you can dual boot), the Windows partition will not automatically be mounted in Fedora.
To see what partitions are being mounted automatically at boot time, display the contents of the /etc/fstab file:
# cat /etc/fstab
LABEL=/     /              ext3    defaults        1 1
LABEL=/boot /boot          ext3    defaults        1 2
none        /dev/pts       devpts  gid=5,mode=620  0 0
none        /dev/shm       tmpfs   defaults        0 0
none        /proc          proc    defaults        0 0
/dev/hda3   swap           swap    defaults        0 0
/dev/cdrom  /mnt/cdrom     udf,iso9660 noauto,owner,kudzu,ro 0 0
/dev/hdc4   /mnt/zip       auto    noauto,owner,kudzu 0 0
/dev/fd0    /mnt/floppy    auto    noauto,owner,kudzu 0 0
There are three kinds of file systems you can see in this listing of the /etc/fstab file:
Automatically mounted file systems-The /and /boot partitions are automatically mounted by default when the system boots. That's because by default, all ext3 file systems listed in this file are mounted at boot time (as are any file systems that are not listed as noauto). 1 in the fifth field indicates that a file system needs to be dumped. The number 1 in the sixth field indicates that a file system check should be done on the root file system (/) first, 2 in the sixth field for the /boot file system indicates that it should be checked after the root file system.
Pseudofile systems-The pts, shm, and proc file systems are actually pseudofile systems (that is, they do not represent real disk partitions).
Manually mounted file systems-With a noauto option listed in the fourth field, the devices listed are not automatically mounted at boot time. The noauto option is useful for removable media, such as the CD-ROM, Zip, and floppy disk drives shown in the example.
Having an entry in the /etc/fstab file makes it possible for the mount command to mount the removable medium later with simply the device name (mount/dev/cdrom) or mount point (mount/mnt/cdrom) as an argument. The rest of the options are taken from the f stab entry.
If you are using the GNOME desktop (which is the default), by default CD and DVD media are automatically mounted when you insert one of those disks into a drive. To see, and possibly change, this behavior, click Preferences ⇨CD Properties from the Red Hat menu. Figure 9-1 shows an example of the window that appears.
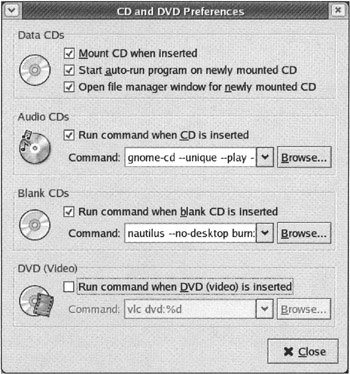
Figure 9-1: Set whether CDs are automatically mounted upon insertion.
As you can see from the top check box, by default a data CD will be mounted (on /mnt/cdrom) if you don't change this preference. This feature (referred to as magicdev) can also otherwise react to the content of the CD or DVD by playing an audio CD or movie DVD or by opening a blank CD so you can write on it (that is a nice feature of nautilus, by the way).
Another way you can have disks and partitions mounted automatically is with the automount feature. With automount, by changing to a mount point (or subdirectory) of a medium that is configured to automount, the device will be automatically mounted. That way, the medium is only mounted when it is needed.
Fedora and Red Hat Linux systems offer two different packages for implementing automount. The Autofs automounter (autofs package) is configured in the /etc/auto.master and /etc/auto misc files. It is started by default from the autofs runlevel script. The BSD automounter (am-utils package) is configured in the /etc/amd.conf file and started with the amd runlevel script. Type man autofs or man amd for further information.
Now that you have some idea of how the file systems and partitions are set up on your computer, let's go through some related troubleshooting issues that may come up.
Here are some tips for troubleshooting the partitions and file systems on your hard disks.
If you don't get a GRUB boot screen when you try to boot from hard disk (and are expecting one), it could be that the master boot record is corrupted. You can reload the master boot record by booting from a rescue CD (assuming Linux is installed on the first IDE hard drive). Here's how:
Reboot your computer with the first CD in the installation set for Fedora or Red Hat Linux in the CD drive.
When you see the boot prompt, type:
# linux rescue
Add information about your language and keyboard as requested.
Choose whether or not to start the network interfaces (you probably don't need to in this case). The rescue process will now look for your Linux installation.
If the rescue mode finds your Linux installation on your hard disk, select OK to continue.
After the computer enters rescue mode, you should see a regular shell prompt (#). Assuming rescue mode mounted your hard disk under /mnt/sysimage , type the following to change your root directory to that of your Linux installation:
# chroot /mnt/sysimage
To install a new master boot record from the grub.conf configuration on your hard disk, type the following:
# /sbin/grub-install /dev/hda
Installation finished. No error reported.
This is the contents of the device map /boot/grub/device.map.
Check if this is correct. If any of the lines are incorrect,
fix it and re-run the script 'grub-install.'
#  this device map was generated by anaconda
(fd0)    /dev/fd0
(hd0)    /dev/hda
Remove the CD and reboot your computer. You should see your original GRUB screen and be able to select which partition and/or kernel to boot.
If you had deleted a partition and simply reinstalling grub to the MBR doesn't work, you may need to do some more work. It's possible that your boot partition is no longer valid, so the boot loader is not able to find your /boot/grub/grub.conf file. Start by booting a rescue CD and running the grub command. Assuming you are booting from the MBR on your first IDE hard disk, type the following (with the first text followed by the tab key):
   grub> root (hd0,   <tab>
    Possible partitions are:
    Partition num: 0, Filesystem type is ext2fs, partition type 0x83
    Partition num: 1, Filesystem type is ext2fs, partition type 0x83
    Partition num: 2, Filesystem type unknown, partition type 0x82
After you press the Tab key, you will see a list of partitions on the first IDE hard disk. Look for the first one that shows up as ext2fs (ext3 file systems appear here as ext2fs). If the first ext2fs that shows up in the list is partition number 0, enter that into your grub command line by typing:
grub> root (hd0,0)
To make sure that you assigned the proper partition as your boot partition, try typing the following:
grub> cat /grub/grub.conf
If this lists the contents of your grub.conf file, you have assigned the correct partition as your boot partition.
You deleted a file (or a set of files) by mistake and you want it back. Is it possible to get it back? Unfortunately, the answer is probably not. Unlike the earlier ext2, the ext3 file system erases pointers to the deleted file's inode.
If you are using an ext2 file system, however, you might be able to use the debugfs command to find and restore your lost file. With ext2, the blocks are simply marked as being unused, so if the space hasn't been reused yet, the file you need might still be there.
Let's say you deleted a file from your home directory (/home/chris/myfile.txt) and you want it back. If you have a separate /home partition (say, for example, /dev/hda5), you can have anyone using the computer log off for a moment, and then do the following:
Determine the partition containing the file you want to recover. Typing df - h or mount will show your currently mounted partitions.
Unmount the directory containing the file you want to recover. (If the file is on the root partition, you should shut down the computer and go into rescue mode, as described in Chapter 6.) Here's how to unmount the /home partition (if /home were on /dev/hda5, you could use that instead of /home):
# umount /home
If the directory fails to unmount, see the Can't Unmount a Directory section later in this chapter.
Run the debugfs command on the home partition. Then from the debugfs prompt, list the deleted files from the directory you are interested in:
# debugfs /dev/hda5
debugfs 1.35-WIP (07-Dec-2003)
debugfs: ls -ld /home/chris
Look for the inode number for the file you want to undelete. With an ext3 file system, the entry will look something like this and you will not be able to recover it:
< 0> 0(1) 0 0 0 myfile.txt
However, if you see the number greater than zero surrounded by less than and greater than signs, you might be able to recover the file. That is the inode number for the file. For example, if you were to try this on an ext2 file system and if the inode is shown as <115>, you could copy it from the /home/chris directory from the unmounted home partition by typing:
debugfs: dump <115> /tmp/myfile_dumped.txt
Remount the file system (mount /home) and you are back in business with your recovered file safely in the /tmp directory. Copy it where you want it to go permanently and you are ready to go.
You try to unmount a directory or device representing a partition and you see a message similar to the following:
unmount: /whatever: device is busy
The most common reason for an unmount to fail is that some process is holding a file or directory open on the partition. In particular, if a directory in the partition is the current directory for any shell, that will cause the device to be busy. To solve the problem, you can often simply close the shell or change the directory so that the current directory is on another partition.
On a multiuser system that has a lot of users logging in and out, it may not be as easy to find out who is making the partition busy. You can try using ps aux to see what is running and kill any run-away process. Or you can go into single-user mode, if it is critical to unmount the directory now. If you can bear to wait a bit, try a lazy unmount:
# umount -l /whatever
The lazy unmount detaches the file system from the hierarchy. However, it waits until the file system is no longer busy to clean up all references to the file system.
You can find out what file system type is on a device using the blkid command. For example, to check the first partition on the first IDE hard disk, type:
   # blkid /dev/hda1
   /dev/hda1: LABEL="/boot" UUID="69477377-81c2-4846-bd3e-
   ad5fe8c2caee" SEC_TYPE="ext3" TYPE="ext2"
If a file system was not cleanly unmounted (for example, when someone kicks out the power cord) or if the time has been reached for a scheduled file system check, an fsck process will run and check (and correct) the file system when you boot the computer. You can check a file system yourself, without rebooting the system, however, if you like. To do that, first unmount the file system.
| Note |
If you are checking the root file system, you should boot from a rescue disk. You should not do an fsck on a mounted file system, and you cannot unmount the root file system on a running Linux system. You could mount the root file system (/) read-only (add ro to the mount entry in /etc/fstab and reboot) and run fsck on it. |
You can force a more thorough check of an ext3 file system using the -f option. To see more details about the output, use the -v option as well:
   # e2fsck -fyv /dev/hda1
   e2fsck 1.34 (25-Jul-2003)
   fsck 1.34 (25-Jul-2003)
   Pass 1: Checking inodes, blocks, and sizes
   Pass 2: Checking directory structure
   Pass 3: Checking directory connectivity
   Pass 4: Checking reference counts
   Pass 5: Checking group summary information
   42 inodes used (0%)
          1 non-contiguous inode (2.4%)
            # of inodes with ind/dind/tind blocks: 10/4/0
      11632 blocks used (11%)
          0 bad blocks
          0 large files

   25 regular files
          3 directories
          0 character device files
          0 block device files
          0 fifos
          0 links
          5 symbolic links (5 fast symbolic links)
          0 sockets
   --------
          33 files
This shows a forced, thorough check being done of a small file system. The -y option indicates that if any errors are encountered, and e2fsck would normally ask if you wanted to try to correct each error, it should instead just correct them all without asking for each one individually.
The fdisk command and related commands such as sfdisk and cfdisk are used to display, modify, delete, and add disk partitions. Once added, file systems can be assigned to the partitions and those file systems can be mounted and used by Linux.
| Caution |
On a critical system, an inexperienced user shouldn't use fdisk other than for listing the partitions on your system (the -l option). If you do want to use fdisk to change, delete, or add partitions, be aware that a small mistake can completely destroy your data or make it inaccessible. If you are just learning, try this on a machine you don't require. Regardless of your experience, you should make sure that any critical data is backed up. |
In this example, I had left about 1GB of free space on my hard disk that I wanted to create into a partition that is mounted on the /mnt/backup directories (so I could use it to make backup copies of my document files). Here is what I did to start the fdisk session, and create the new partition:
   # fdisk /dev/hda
   Command (m for help): n
   Command action
      l   logical (5 or over)
      p   primary partition (1-4)
   p
   Selected partition 3
   First sector (75987450-78165359, default 75987450): <Enter>
   Using default value 75987450
   Last sector or +size or +sizeM or +sizeK
      (75987450-78165359, default 78165359): <Enter>
   Using default value /8165359
   Command (m for help): w
In the previous example, I created a primary partition (partition 3 was available) and just took the defaults. That allowed me to use the rest of the available disk space for the new partition.
After that, I made the partition into an ext2 file system. Here is an example of creating an ext2 file system on the /dev/hda3 partition:
   # mkfs -text2 /dev/hda3
   mke2Fs 1.34 (25-Jul-2003)
   Filesystem label=
   OS type: Linux
   Block size=4096 (log=2)
   Fragment size=4096 (log=2)
   135648 inodes, 2/1096 blocks
   13554 blocks (5.00%) reserved for the super user
   First data block=0
   9 block groups
   32768 blocks per group, 32/68 fragments per group
   15072 inodes per group
   Superblock backups stored on blocks:
           32768, 98304, 163840, 229376
   Writing inode tables: done
   Writing superblocks and filesystem accounting information: done
   This filesystem will be automatically checked every 32 mounts or
   180 days, whichever comes first. Use tune2fs -c or -i to override.
Next 1 added a label to the partition, based on its mount point:
# e21abel /dev/hda3 /mnt/backup
If I want to make it into a journaling file system (ext3) now, I can do that using the tune2fs command. This action will take about 33MB of disk space to create the journal file needed by ext3. Here's an example:
   # tune2fs -j /dev/hda3
   tune2fs 1.34 (25-Jul-2003)
   Creating journal inode: done
   This filesystem will be automatically checked every 32 mounts
   or 180 days, whichever comes first.
   Use tune2fs -c or -i to override
After that, I created an entry in the /etc/fstab file, so the partition would be automatically mounted each time Linux started (if I hadn't added the journal, the file system type would be ext2 instead of ext3):
After that I can mount the file system immediately by typing:
# mount /mnt/backup
At this point, the new partition will be mounted on the /mnt/backup directory each time the system boots.