One of the most popular ways of sharing files among Linux and other UNIX systems is with the network file system (NFS) facility. Even Mac OS X can act as both an NFS client and a server. The fact that an NFS from a remote computer is connected to a local computer can be nearly invisible to a local user. To a systems administrator, however, there are lots of opportunities for configuring and tuning NFS.
This chapter takes you through some of the basics of setting up an NFS server, sharing file systems from that server to NFS clients, and tuning and troubleshooting the results.
In many ways, an NFS is treated like any other file system that might be available on your computer from hard disk partitions, a CD, a floppy disk, or other medium. To use an available NFS, you should follow two basic steps:
Mount it-Using the mount command (with some special options), you identify the location in your local file system tree where you want the remote file system connected. For example, you might know that the /var/chris directory is being shared from a computer named daylight. To make the NFS-shared /var/chris available to your local computer, you might mount it on a local directory named /var/daylight-chris.
Access it-Once a remote NFS is mounted locally, you access the contents of that file system as you would any other directory on your computer. To continue with the example, you could change to the mounted NFS directory (cd /var/daylight-chris), and then open files or run applications that are located in that directory.
The permissions to access data files, applications, and directories are determined by the computer that owns those items. Therefore, when a directory is shared using NFS, permissions from the computer using the shared NFS directory (the client) need to be mapped into those of the computer holding those assets (the server).
To continue with the example, let's say that the remote directory /var/chris/docs from the machine named daylight is restricted so that only the owner chris can access it (700 permissions). Someone trying to change to that directory or list its contents from the local mount point (/var/daylight-chris/docs) would have access denied, except in two cases. If the computer daylight mapped its user permissions in such a way that the local user trying to access that directory was mapped into the permissions of the computer daylight's user named chris, then access would be allowed. Likewise, if user permissions were set up to allow root user on a client machine to have the same privileges on the server, access would also be allowed.
To use NFS, you need at least two computers that are connected together by a common network. Because NFS is not considered a particularly secure network protocol, it is typically just run on a company's or other organization's local LAN. To run the example in this chapter, I use two computers on the same Ethernet LAN that are configured to use TCP/IP to communicate.
On the NFS server, Fedora and Red Hat Linux systems have a graphical user interface that makes it easy to set up directories to be shared with other computers over your LAN. You start the NFS Server Configuration window by selecting System Settings⇨Server Settings⇨NFS. Or you can run redhat-config-nfs to launch the window on your desktop in Fedora Core 1.
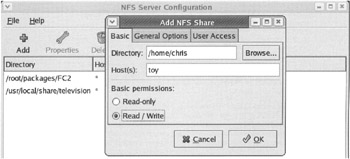
To add a shared directory using the NFS Server Configuration window, click Add and enter information in the Add NFS Share window that appears. Figure 16-1 shows the NFS Server Configuration window with the pop-up window for adding a shared directory.
In this example, I identify the directory /home/chris as being made available to be shared by the computer named toy as a read/write file system. A client (in this case, only the computer named toy) that mounts that directory could potentially have access to all files and directories below /home/chris. Of course, that depends on the read, write, and execute permissions set on those files and directories, as well as how users from the client are mapped into those permissions.
Here's a quick rundown of the information you can set from the Basic, General Options, and User Access tabs in the Add NFS Share window:
Directory-You can add any directory you choose.
Host(s)-Instead of entering a single TCP/IP host name, you can enter a fully qualified domain name (such as toys.linuxtoys.net), all hosts in an IP subnet (such as 10.0.0.0/255.255.255.0), all hosts in an NIS netgroup (@mynisgrp), or all hosts in a domain (such as *.linuxtoys.net). Instead of an asterisk (to match all characters), you can use question marks to match any single character (for example, ???.linuxtoys.net would match any three-character host name in the linuxtoys.net domain). To leave access open to all hosts, simply put a single asterisk (*) in this field.
Basic permissions-Selecting read-only restricts access and so a client can only mount the directory read-only. Selecting read/write lets the client mount the directory with either full read/write permission or read-only (as the client chooses).
Allow connections from ports 1024 and higher-Choose this option to allow a client to connect to the server from a request that originates from a port number higher than 1024. (See the insecure option on the exports man page.)
Allow insecure file locking-This causes NFS to not authenticate locking requests from remote users of this shared directory. (See the insecure_locks option on the exports man page.)
Disable subtree checking-With this feature on, NFS won't verify that the file requested by the client is actually in the shared directory. The server will only check that the file is in the file system. (See the no_subtree_check option on the exports man page.)
Sync write operations on request-This forces a remote client write operation to be synced on your local disk at the client's request. (See the sync option on the exports man page.)
Force sync of write operations immediately-This forces writes to the shared directory to be immediately synced to hard disk (when no loss of data is acceptable). (See the no__wdelay option on the exports man page.)
Treat the remote root user as local root-This maps the permission of the root user on the client machine into the root user on the server. With this on, the client's root user has full control over the files and directories on the shared file system, and so use this feature with caution. (See the no_root_squash option on the exports man page.)
Treat all client users as anonymous users-Use this feature to grant the same user and group privileges to everyone that accesses the shared directory. Then choose which user ID (UID) and group ID (GID) the clients are mapped into on the server for that shared directory. (See the anonuid and anongid options in the exports man page.)
After you have saved the information, it is written to the /etc/exports file. Some people who prefer to edit configuration files will bypass the NFS Server Configuration window and go straight to the /etc/exports file. Here's an example of the entry I just created as it appear in the /etc/exports file:
/usr/local/share/television toy(rw,sync,all_squash,anonuid=507,anongid=507)
As shown, the /usr/local/share/television directory is being made available to only one computer (named toy). The client will be able to mount the directory with read/write permissions (rw). The sync option indicates that writes only from the client have to be synced to the hard disk when the client requests it.
The last three options have to do with how user permissions are assigned. With all_squash set, every user who tries to access the directory from the host toy will be assigned to a single, anonymous user account. I then specifically set the anonymous user to UID 507 and GID 507 on the server (anonuid=507 and anongid=507).
To make the directory that you just configured (and all other configured shared directories) available to client computers, type the following as root user:
# chkconfig nfs on
# service nfs start
Starting NFS services:        [ OK ]
Starting NFS quotas:          [ OK ]
Starting NFS daemons:         [ OK ]
Starting NFS mountd:          [ OK ]
At this point, you should be able to connect to the shared directory from the computer named toy by mounting it on toy's local file system.
To use the files, applications, and directories that an NFS server makes available through a shared NFS directory, a client computer has to mount that directory. Like mounting a disk partition or CD, mounting a shared NFS directory results in that directory being connected to some point in the client computer's file system.
There are several different ways you can mount an NFS directory on a client computer:
Manual-Run the mount command (as root user) from a Terminal window to identify the remote NFS directory, local mount point, and other information needed to complete the mount.
Boot time-Add a line identifying the mount information to the /etc/Fstab file. Unless you specifically indicate not to immediately mount the remote NFS directory, your computer will try to mount that directory when the computer boots up.
Automount-Using the automount facility, you can configure the mounting of the NFS directory to occur when someone tries to access the contents of the local mount point directory.
These three procedures are explained in the following subsections.
Although there is NFS client and server software that runs on other platforms, for our purposes I'm going to show how a Fedora or Red Hat Linux client can connect to a shared NFS directory. The mount command and other procedures should work much the same way on any Linux or UNIX-like operating system (including MAC OS X and BSD systems).
| Note |
NFS client and server software is also available for Windows platforms. NFS is in Microsoft Windows Services for UNIX (www.microsoft.com/windows/sfu). There are also third-party NFS clients for Windows. For example, you can get a free trial of NFS software for Windows from XLink Technology, Inc. NFS client software starts at $89 to purchase a copy. |
Although the options may differ slightly among different operating systems, the mount command is the common way of mounting an NFS directory on a client. If the server has made a shared NFS directory available to your computer (either specifically, or by allowing all or a group of computers to access it), you use the mount command with the -tnfs option to mount the directory locally.
Following the example started in the NFS Server section, from the client computer named toy, you could type the following commands to mount the directory /var/chris from the computer daylight on a local mount point directory /var/daylight-chris. Run them as root user from a Terminal window:
   # mkdir /var/daylight-chris
   # mount -t nfs daylight:/var/chris /var/daylight-chris
If the mount was successful, you should silently see a new command prompt. Then you can type ls/var/daylight-chris to see if the contents of that directory show up. (If this doesn't happen for you, don't worry. Most of this chapter is devoted to troubleshooting the process.)
After you have successfully mounted an NFS directory manually, if you want that shared directory to be always available on your system, you can set it to be mounted automatically at boot time. You do this by adding an entry to the /etc/fstab file.
Following our example, this line shows what you could add to the /etc/fstab file on the computer named toy so that the directory /var/chris from the computer daylight is automatically mounted each time the toy computer is booted:
daylight:/var/chris /var/daylight-chris nfs rsize=8192,wsize=8192 0 0
There are six fields here. The daylight:/var/chris identifies the remote host and share names. The /var/daylight-chris identifies the local mount point. The nfs identifies this as an NFS. The rsize=8192, wsize=8192 are just two options I chose to add to the mount command (based on recommendations from the nfs man page). You can add other comma-separated options as well. The last two fields (0 0) tell the operating system not to dump the contents of the file system or run fsck, as you would do on a normal local file system.
With this entry in place, the NFS shared directory will automatically mount (if all goes well) the next time the client computer boots up.
There are many other options you can pass to the mount command to adjust how the NFS shared directory is mounted. We'll get into some of those later. For the moment, however, I want to mention the noauto option. For example, if you had put noauto, rsize=8192, wsize=8192 as options to mount, the directory would not be mounted automatically at boot time. However, when you go to mount it manually later, you can type the mount command using only some of the options. For example:
# mount /var/daylight-chris
Using this command line, the mount command would go to the /etc/fstab file and figure out that the directory is associated with daylight:/var/chris, that it is an NFS directory (nfs), and that the rsize, wsize, and any other mount values listed should be used. This just saves you some typing for NFS shared directories you use often, but don't want to mount automatically.
The autofs package is the default automounter used in Fedora and Red Hat Linux systems. (This package is described in Chapter 9.) Another automount package available with Fedora and Red Hat Linux systems is the am-utils package. The am-utils package has some good features that you can use with NFS.
In large installations where a lot of computers are offering and using NFS shared directories on a network, it can become difficult to manage them all. One way to deal with that problem is to use the am-utils automounter service (amd daemon) that comes with Fedora and Red Hat Linux (as well as other Linux and UNIX systems).
Using amd, an NFS can be mounted only when it is accessed. Then, after a period of inactivity, it is unmounted. In Fedora and Red Hat, a nice set of configuration files allows you to start up the automounter, and then change to list the contents of, or run a command from, the remote directory (/net by default).
Starting with the example shared directory we've been using in this chapter (daylight:/var/chris), here is how you would start the automounter to access that directory from a client machine (assuming the client is a Fedora or Red Hat Linux system):
   #  service amd start
   #  chkconfig amd on
Once the service is turned on (service command) and set to turn on at every reboot (chkconfig command), the /net directory should appear. If all goes right (and there are a lot of things that can go wrong along the way), in our example you should be able to type the following:
# ls /net/daylight/var/chris
For this to work, I assume that:
Your local computer can resolve the IP address for the computer named daylight (either through DNS, /etc/hosts, or some other mechanism).
The /var/chris directory has been shared by daylight and made available to this local computer.
Permissions on /var/chris are open to the extent that listing the contents of /var/chris will return something.
Notice that the system name follows the /net. You will have to traverse the full /net/daylight/var/chris/ to get to the shared content. Also, typing ls /net/daylight/var will not show other directories from the server that exist in its /var directory.
To free up resources, after a period of not being accessed, the shared NFS directory will be unmounted. The mount will occur again, however, the next time someone tries to access any component of the shared NFS directory.
You can control who can mount your NFS shared directory when you export it (from the information you added to the entry in /etc/exports). However, controlling how users can access the files, directories, and programs from the client computers that mount that shared directory is a bit trickier. The following subsections explain some means for controlling how users from the remote NFS client computer can access the files and directories on your NFS share.
There are a few ways to keep remote users from adding files to or changing files within a shared NFS directory from your server. The first way is to simply share the directory read-only from the server.
For an NFS directory that is shared read-only when it is mounted by the client, the client cannot change any file on the shared directory. Alternatively, if the client mounts a directory read-only (whether it was shared read-only or read/write), no user from the client will be able to write to the directory.
Using the all_squash option when the directory is shared in the /etc/exports file on the server, all users from the client computer are mapped into a single user and group ID on the server. By default, the anonymous UID is 65534 (nfsnobody) and GID is also 65534 (nfsnobody).
Because nfsnobody is not a real user on the server, the only files, directories, and programs users from client hosts will have access to on the shared directory are those that are either world read, write, and executable or those that were created by a user from the NFS client.
An administrator on the NFS server can assign any user ID and group ID to act as the anonymous NFS user. This is done by assigning appropriate ID numbers to the anonuid= and anongid= options when the directory is exported. You must use the UID numbers (from the /etc/passwd file)and GID numbers (from the /etc/group file), rather than using user or group names, when you assign the anonymous users and groups.
When you don't designate all users to be assigned to an anonymous user account, the default user and group mappings are a bit strange. In that case, each user will have ownership and group permissions to files and directories based on their user and GID assignments on the client.
What exactly does this mean? Well, if your UID and GID numbers on the NFS client were 501, then you would be considered the owner of any files on the shared directory that was owned by the user number 501. This can cause some confusion (as well as a security breakdown) when the user named sally on the server has UID 501 and the user named joe on the client has UID 501. Once that directory is shared using NFS, files and directories owned exclusively by sally on the server are now also owned by joe (provided the directory was mounted with read/write permissions).
Because ownership is set by the UID and GID numbers, an ls -1 of a file owned by sally will appear as follows when done on the server:
   #  ls -1 file.txt
   -rw-rw-r--   1 sally    sally    34322 Mar    9 02:10 file.txt
A listing of the same file, mounted on a client computer using NFS, however, will appear to be owned by whatever user on the client machine has the same UID and GID as sally does on the server machine. You can see the numeric user and GIDs using ls -ln as follows:
Now, with joe, who is assigned UID 501 and GID 501 on the client machine, here's how a listing of the same file would appear when ls -l is run on the NFS client:
   #  ls -1 file.txt
   -rw-rw-r--   1 joe    joe    34322 Mar    9 02:10 file.txt
In the old UNIX days, this type of user mapping made more sense. A company might have had only a handful of computers, each of which might have 100 user accounts on it. A small team of system administrators might be responsible for administering all those computers. The administrators could then share /etc/passwd files among those computers, allowing a set of users to easily maintain the same rights to files and directories across all those host computers.
With today's less centralized system administration and the proliferation of personal computers, a single /etc/passwd file is harder to maintain across a group of computers. So, the person who owns the computer may be assigned to the first user account on that computer (with UID and GID 500 in Fedora and Red Hat Linux systems by default).
As an administrator, you need to understand the potential lack of security that can arise by users from multiple computers with the same UID and GID, all sharing files from the same shared NFS resource.
One way in which a bit of security is built in by default is that the root user from the client does not have root permission to modify files on the NFS server. The root user is mapped to the permissions of the anonymous NFS user. You can override that, if you like, by adding the no_root_squash option to the exported directory (in the /etc/exports file on the server).