Security Business Processes
At some point, preferably before you start loading software, you should document in writing a business process for your firewall(s). Not only will this be a useful tool for planning your installation and configuration, but it may also help if you have to justify hardware purchases or personnel time to your boss. Documenting your security activities will make you look more professional and emphasize the value you add to the organization, which is never a bad thing. It also makes it easier for anyone who comes after you to pick up the ball.
This plan documents the underlying processes and procedures to make sure that you get a business benefit from the technology. Installing a firewall is all well and good, but without the proper processes in place, it might not actually give the organization the security it promises. The following steps outline a business process for firewall implementation and operation.
Develop a network use policy.
There may already be some guidelines in your employee manual on proper computer use. However, many computer use polices are intentionally vague and don't specify which applications count as misuse. You may have to clarify this with your manager or upper management. Are things like instant messengers allowed? Do you want to follow a stringent Web and e-mail only outbound policy? Remember that it is safer to write a rule for any exceptions rather than allowing all types of activity by default. Getting the answers to these questions (hopefully in writing) is crucial before you start writing rules.
Map out services needed outward and inward.
If you don't already have a network map, create one now. What servers need to be contacted from the outside and on which ports? Are there users who need special ports opened up for them? (Hint: technical support staff often need FTP, Telnet, and SSH.) Do you want to set up a DMZ for public servers or forward ports to the LAN from the outside? If you have multiple network segments or lots of public servers, this could take longer than the firewall setup itself. Now is the time to find out about these special requests, not when you turn on the firewall and it takes down an important application.
Convert the network use policy and needed services into firewall rules.
This is when you finally get to write the firewall rules. Refer to your list of allowed services out, required services in, and any exceptions, and create your firewall configuration. Be sure to use the "deny all" technique described in the sidebar to drop anything that doesn't fit one of your rules.
Implement and test for functionality and security.
Now you can turn on your firewall and sit back and wait for the complaints. Even if your rules conform exactly to policy, there will still be people who didn't realize that using Kazaa to download movies was against company policy. Be ready to stand your ground when users ask for exceptions that aren't justified. Every hole you open up on your firewall is a potential security risk.
Also, once your firewall is operating to your users' satisfaction, make sure that it is blocking what it is supposed to be blocking. By using two tools discussed later in this book together, you can run tests against your firewall: A port scanner on the outside and a network sniffer on the inside will tell you which packets are getting through and which ones aren't. This setup can also be useful for troubleshooting applications that are having problems with the firewall.
Review and test your firewall rules on a periodic basis.
Just because your firewall is working great today doesn't mean it will be tomorrow. New threats may evolve that require new rules to be written. Rules that were supposed to be temporary, just for a project, may end up being left in your configuration. You should review your rules periodically and compare them with the current business requirements and security needs. Depending on the size and complexity of your configuration and how often it changes, this may be as infrequently as once a year for firewalls with a small rule set (20 or fewer rules), or once a month for very complex firewalls. Each review should include an actual test using the scanner/sniffer setup mentioned above using the tools in Chapters 4, 5, and 6 to verify that the rules are indeed doing what they are supposed to be.
Designing and using a business process such as this will help ensure you get a lot more out of your firewall implementation, both professionally and technically. You should also develop plans for the other technologies discussed in this book, such as vulnerability scanning and network sniffing.
 | "Deny all!" When It Comes to Firewall Rules There are two ways to set up a firewall: You can start with an "allow all" stance and then add the behavior you want blocked, or start with a "deny all" statement and then add what you want to allow (permissible user behavior). The overwhelmingly preferred method is starting with "deny all." By beginning with this statement, you automatically block all traffic unless it is specifically allowed in the configuration. This method is both more secure and easier to maintain securely than the other route. Most commercial firewalls use this philosophy. The idea behind it is that if you have to define what is bad behavior, you will be continually behind as the Internet changes and evolves. You cannot predict what form the next new attack might take, so you will be vulnerable until it is published and you can add a new line to your firewall configuration. By using the "deny all" approach, you categorically deny anything that isn't known good activity. The "allow all" type of configuration might make sense in a extremely permissive environment where the overhead of adding lines for allowed items overrides the value of the information on the network, for example, on a nonprofit or purely informational site. But for most sites the "deny all" approach is much safer. However, just because you use this approach doesn't mean your network is totally secure. Attacks can still come in via any holes you've created, such as for the Web and e-mail. Also, keep in mind that even when the "deny all" statement is used, you have to be careful not to negate it with an overly permissive statement higher up in your configuration. |
|
This section describes how to configure a firewall with Iptables, which is the firewall/packet filter utility built into most Linux systems with kernel version 2.4 and later. This utility lets you create a firewall using commands in your operating system. Iptables evolved from earlier attempts at firewalls on Linux. The first system, called Ipfwadm, could be used to create a simple set of rules to forward or deny packets based on certain criteria. Ipchains was introduced in kernel 2.2 to overcome the limitations of Ipfwadm. Ipchains worked pretty well and was modular in architecture. However, with the growing number of people using their firewalls for multiple functions (for example, proxy server and NAT device), Ipchains also became insufficient. Iptables represents an update to these programs and allows for the multiple uses that today's firewalls are expected to perform. (Note that the concepts and terms for Iptables are pretty much the same for Ipchains.)
Iptables is a powerful but complex tool, and is usually recommended for users who are familiar with firewalls and the art of configuring them (see the sidebar on writing shell scripts). If this is your first firewall, I suggest using one of the autoconfiguration tools discussed later in the chapter to create your firewall configuration, at least at first. These tools use Iptables (or its predecessor, Ipchains) to create a firewall by using your input. However, it is good to have a basic understanding of what is going on "under the hood" with Iptables before start configuring with one of the graphical tools.
Installing Iptables
Most Linux systems on kernel 2.4 or higher will have Iptables built right in, so you don't have to install any additional programs. (If your system is earlier than kernel 2.4, it will use Ipchains or Ipfwadm. These are similar systems, but they are not reviewed in this book.) You can issue Iptables statements from the command line or via a script (see the sidebar). To double-check that Iptables is installed, type iptables - L and see if you get a response. It should list your current rule set (which is probably empty if you haven't configured a firewall yet).
 | If your system doesn't have Iptables or if you want to get the latest version of the code, go to www.netfilter.org and download the RPM for your operating system. You can also get it from the CD-ROM that comes with this book. |
If you don't have a Webmin RPM on your installation disks, check www.webmin.com to see if there is a version of Webmin available for your operating system. Webmin is required for the Turtle Firewall, and there are specific versions for each distribution and operating system. If there isn't one for your particular operating system, then you can't use Turtle Firewall, but the list of supported systems is quite large. Click on the RPM file in X-Windows and it will install automatically.
Using Iptables
The idea behind Iptables and Ipchains is to create pipes of input and process them according to a rule set (your firewall configuration) and then send them into pipes of output. In Iptables, these pipes are called tables; in Ipchains, they are called chains (of course!). The basic tables used in Iptables are:
Input Forward Prerouting Postrouting Output
The general format of an Iptables statement is
iptables command rule-specification extensions
where command, rule-specification, and extensions are one or more of the valid options. Table 3.2 lists the Iptables commands, and Table 3.3 contains the Iptables rule specifications.
Table 3.2. Iptables CommandsCommands | Descriptions |
|---|
-A chain | Appends one or more rules to the end of the statement. | -I chain rulenum | Inserts chain at the location rulenum. This is useful when you want a rule to supercede those before it. | -D chain | Deletes the indicated chain. | -R chain rulenum | Replaces the rule at rulenum with the provided chain. | -L | Lists all the rules in the current chain. | -F | Flushes all the rules in the current chain, basically deleting your firewall configuration. This is good when beginning a configuration to make sure there are no existing rules that will conflict with your new ones. | -Z chain | Zeros out all packet and byte counts in the named chain. | -N chain | Creates a new chain with the name of chain. | -X chain | Deletes the specified chain. If no chain is specified, this deletes all chains. | -P chain policy | Sets the policy for the specified chain to policy. |
Table 3.3. Iptables Rule SpecificationsRule Specifications | Descriptions |
|---|
-p protocol | Specifies a certain protocol for the rule to match. Valid protocol types are icmp, tcp, udp, or all. | -s address/mask!port | Specifies a certain address or network to match. Use standard slash notation to designate a range of IP addresses. A port number or range of port numbers can also be specified by putting them after an exclamation point. | -j target | This tells what to do with the packet if it matches the specifications. The valid options for target are: | DROP | Drops the packet without any further action. | REJECT | Drops the packet and sends an error packet in return. | LOG | Logs the packet to a file. | MARK | Marks the packet for further action. | TOS | Changes the TOS (Type of Service) bit. | MIRROR | Inverts the source and destination addresses and sends them back out, essentially "bouncing" them back to the source. | SNAT | Static NAT. This option is used when doing Network Address Translation (NAT). It takes the source address and converts it into another static value, specified with the switch --to-source. | DNAT | Dynamic NAT. Similar to above but using a dynamic range of IP addresses. | MASQ | Masquerades the IP using a public IP. | REDIRECT | Redirects the packet. |
There are other commands and options but these are the most common operations. For a full listing of commands, refer to the Iptables man page by typing man iptables at any command prompt.
Creating an Iptables Firewall
The best way to learn is to do, so let's walk through a couple of commands to see how they are used in practical application. Here is an example of how to create a firewall using Iptables. You can enter these commands interactively (one at a time) to see the results right away. You can also put them all into a script and run it at boot time to bring your firewall up at boot time (see the sidebar on writing scripts). Remember to type them exactly as shown and that capitalization is important.
|
Often you will need to automate a process or have a single command initiate a number of statements. In the firewall example, you will generally want to have all your firewall commands executed when your system boots. The best way to do this is to write a shell script. A shell script is a simple text file that contains a command or list of commands. The shell editor executes the commands when it is invoked by a user typing the name of the script.
To create a shell script, first open a text editor such as vi or EMACS and type in your command(s).
Make sure you put a line at the very top that looks like this:
#! /bin/bash
This tells the script which shell to use to execute the command. You must have that shell on your OS, and the commands you put in your script will have to be valid commands for that shell. This example is for the bash shell location on Mandrake Linux. You can use a different shell, for example, Tcsh or Csh. Just put the path to it on this line. Then save your file. Make the file executable so the shell can run it as a program. You do this with the chmod command. Type:
chmod 700 script_name
where you replace script_name with your file name. This makes the permissions on the file readable, writable, and executable.
To run the script, type the file's name in the command line. (In the bash shell, you need to add a ./ before the file name to run the script from your local directory.) When you press Enter, the commands in your script should run.
You have to be in the same directory as the file or type the path in the command line statement when you run it. Alternatively, you could add the directory for the script to your PATH statement so it will run from anywhere or put the script in one of your PATH directories.
|
The example in the following procedure assumes that your local LAN subnet is 192.168.0.1 - 192.168.0.254, that the eth1 interface is your local LAN connection, and that the eth0 interface is your Internet or WAN connection.
Start by eliminating any existing rules with a Flush command:
iptables -F FORWARD
This flushes all rules for the FORWARD chain, which is the main "funnel" for any packets wanting to pass through the firewall. Flush the other chains:
iptables -F INPUT

iptables -F OUTPUT
This flushes any rules to your local machine and your output chain. Put your standard "deny all" statement right up front.
iptables -P FORWARD DROP

iptables -A INPUT -i eth0 -j DROP
To accept fragmented packets in Iptables, this must be done explicitly.
iptables -A FORWARD -f -j ACCEPT
There are two types of common attacks that you should block right away. One is what is known as spoofing, which is when someone forges the IP packet headers to make it look like an outside packet has in internal address. By doing this, someone could route onto your LAN even if you have private IP addresses. The other type of attack is done by sending a stream of packets to the broadcast address of the LAN to overwhelm the network. This is called a smurf attack (although I'm not sure what this has to do with little blue cartoon characters). You can block these types of attacks with two simple statements.
iptables -A FORWARD -s 192.168.0.0/24 -I eth0 -j DROP
iptables -A FORWARD -p icmp i eth0 d 192.168.0.0/24 j
DENY
The first statement drops any packets coming from the Internet interface eth0 with the internal address 192.168.0.0/24. By definition, no packets should be coming from the untrusted interface with an internal, private source address. The second statement drops any packets of protocol ICMP coming from the outside address to the inside. You generally do want to accept incoming traffic based on connections initiated from the inside, for example, someone surfing a Web page. As long as the connection is ongoing and it was initiated internally, then it is probably okay. You can, however, limit the type of traffic allowed in. Let's say that you only want to allow employees Web and e-mail access. You can specify the types of traffic to allow through and only if it is on an already-initiated connection. You can tell if it is an existing connection by seeing that the ACK bit has been set, that is, that the TCP three-way handshake has occurred. The following statements allow HTTP and Web traffic based on this criteria.
iptables A FORWARD p tcp i eth0 d 192.168.0.0/24 --
dports
www,smtp --tcp-flags SYN,ACK j ACCEPT
iptables A FORWARD p tcp i eth0 d 192.168.0.0/24 --
sports
www,smtp --tcp-flags SYN,ACK j ACCEPT
The -dport statement says to only allow e-mail and Web, and the tcp flags statement says you only want packets with the ACK field set. To be able to accept incoming connections from the outside only on certain ports, such as e-mail coming into your mail server, use a statement like this:
iptables A FORWARD m multiport p tcp i eth0 d
192.168.0.0/24
--dports smtp --syn j ACCEPT
The -m multiport flag tells Iptables that you will be issuing a match statement for ports. The -syn statement tells it to allow SYN packets, which means to initiate TCP connections. And the -dports flag allows only the SMTP mail traffic. You can allow outgoing connections to be initiated by your users, but only on the protocols you want them using. This is where you can prevent your users from using FTP and other nonessential programs. The all-zero IP address is shorthand for saying "any address."
iptables A FORWARD m multiport p tcp i eth0 d
0.0.0.0 --dports www,smtp --syn j ACCEPT
You need to allow certain incoming UDP packets. UDP is used for DNS, and if you block that your users won't be able to resolve addresses. Because they don't have a state like TCP packets, you can't rely on checking the SYN or ACK flags. You want to allow UDP only on port 53, so you specify domain (a built-in variable for port 52) as the only allowable port. You do that with these statements.
iptables A FORWARD m multiport p udp i eth0 d
192.168.0.0/24 --dports domain j ACCEPT
iptables A FORWARD m multiport p udp i eth0 s
192.168.0.0/24 --sports domain j ACCEPT
iptables A FORWARD m multiport p udp i eth1 d
0.0.0.0 --dports domain j ACCEPT
iptables A FORWARD m multiport p udp i eth1 s
0.0.0.0 --sports domain j ACCEPT
The first two statements allow the incoming UDP datagrams, and the second two allow the outbound connections. You also want to do this for ICMP packets. These are the network information packets discussed in Chapter 2. You want to allow all types of internal ICMP outwards, but only certain types such as echo-reply inwards. This can be accomplished with the following statements.
iptables A FORWARD m multiport p icmp I eth0 d
192.168.0.0/24 --dports 0,3,11 j ACCEPT
iptables A FORWARD m multiport p icmp I eth1 d
0.0.0.0
--dports 8,3,11 j ACCEPT
Finally, you want to set up logging so you can look at the logs to see what is being dropped. You will want to view the logs from time to time even if there isn't a problem, just to get an idea of the kinds of traffic being dropped. If you see dropped packets from the same network or address repeatedly, you might be being attacked. There is one statement to log each kind of traffic.
iptables A FORWARD m tcp p tcp j LOG
iptables A FORWARD m udp p udp j LOG
iptables A FORWARD m udp p icmp j LOG
That's it! This will provide you with firewall protection from the most common attacks from the Internet.
IP Masquerading with Iptables
When the Internet was originally designed, several large blocks of addresses were set aside for use on private networks. These addresses will not be routed by the Internet and can be used without worrying that they will conflict with other networks. The private address ranges are:
10.0.0.0 10.255.255.255 192.168.0.0 192.68.255.255 172.16.0.0 172.31.255.255
By using these addresses on your internal LAN and having one external, routable IP on your firewall, you effectively shield your internal machines from outside access. You can provide this additional layer of protection easily with Iptables using IP masquerading. The internal IP header is stripped off at the firewall and replaced with a header showing the firewall as the source IP. The data packet is then sent out to its destination with a source IP address of the public interface of the firewall. When it comes back, the firewall remembers which internal IP it goes to and re-addresses it for internal delivery. This process is also known as Network Address Translation (NAT). You can do this in Iptables with the following statements.
iptables t nat P POSTROUTING DROP
iptables t nat A POSTROUTING o eth0 j MASQUERADE
The MASQUERADE flag can be abbreviated to MASQ. One of the improvements of Iptables over previous systems like Ipchains and Ipfwadm is the way that it handles secondary tasks like NAT.
So now you know how to build a basic firewall. This is just a simple configuration; the possible variations are endless. You can forward certain ports to internal servers so they don't have to have a public IP address. You can put another network card in your firewall box and make it a DMZ interface for servers with public addresses. There are entire books on advanced firewall configuration and many mailing lists. One of the better lists is firewall-wizards. To subscribe to this list, send an e-mail with "subscribe" in the body to:
firewall-wizards-request@honor.icsalabs.com
The firewall-wizards list hosts discussions about all levels of firewall configuration and is vendor agnostic, that is, all firewall brands are discussed, from open source to commercial.
If you want to build a quick firewall without entering all those Iptables statements and remembering the syntax, there is tool that builds the firewall statements using a graphical interfaceso it's all done for you in the background.
 |
This neat little contraption, called Turtle Firewall, was created by Andrea Frigido. Turtle is basically a set of Perl scripts that do all the dirty work for you to set up an Iptables firewall. This program makes it much easier to see your rules and to make sure you are getting the statements in the right order. It runs as a service, so you don't have to worry about initializing your firewall with a shell script. It uses the Linux Webmin service, which is a little Web server that allows you to make configuration changes to your server via a Web browser. While this might introduce some insecurity into your system by running a Web server on the firewall, it may be worth it for the ease of configuration it brings. Many commercial vendors now use a Web browser interface for configuration. A big benefit of this application is that you can reach the configuration screen from any Windows or UNIX machine.
For support, Andrea offers a commercial support option. For a mere 100 euros (don't ask me to convert that to dollars exactly, but when this book was printed it was about $100.00), you can get 30 days of e-mail support so you can get help setting it up. It also might be worth subscribing if you have a problem with an existing installation that you can't solve on your own.
Installing Turtle Firewall
Installing and setting up Turtle Firewall is very easy because it uses the Webmin administration module, which is available on most Linux platforms.
If you did not install the Webmin administration module during your OS installation, you will need to in order to use Turtle Firewall. Locate and run the RPM, which should be on most Linux distributions disks. Click on the RPM file and it will install automatically.
Once that is done, you should be able to log into your firewall's configuration screen by putting its IP address in your browser window and pressing Enter.
Now you are ready to install Turtle Firewall. Download the packed distribution from www.turtlefirewall.com or get it from the CD-ROM that comes with this book and unzip it. Change to the turtlefirewall directory and type:
./setup
This runs an installation script that puts the Perl modules and other things that are needed in the right places. Log into the Webmin server using a Web browser pointed at the IP address or host name the server is using. The Webmin interface will display.
Click the Module Index tab, and the Turtle Firewall Main screen displays (see Figure 3.3).
 Click on the Firewall Items icon to begin configuring your firewall.
First you will need to define some basic things about your firewall (see Figure 3.4). Turtle Firewall uses the concept of zones to define trusted and untrusted networks. A trusted zone connects to a network with employees or people who should generally be trusted on it, such as your internal network. An untrusted zone is a network that could have anything on it, from employees to customers, vendors, or even people with malevolent intentions. Turtle calls them "good" and "bad," but it is basically the same thing as trusted and untrusted.
Turtle also has an entry for a DMZ or "Demilitarized Zone" segment. A DMZ segment is used to put servers that need unfettered access to the untrusted zone. Put the interfaces for your good, bad, and DMZ (if any) interfaces here. Next you need to define your internal network IP addresses in the Net box. Put the IP address range with subnet mask for your internal LAN to be protected by the firewall in the box provided (see Figure 3.4). Next, define any internal or DMZ hosts that will need special consideration, such as your mail server or Web server. Do this in the Hosts box (see Figure 3.4). Finally, you can define any special hosts that you want to treat differently, such as administrators, in the Group area. Now your firewall is up and running in basic mode.
There are probably some additional restrictions or permissions you will want to add, for example, the ability for someone from the outside to use SSH to get in. You can do this by writing a rule on the Firewall Rules tab. Click on that tab, and it will graphically walk you through writing a new firewall rule. You will notice the format is similar to Iptables (see Figure 3.5).
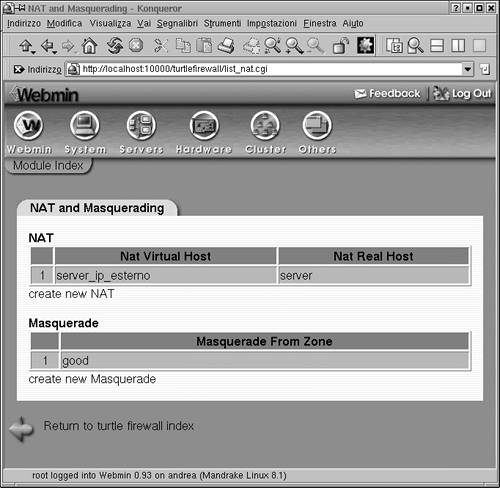
If you want to implement the Iptables Masquerade function using private IP addresses for your internal LAN, click on the NAT and Masquerading icon on the main screen. Here you can define what zone will be masqueraded (see Figure 3.6). Generally, it will be your "good" or trusted interface. You can also set up hosts to be "NAT'ed" here. Putting a host to be your virtual IP makes it act as the front for your real host, and the firewall will forward all packets through the virtual host to the real host. This provides an extra level of protection for your internal servers.
The two programs discussed previously, Iptables and Turtle Firewall, offer an inexpensive way to set up a simple firewall. But if you need a DHCP server, you have to set that up separately. And if you want to be able to SSH into the machine, that is another program to install. SmoothWall is an open source firewall that offers a robust firewall package with all those features and more built in. It is designed by a company that offers both a free GPL version and a commercial version with some additional features and enhanced support. This is another example of how a product can take advantage of the power of open source and also reap commercial gains for a company. The free version is called SmoothWall Express and is currently on version 2.0; the commercial version is called SmoothWall Corporate Server version 3.0.
SmoothWall Express contains several options beyond Iptables that most companies would want in a fully functional firewall. Granted, you can cob most of these together with other programs and Iptables, but SmoothWall offers it all in one program in an easy to install package. Some of these features are:
VPN support:
SmoothWall integrates an IPsec VPN with firewall capabilities. This allows people on the outside to securely access the local area network via an encrypted tunnel. This can be a fixed remote office or a roaming salesperson (nonstatic IP VPN is only supported in the corporate edition).
DHCP client and server:
The client allows the firewall to get a dynamic IP address for its WAN interface. This is common practice on DSL and cable modem ISP service. It also allows the firewall to act as a DHCP server for the internal LAN, handing out IP addresses according to a preset policy. Again, you can add these things to an Iptables firewall, but then you have two separate programs to install and manage.
SSH and Web access to firewall:
Secure access via command line and a Web browser. The Turtle Firewall gives this capability for Iptables but doesn't allow SSH access. SmoothWall has both built in with no additional software to install.
Web proxy server:
The ability to set up a Web proxy so that all Web sites are accessed through a firewall. This provides some level of Web security, since any exploits would have to run on the firewall and not the local machine. It can also allow for further protection through a content filtering option available from SmoothWall Limited.
Web caching server:
This feature stores the most popular Web pages for local access so that access times are improved and bandwidth usage is lowered.
Intrusion detection:
SmoothWall offers some basic network intrusion detection capabilities.
Graphs and reports:
SmoothWall allows you to run some simple reports on firewall activity and generate graphs based on this data.
Support for additional connection types:
SmoothWall supports many types of interfaces including dial-up, cable, ADSL, ISDN, and Ethernet. Some of these interfaces require additional software and configuration when supported under Ipchains.
One major difference between SmoothWall and the programs mentioned earlier is that SmoothWall needs to run on a dedicated machine. When you install SmoothWall, it wipes everything off the hard disk and installs its own operating system. This is basically a stripped down and hardened version of Linux, but you don't have to know anything about it to run your SmoothWall firewall. This means you won't be able to run any other tools on that machine or use it for anything else (at least not without a lot of hassle and the potential of breaking the SmoothWall software), so it may not be the right fit for everyone. But if you are looking for a cheap and quick way to set up a turnkey firewall with a lot of features, SmoothWall may be right for you.
|