|
|
< Day Day Up > |
|
Types of EncryptionThere are two main ways to do encryption today. The first kind of encryption, called symmetric cryptography or shared secret encryption, has been used since ancient Egyptian times. This form of encryption uses a secret key, called the shared secret, to scramble the data into unintelligible gibberish. The person on the other end needs the shared secret (key) to unlock the datathe encryption algorithm. You can change the key and change the results of the encryption. It is called symmetric cryptography because the same key is used on both ends for both encryption and decryption (see Figure 9.2). Figure 9.2. Symmetric Cryptography The problem with this method is that you have to communicate the secret key securely to your intended recipient. If your enemy intercepts the key, he can read the message. All kinds of systems were invented to try to get around this basic weakness, but the fact remained: you still had to communicate the secret key in some way to your intended recipient before you could commence secure communications. A revolution in encryption was started when Whitfield Diffie, Martin Hellman, and Ralph Merkle invented Public Key cryptography. (Actually, there is some debate whether the British civil servant James Ellis really invented it earlier and kept it secret, but Diffie, Hellman, and Merkle were the first to go public with it in 1976.) They were trying to solve the age-old problem of key exchange. Diffie wondered how two individuals wanting to make a financial transaction over an electronic network could do so securely. He was thinking far ahead here, because the Internet was in its infancy at the time and e-commerce didn't yet exist. If big governments had problems dealing with the key exchange problem, how could the average person manage this? He wanted to come up with a system by which two parties could easily hold protected conversations and secure transactions without having to exchange keys every time. He knew that if he could solve the key exchange problem, it would be a huge advance in cryptography. Diffie partnered with Martin Hellman and Ralph Merkle. It took them a few years, but finally they came up with a system called public key encryption (PKE), also known as asymmetric cryptography. Asymmetric cryptography uses encryption that splits the key into two smaller keys. One of the keys is made public and one is kept private. You encrypt a message with the recipient's public key. The recipient can then decrypt it with their private key. And they can do the same for you, encrypting a message with your public key so you can decrypt it with your private key (see Figure 9.3). The difference here is that you don't need someone's private key to send him or her a secure message. You use his or her public key, which doesn't have to be kept secure (in fact, it can be published like a phone number). By using your recipient's public key, you know that only that person can encrypt it using his or her private key. This system allows two entities to communicate securely without any prior exchange of keys. Figure 9.3. Asymmetric Cryptography (Public Key)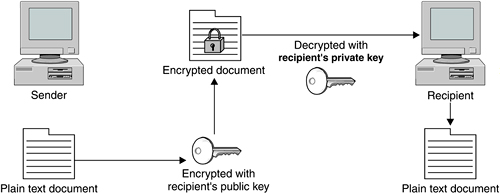 Asymmetric cryptography is usually implemented by the use of one-way functions. In mathematic terms, these are functions that are easy to compute in one direction but very difficult to compute in reverse. This is what allows you to publish your public key, which is derived from your private key. It is very difficult to work backwards and determine the private key. A common one-way function used today is factoring large prime numbers. It is easy to multiply two prime numbers together and get a product. However, to determine which of the many possibilities are the two factors of the product is one of the great mathematical problems. If anyone were to invent a method for easily deducing factors of large prime numbers, it could make obsolete much of the public key encryption used today. Fortunately, other one-way functions work for this application, such as calculations on elliptical curves or computation of inverse logarithms over a finite field. Soon after the paper by Diffie, Hellman, and Merkle was released, another group of three men developed a practical application of the theory. Their system for public key encryption was called RSA after their names: Ronald Rivest, Adi Shamir, and Leonard Adleman. They formed a company and began licensing their system. The adoption rate was slow and their company almost went out of business, until they cut a deal to take advantage of the growing Internet commerce field with a then little-known company called Netscape. The rest is history, and RSA is now the most widely used public key encryption algorithm. Diffie and Hellman eventually released a practical application of their own, but it is usable only for key exchanges, whereas RSA can do authentication and nonrepudiation. Public key encryption is now behind every Web server that offers you a secure purchase. Your transaction is encrypted without giving or taking a secret key, and it all happens in the background. All we know as users is that the little SSL lock symbol displays in our browser and we feel safer. Imagine the effects on Internet commerce if every time you wanted to buy something online you had to think of a secret key, encrypt the message, and then somehow communicate that key to the other party. Obviously, e-commerce could not exist as it does today without public key cryptography. There are many different encryption algorithms, protocols, and applications based on these two main types of encryption. The following sections introduce some of these. Encryption AlgorithmsToday, strength of encryption is usually measured by key size. No matter how strong the algorithm, the encrypted data can be subject to brute force attacks in which all possible combinations of keys are tried. Eventually the encryption can be cracked. For most modern ciphers with decent key lengths, the time to crack them with brute force them is measured in millennia. However, an undisclosed flaw in an algorithm or an advance in computer technology or mathematical methods could sharply decrease these times. Generally, the thinking is that the key length should be suitable for keeping the data secure for a reasonable amount of time. If the item is very topical, such as battlefield communications or daily stock information, then a cipher that protects it for a matter of weeks or months is just fine. However, something like your credit card number or national security secrets need to be kept secure for a longer period, effectively forever. So using weaker encryption algorithms or shorter key lengths for some things is okay, as long as the information usefulness to an outsider expires in a short amount of time. Data Encryption Standard (DES)DES is the original standard that the U.S. government began promoting for both government and business use. Originally thought to be practically unbreakable in the 1970s, the increase in power and decrease in cost of computing has made its 56-bit key functionally obsolete for highly sensitive information. However, it is still used in many commercial products and is considered acceptable for lower security applications. It also is used in products that have slower processors, such as smart cards and appliance devices that can't process a larger key size. TripleDESTripleDES, or 3DES as it is sometimes written, is the newer, improved version of DES, and its name implies what it does. It runs DES three times on the data in three phases: encrypt, decrypt, and then encrypt again. It actually doesn't give a threefold increase in the strength of the cipher (because the first encryption key is used twice to encrypt the data and then a second key is used to encrypt the results of that process), but it still gives an effective key length of 168 bits, which is plenty strong for almost all uses. RC4, RC5, and RC6This is an encryption algorithm developed by Ronald Rivest, one of the developers of RSA, the first commercial application of public key cryptography. Improvements have been made over time to make it stronger and fix minor issues. The current version, RC6, allows up to a 2,040-bit key size and variable block size up to 128 bits. AESWhen the U.S. government realized that DES would eventually reach the end of its useful life, it began a search for a replacement. The National Institute of Standards and Technology (NIST), a government standards body, announced an open competition for a new algorithm that would become the new government standard. There were many competitors including RC6, Blowfish by renowned cryptographer Bruce Schneier, and other worthy algorithms. They settled on AES, which is based on an algorithm called Rijndael, designed by two Belgian cryptographers. This is significant because they used an open competition to decide on the standard. Also, selecting an algorithm by two non-American developers with no significant commercial interests helped to legitimize this selection worldwide. AES is rapidly becoming the new standard for encryption. It offers up to a 256-bit cipher key, which is more than enough power for the foreseeable future. Typically, AES is implemented in either 128- or 192-bit mode for performance considerations. Encryption ApplicationsHashesHashes are a special use of one-way functions to provide authentication and verification using encryption. A hash function takes a file and puts it through a function so that it produces a much smaller file of a set size. By hashing a file, you produce a unique fingerprint of it. This gives you a way to make sure that the file has not been altered in any way. By hashing a suspect file and comparing the hash to the known good hash, you can tell if any changes have been made. It is unlikely that a file with a different structure would produce an identical hash. Even changing one character changes the hash significantly. The chances of two different files producing the same hash are infinitesimal. Hashes are often provided on downloaded versions of software to make sure you are getting the real thing. This is important, especially with open source software, where it may have been passed around quite a bit or downloaded from another site. The official Web site will usually post the correct hash of the latest version. If the two don't match, then you know some changes have been made, possibly without the permission or knowledge of the software developers. The most popular hashing algorithm is called MD5. Digital CertificatesDigital certificates are the "signature" of the Internet commerce world. These use a combination of encryption types to provide authentication. They prove that who you are connecting to is really who they say they are. Simply put, a certificate is a "certification" of where the information is coming from. A certificate contains the public key of the organization encrypted with either its private key or the private key of a signing authority. Using a signing or certificate authority is considered the more secure method of the two. If you can decrypt the certificate with their public key, then you can reasonably assume the Web site belongs to that organization. Certificates are usually tied to a particular domain. They can be issued by a central entity, called a Certificate Authority (CA), or created and signed locally as described above. There are several of these organizations, the biggest of which is VeriSign, the company that also runs the domain names system. They have sanctioned many other companies to offer certificates under their authority. Getting a certificate from VeriSign or one of the companies it authorizes is like having someone vouch for you. Generally, they will not issue you a certificate until they verify the information you are putting in the certificate, either by phone or via some kind of paper documentation, such as a corporate charter. Once they "certify" you, they will take this information, including the URLs you are going to use the certificate for, and digitally "sign" it by encrypting it with their private key. Then a Web server or other program can use this certificate. When outside users receive some data, such as a Web page from the server, and it has a certificate attached, they can use public key cryptography to decrypt the certificate and verify your identity. Certificates are used most often at e-commerce Web sites, but they can also be used for any form of communications. SSH and Nessus both can use certificates for authentication. VPNs also can use certificates for authentication instead of passwords. Encryption ProtocolsIPsecIt's a well-known fact that the IP protocol as designed originally was not very secure. IP version 4 (IPv4), which is what most of the world uses for IP communications, doesn't provide any kind of authentication or confidentiality. Packet payloads are sent in the clear, and packet headers can easily be modified since they are not verified at the destination. Many Internet attacks rely on this basic insecurity in the Internet infrastructure. A new IP standard, called IPv6, was developed to provide authentication and confidentiality via encryption. It also expanded the IP address space by using a 128-bit address rather than the 32-bit currently used and improved on a number of other things as well. Fully implementing the IPv6 standard would require wide-scale hardware upgrades, so IPv6 deployment has been pretty slow. However, an implementation of security for IP, called IPsec, was developed that wouldn't require major changes in the addressing scheme. Hardware vendors have jumped on this, and IPsec has gradually become a de facto standard for creating Internet VPNs. IPsec is not a specific encryption algorithm, but rather a framework for encrypting and verifying packets within the IP protocol. IPsec can use different algorithms and can be implemented in whole or just partially. A combination of public key and private key cryptography is used to encrypt the packet contents, and hashes add authentication as well. This function is called Authentication Header (AH). With AH, a hash is made of the IP header and passed along. When the packet arrives at the destination, a new hash is made of each header. If it doesn't compare to the one sent, then you know the header has been altered somehow in transit. This provides a high level of assurance that the packet came from where it says it does. You may choose to do encryption of the packet payload but not do AH, as this can slow down the throughput. AH can also get fouled up in some environments with NAT or firewalls. There are also different two operation modes you can run IPsec in: tunnel mode or transport mode. In tunnel mode, the entire packetheader and allis encapsulated and encrypted, placed in another packet, and forwarded to a central VPN processor. The endpoints decrypt the packets and then forward them to the correct IP. A benefit of this method is that outsiders can't even tell what the final destination is for the encrypted packet. Another advantage is that the VPN can be controlled and administered from a few central points. The downside is that this requires dedicated hardware at both ends to do the tunneling. In transport mode, only the packet payloads are encrypted; the headers are sent intact. This makes deployment a little easier and requires less infrastructure. You can still do AH when using transport mode and verify the source address of the packets Point-to-Point Tunneling Protocol (PPTP)PPTP is a standard that was developed by Microsoft, 3Com, and other large companies to provide encryption. Microsoft has added it to Windows 98 and later releases. This made it seem a likely candidate to be the major standard for widespread encryption technology. However, some major flaws were discovered in PPTP, which limited its acceptance. When Microsoft bundled IPsec with Windows 2000, it seemed a tacit admission that IPsec had won as the new encryption standard. However, PPTP is still a useful and inexpensive protocol for setting up VPNs between older Windows PCs. Layer Two Tunneling Protocol (L2TP)This is another industry-developed protocol, and is endorsed by Microsoft and Cisco. Although used frequently in hardware-based encryption devices, its use in software is relatively limited. Secure Socket Layer (SSL)This protocol was designed specifically for use on the Web, although it can be used for almost any type of TCP communications. Netscape originally developed it for their browser to help stimulate e-commerce. SSL provides data encryption, authentication on both ends, and message integrity using certificates. Most of the time, SSL is used when connecting to a Web server so that we know the information we send it is being protected along the way. Most people don't even realize that SSL is running in the background. Usually it only authenticates one end, the server side, since most end users don't have certificates. Encryption ApplicationsPhil Zimmerman is a programmer who was heavily involved with human rights. He was concerned that the growing use of computers and communication networks would make it easier for the state security agencies of repressive regimes to intercept and gather information on dissidents. Phil wanted to write some software that would help these people keep their information private and safe from the eyes of the brutal regimes that ruled them. This software could quite literally save people's lives. He also didn't entirely trust his own government not to observe his personal data as it traveled across interconnected networks. He knew how easy it would be for the government to build systems to search every line of every e-mail for certain key words. He wanted to provide people with a way to protect and guarantee their constitutional right to privacy. He called his software Pretty Good Privacy (PGP), as he felt it did a good enough job to protect the data from smaller countries' intelligence forces. However, the U.S. information security agency, NSA, didn't see it that way. Zimmerman was investigated for violating federal munitions export laws for allowing his software to be downloaded out of the country. He originally intended on founding a company to sell his innovation. However, when the government came after him, he freely distributed the software over the Internet to get it widely distributed. He did subsequently form a company to market commercial versions of the software, but there are open source implementations of PGP all over the Internet. Some of them are more popular than others, and some are for niche applications such as e-mail encryption. The next section reviews the official PGP Corporation freeware version as well as a full open source version. You can find a list of all the implementations of PGP at www.cypherspace.org/openpgp/.
MIT maintains the official freeware version of PGP. Since it is licensed from Phil Zimmerman and PGP Corporation, you can be reasonably sure of its integrity and validity. The downside of the PGP freeware is that it is licensed for personal use only, so you can use it for your personal e-mail or for educational purposes if you are student. If you are going to use this version of PGP, make sure that you carefully read the license and understand it. While this version of PGP is open source and freeware, there are considerable restrictions on what you can use it for. Remember, open source doesn't always mean free. If you want the best of both worlds, both the most current version and ease of use and support, you should look into buying a full license from PGP Corporation. It runs about $125 for a single user, and has a discount for volume purchases. If you can't or won't pay, then the next tool, GnuPG, which is a fully free implementation of PGP, may be of more interest to you The official PGP from PGP Corporation does have some excellent features.
Before you install and begin using PGP, you should understand a little about how it works and the principles behind it. This section is not meant to give you detailed training and understanding of cryptography or PGP; you can refer to the many books on those subjects. But you should come out of this chapter being able to encrypt and decrypt messages using PGP. Caution: If you implement PGP improperly, it can provide little or no protection at all. You can also irrevocably lose your data if you are not careful with your decryption keys (see the sidebar "Don't Lose Your Keys!!"). PGP is considered a hybrid cryptosystem, which means that it uses a combination of symmetric and asymmetric encryption to accomplish its function. Public key encryption takes a lot more processing power than shared secret encryption because public key encryption typically uses complex math involving prime numbers. PGP uses only public key encryption to create a session key, which is then used to encrypt the whole message using traditional symmetric cryptography. Most public key cryptosystems use this method to improve performance. Rather than type in your whole private key each time you use PGP, which would take quite some time and be very prone to error, your private key is stored on your hard drive in encrypted form. To unlock your key, you type in a pass-phrase each time you use PGP. This is like a password, only generally it is longer and made up of several words, preferably with numbers and letters. This pass-phrase is very important to remember, because if you ever lose or forget it, you won't be able to recover the data you encrypted with PGP. Installing PGP and Generating Your Public/Private Key Pair
If you want to delete PGP from your computer, you must use the uninstaller function provided. Simply removing the files will not work properly as PGP makes significant changes to your registry and other core windows settings.
Using PGPYou access PGP from your Programs menu under Start. There are several available options, including PGPMail and the documentation. The PGP freeware version has great documentation, including a 70-plus page introduction to cryptography. It is a good primer for those new to cryptography. PGP also has a huge user's guide. When you start PGPMail, a small tool bar displays on your screen. This can be minimized to a small icon on your system tray when you are not using it. This simple interface offers your several options: PGPKeys, Encrypt, Sign, Encrypt and Sign, Decrypt/Verify, Wipe, and FreeSpace wipe. The specific functions of each item are covered next. PGPKeysYou use the PGPKeys section to manage both your own public and private keys and the public keys of others you wish to communicate with (see Figure 9.4). The PGP program creates two directories for keys on your disk. These directories are called key rings, as they contain all the keys that you need to use PGP, both public and private. The file pubring found in your main PGP directory contains your public key as well as others of people you want to send encrypted files to. The file secring contains your private key, usually in encrypted format. It normally contains only one private key, but you can maintain more than one private key. For example, you can have one for your business e-mail and another for your private correspondence. Just remember, items encrypted with a specific public key are not decryptable with anything other than that specific matching private key. Figure 9.4. PGPKeys Screen You can also create new key pairs here, and revoke pairs of keys you are no longer using. You can upload your public key to one of several public key servers. This allows someone who has never talked to you to find your key on a public key server and send you a PGP message. Many folks who use PGP are in the habit of putting their public key in the signature line on their e-mails so correspondents can easily send them a PGP-encrypted message. Another way to help to verify the legitimacy of a person's key is have it signed by other people's keys. This is a way of validating that someone's public key is a match to that person. You should only sign public keys of people that you personally know well and have verified that the key is correct. You should also get your friends and associates to sign your keys. This circle of key signing creates a nonhierarchical trust model called a web of trust. The nice thing about this model is that it doesn't require a central authority to make it work. For more details on how this web of trust works, see the GnuPG section later in this chapter. To add other users' keys to your public key ring, you can either import them directly from a file or do a search of public key servers. By selecting Search on the Servers menu or clicking on the magnifying glass icon and typing in part of a name or some identifying text, you can see what keys on the public key servers match your request. Drag and drop the appropriate selection from the results to the main PGPKey screen and that person's public key will be available for using in your PGP messages. You can also view the specific properties of any key, including the signers of that key, size of the key (in bits), and the method (usually DH for Diffie-Hellman). Finally, you can import or export your key rings if you have moved computers or need to restore from a backup. EncryptThe Encrypt function is pretty straightforward. First, a dialog box lets you pick the file to encrypt. Once you select a file, PGP prompts you to select the recipient's public key from your key ring. If you don't have it yet, do a search on the public key servers for it as described above and add it to your list. Select the public key of your intended recipient and drag and drop the key from the box on top down to the recipient list. The check boxes on the lower left have several important options (see Figure 9.5). One of the most important is Wipe Original. Click on this if you are encrypting this file to keep on your hard disk. Otherwise, PGP will simply create a new encrypted file and leave the original in plain text in the same directory for viewing. Remember, though, if you do this and lose your keys, that file is gone forever. Figure 9.5. PGP Encrypt Option Screen
Another important option is Conventional Encryption. If you select this, public key encryption will not be used. Instead, standard shared secret encryption will be employed and you will have to pick a pass-phrase in order to encrypt the data. This pass-phrase will then have to be passed securely to your intended party on the other end. This method defeats the main benefit of PGP, but it may be necessary if you don't have the recipient's public key. If the recipient doesn't have PGP software, select the Self-Decrypting Archive file option. This creates a file that will decrypt itself when the person receiving the file clicks on it. Of course, your recipient will still have to know the pass-phrase you used to create the file. SignThe Sign function lets you sign a file with your public key, thereby allowing someone to verify that it hasn't changed since you signed it. This uses a hash function to summarize the file in a digest format and then encrypt it with your private key. This is the reverse of normal public key encryption. The recipient can take the signature and attempt to decrypt it with your public key. If the hashes match, then he or she knows that the contents haven't changed since you signed it. This is a useful function if you are more concerned about the integrity of the file than the confidentiality of the information. An example would be a lengthy contract that has been heavily edited. You could sign it digitally and be sure that no one could change it after you looked at it. Signing can also be used to provide what is known as nonrepudiation, that is, if you sign a document, it can be proven that you did it, unless someone got hold of your private keys. This is akin to the validity of your physical signature except the ability to forge a digital signature is significantly harder than a traditional signature. Encrypt and SignThis function performs both of the Encrypt and Sign functions above, providing strong confidentiality, integrity, and nonrepudiation. Decrypt/VerifyYou use the Decrypt/Verify function to reverse the PGP encryption process. After you select the file to decrypt, it prompts you for your pass-phrase to use your private key on your disk. If entered correctly, it asks you for a new file name to decrypt the file into. You can also use this function to verify that a signature is valid. WipeThe Wipe function permanently removes a file from your hard disk. This process is much more final that the Windows Delete function. The problem with Windows (and most operating systems) is that it doesn't actually remove the data from your hard disk when you delete a fileit just removes the file's listing in the file system index. The data is still sitting there on the disk platters. It can be viewed with a low-level disk editor or recovered using readily available utilities like Norton or DD (DD is demonstrated in Chapter 11). The Wipe function actually overwrites the data multiple times on the disk with random zeros and ones. The default for this activity is three times, which is fine for most uses. You may want to increase this to at least ten if you are using this for highly sensitive data, since specialists in data recovery can actually recover data even when it has been overwritten several times. You can increase the passes made, up to 28 times, at which point not even the NSA could get the file back. Note that if you are deleting large files with lots of passes your disk will turn for a quite a while. This is very disk-intensive activity. Freespace WipeFreespace Wipe performs the same function as the Wipe function, but on the free space on your disk. You should do this occasionally because old files that you deleted but didn't wipe may still exist. Also, programs regularly create temp files that may contain copies of sensitive data. They are deleted by the operating system when you close the program but they still exist on your disk. Freespace Wipe sanitizes your entire hard disk. You can also schedule this function to do automatic regular wipes of your hard drive. PGP OptionsThere are a number of global options you can set in PGP. From the PGPKeys main menu, under File choose Edit to display the PGP Options dialog box (see Figure 9.6). Table 9.1 lists the tabs and gives an overview of each.
Figure 9.6. PGP Options Dialog Box This should give you enough information to start with PGP and protect your files and communications. Again, this is meant to be a quick overview of the PGP product. Please read the ample documentation if you intend to be a heavy PGP user. If you need additional functionality or commercial use, consider upgrading to the commercial version. If you don't want to agree to all the limitations of the PGP freeware license but want to use PGP, there is another option, the GNU version of PGP, which is described next.
GNU Privacy Guard (GnuPG) is based on the OpenPGP standard and is an answer to the commercial and restrictive freeware license versions of PGP. Of course, as with most things from GNU, the name is a play on words (it's the inverse of PGP). The big upside of the GNU version is that you can use it for any application, personal or commercial. Also, since its license is GPL, you can extend it or graft it onto any application you like. The downside is that it is a command line tool, so it doesn't come with some of the nice add-ons that the commercial version of PGP offers. If cost is an issue and you don't mind learning to use the commands, then GnuPG is for you. A word of warning, though: GnuPG is probably not the best choice for nontechnical users, unless you add your own front end or some user-friendly scripts (there are several available on the Internet). Installing GnuPGMany current versions of Linux and BSD ship with GPG already installed, so you can check to see if you already have it by typing gpg --version at the command line. If you get a listing of the program information, you can skip this section and start using GnuPG.
Creating Key PairsOnce you have the program installed, the first thing you need to do is to create your public-private key pair. If you already have a key and want to import it onto this system, use the command:
gpg --import path/filename
where you replace path/filename with the path and file to your keys. You must do separate statements for your public and private key rings. The file format of the key rings is generally pubring.pkr and secring.skr. Otherwise, follow this procedure.
Creating a Revocation CertificateOnce you've created your keys, you can also create a revocation certificate. This is used if you lose your keys or if someone gains access to your private key. You can then use this certificate to revoke your key from the public key servers. You can still decrypt messages you have received using the old public key (assuming you didn't lose it) but no one will be able to encrypt messages anymore with the bad public keys. To create your revocation certificate, type:
gpg output revoke.asc gen-revoke user
where you replace user with a unique phrase from that user on your secret key ring. This generates a file called revoke.asc. You should remove this from your hard drive and store it somewhere safe. You do not want to leave it in the same place as your private key, the theory being if someone has access to your private key material, they could also keep you from revoking it. Publishing Your Public KeyYou will want to place your public key on a key server so people can easily find your public key to send messages to you. To do this, use this command: gpg keyserver server send-key user where you replace server with the name of a public key server and user with the e-mail address of the key you want to publish. You can use any public PGP key server since they all sync up on a regular basis. You can choose any one of them and your public key will propagate across the servers. There are many public key servers, including:
Encrypting Files with GnuPGTo encrypt a file you use the --encrypt command. The format is as follows: gpg --output file.gpg --encrypt --recipient friend@example.com file.doc [All on one line] where you replace file.gpg with the resulting filename you want, friend@example.com with the e-mail address of the user you are sending it to, and file.doc with the file you want to encrypt. Note that you must have the recipient's public key on your key ring in order to do this. You can also use GnuPG to encrypt files with simple symmetric cryptography. You might use this for local files you want to protect or for someone for whom you don't have a public key. To do this, use the --symmetric command in this format: gpg --output file.gpg --symmetric file.doc where you replace file.gpg with the output file you want and file.doc with the name of the file you want to encrypt. Decrypting FilesTo use GnuPG to decrypt files you have received, use the following command: gpg --output file.doc --decrypt file.gpg where file.doc is the resulting file name you want and file.gpg is the encrypted file. You must have the private key for the user it was encrypted for on your secret ring. This prompts you for the pass-phrase, and once you have entered it correctly, GnuPG produces the decrypted file. Signing FilesAs mentioned earlier, another use of GnuPG and PGP is signing documents to verify their integrity. You can do this by issuing the following command: gpg --output signed.doc --sign unsigned.doc Replace signed.doc with the resulting output filename you want and unsigned.doc with the file you want signed. This command signs and encrypts the document and produces the output file signed.doc. When it is decrypted, GnuPG will also verify the document. You can verify a file with the following command:
gpg --verify signed.doc
where signed.doc is the encrypted file you want to verify. You can also create signatures separate from the file if you want users without GnuPG to be able to access them but still want to include the signature. There are two commands for this. The command
gpg --clearsign file.doc
creates a text addendum to the file with the signature. If you don't want to alter the file, you can create a separate signature file with the command gpg --output sig.doc --detached-sig file.doc The PGP/GnuPG Web of Trust ModelAs mentioned earlier, rather than use a hieratical trust system like digital certificates and their central certificate authority, PGP and GnuPG use a web of trust model. By signing the keys of people you know, you can verify that their key is worthy of trust. And if they sign other people's keys who you don't know directly, you create a chain of trust. The model is based on the idea of "any friend of yours is a friend of mine." Granted this model doesn't work perfectly; someone far down the trust chain could turn out to be a bad apple and get away with stuff for a while. But the idea behind this system is that it spreads organically and doesn't require any infrastructure. Because of this, it can't be dismantled or co-opted on a large scale easily. The way you establish this web of trust is by signing people's keys and having them sign yours. In the example in Figure 9.7, Tony can implicitly trust Jane, Joe, John, and Eve's keys even though he doesn't know them directly. Figure 9.7. Web of Trust Model
Signing Keys and Managing Your Key TrustsIn GnuPG you sign keys and manage your key trusts by going into key edit mode with the following command:
gpg --edit-key friend@example.org
where friend@example.org matches the e-mail address of the key you want to sign or manage and must be one of the keys on your public ring. It prints out basic information on the key. Within this mode, type fpr to print the fingerprint of that key. Just like humans, the key fingerprint is a specific identifier of that key. Make sure that this is the person's key by comparing it with him or her either on the phone or by some other manner. You can also check to see who else has signed this key by typing check. This prints a list of other signers of this key and may help you decide the validity of the key. When you are sure that this is the person's key, type sign. This signs that person's key so that anyone looking at it knows that you trust him or her. In this mode you can also edit the trust levels of the different keys in your ring. Enter this mode from within key edit mode by typing trust. This displays the following menu.
Pick one of the items and that key will be marked as such by you. This is another way you can communicate to yourself and others about which users have your highest level of trust and which ones you barely know. This should give you a good introduction to the world of PGP and GnuPG. Again, this chapter is not intended to be the conclusive source on these, and you should refer to their respective Web sites and the other listed sources to read further on these revolutionary programs. PGP and GnuPG are great for encrypting files. However, what if you want to encrypt all communications between two points? PGP is not really viable for this function (the newly included VPN client with the commercial version not withstanding). An open source tool for creating these standing connections where everything is encrypted on the fly is discussed next.
Most of the file and communication utilities used on the Internet today hark back to the days when the Internet was a small and safe place. One of the most common tools used, other than a Web browser, is Telnet. This utility is used for remote terminal access to all types of servers, routers, firewalls, and other devices. The big downside of Telnet is that it sends its transmissions in the clear, so if you are using Telnet to log into a system over the Internet, someone could capture your traffic, including your passwords. You may think finding your password in the stream of data would be like finding a needle in a haystack, but hackers have written programs that run on top of sniffers to search for common login terms and catalog the results. This is also true of other remote tools such as FTP, TFTP, and RCP. SSH fixes this problem by using both public key and symmetric cryptography to encrypt your session starting from the first keystroke. This way, all anyone listening to your connection gets is random noise. SSH not only provides confidentiality for your data by using encryption, but it also provides strong authentication that foils spoofing and other identity-type attacks. It does this by using digital certificates to authenticate users. Don't confuse SSH with SSL, the Web encryption standard. Though they both do the same thing, SSH works with any protocol, whereas SSL is primarily designed for Web communications. SSH also includes SCP, which is a secure replacement for RCP, the remote copying tool, and SFTP, a secure replacement for FTP. SSH can also be used to tunnel other protocols, such as HTTP and SMTP, between machines. Several applications are discussed at the end of this section. Using this suite of programs instead of their older counterparts ensures that your remote communications to servers aren't being read. Eliminating the use Telnet and FTP on your network may be difficult, but the more you do it, the more secure you will be. In order to use SSH, you must have a SSH server running on the machine you want to connect to and a SSH client on the machine you are connecting to. Regular FTP and Telnet clients won't connect to a SSH server. The client is built into most current Linux operating systems, although you may have to select this option when installing your OS. (See Chapter 2 for information on the SSH client.) The SSH server is usually optional and you have to select it when you install your OS. To determine if it is already installed, type ps and see if the sshd process is running. If not, you will have to install the server to allow connections to your machine via SSH.
Remember, to connect to your server via SSH you need to be running a compatible version of the SSH on the client end. Instructions on the installation and use of the SSH client are in Chapter 2. Port Forwarding with OpenSSHWhile SSH was primarily intended for Telnet-like command line interaction, it can also be used to set up a secure tunnel between two machines for any application. You can create a secure connection between two servers with the built-in port forwarding capability in SSH. For this to work, you must have SSH running on both ends of the connection. You can do with any service on any port with the following statement issued on the client end.
ssh -L local_port:local_host:remote_port remote_hostname
N &
where you replace:
The -L option tells SSH to listen on the local_port on local_host and forward any connections to the remote_port on the remote_host. The -N option tells SSH not to try to log in, just to keep the connection open for forwarded traffic. The & runs the task in the background, so it will run as a system process and you can do other things on the machine. If the machine is rebooted, you will have to enter the command again unless you put it in the start-up script. Using this method, you do not need a login on the remote end to establish the encrypted connection to the remote server. You will need appropriate credentials for anything you want to do over the forwarded port if they are required. The following are two examples to show how this works. Example 1: Creating an Encrypted E-mail Connection with OpenSSHNormally, e-mail is sent over port 25 unencrypted. Let's say you want to encrypt this connection instead. The way to do this is to use SSH to set up an encrypted tunnel for any traffic bound for port 25 traffic on your mail server. Using the above format and assuming your mail server has IP address 192.168.1.2, the correct command would be: ssh L 5000:localhost:25 192.168.1.2 N & This sets up port 5000 on your local machine as the port that would tunnel the mail port (25) to your remote mail server. So if you set up your mail client to connect to localhost:5000 instead of the default mail port, SSH will automatically forward the traffic to port 25 on your mail server using SSH to encrypt it. Now, you can receive and send mail to this machine without worry of having your mail read off of the wire. Example 2: Creating a Secure Web ConnectionWhat if you want to connect your Web server for a secure transaction? If the server wasn't set up to do SSL, you could still use SSH to securely tunnel your Web traffic to the server. If your Web server is located at 192.168.1.3, the command string looks like this: ssh L 5000:localhost:80 192.168.1.3 N & Now you can connect by entering localhost:5000 in your Web browser, and you will actually be forwarded via a secure tunnel to port (80) on the remote machine. You can port forward several different ports on the same machine. For example: ssh L 5000:localhost:5000:25 L 5001:localhost:80 192.168.1.2 N & will forward all traffic on port 5000 locally to the mail port on 192.168.1.2, and all traffic to port 5001 to port 80 on the remote machine. Of course, this example assumes you have a mail account on the remote server. As you can see, SSH works great for creating a secure connection between two machines for just about any protocol. However, what if you want to encrypt all traffic, regardless of what port or service? In this case, setting up a virtual private network makes more sense. | ||||||||||||||||||||||||||||||||||||||||||||||||||||||||||||||||
|
|
< Day Day Up > |
|