| [ Team LiB ] |
|
Reviewing Essential Administration ToolsThe Solaris Operating Environment provides two groups of administration tools.
Frequently Used CommandsThe following sections briefly introduce basic Solaris commands that you are likely to use regularly as part of routine system administration; they are grouped by tasks. See Chapter 2, "Using Basic OS Commands," for additional frequently used commands. Getting Around in the File System (pwd, cd)The Solaris Operating Environment has a hierarchical file system. When administering systems, you need to know where you are in the file hierarchy and how to change to a different directory. Finding Where You Are in the File SystemTo find out where you are in the file system hierarchy, type pwd and press Return. The print working directory command displays the current directory.
oak& pwd
/etc
oak%
Changing DirectoriesTo change directories, type cd pathname and press Return. The change directory command moves the focus to the directory whose name you type. oak% cd /usr oak% pwd /usr oak% If you type cd and press Return without typing a path name, focus is returned to the login home directory. Finding Information About FilesWith the ls command, you can list the contents of a directory and display permissions, links, ownership, group, size (in bytes), modification date and time, and file name for files. Many user problems related to accessing files can be traced to problems with incorrect permissions or ownership. See Chapter 12, "Recognizing File Access Problems," for more information. Table 17 shows the options to the ls command.
Displaying File Information (ls)To display information about an individual file, type ls -l filename and press Return. Permissions, links, owner, group, file size in bytes, modification date and time, and the file name are displayed.
oak% ls -l /etc/passwd
-r--r--r--    1 root     sys        659 Feb 24 17:28 /etc/passwd
oak%
The next nine characters are interpreted as three sets of three bits each. The first set refers to the owner's permissions; the next, to permissions of others in the user-group of the file; and the last, to all others. Within each set, the three characters indicate permission to read, to write, and to execute the file as a program. For a directory, execute permission is interpreted as permission to search the directory for a specified file. For user and group permissions, the third position can be occupied by x (execute) or - (deny access). For user permissions, s denotes the set-user-ID bit. For group permissions, it denotes the set-group-ID bit. For example, the ability to assume the same user ID as the program owner during execution is used during login when you begin the process as root but then assume the identity of your user login. For group permissions, l can occupy the third position. l refers to mandatory file and record locking. This permission describes a file's ability to allow other files to lock its reading or writing permissions during access. For others permissions, the third position can be occupied by t or T. These refer to the state of the sticky bit and execution permissions. The permissions are described below.
To see a complete list of all files in the directory, type ls -l and press Return. See the ls(1) manual page for a complete list of options. Finding a File (find)To find a file by searching from the home directory, type find $HOME -name filename -print and press Return. The $HOME variable starts the search with the home directory. The -name option looks for the name specified in the filename variable. The -print option displays the results of the find. If the named file is not found, the prompt is redisplayed. The following example shows the results of find looking for core files.
oak% find $HOME -name core -print
/home/ignatz/core
oak%
Table 18 shows some of the options to the find command that you can use to focus your searches.
See the find(1) manual page for a complete list of options. Finding the Type of a File (file)Sometimes you need to determine the type of a file. To find the type of a file, type file filename and press Return. The output of the command makes an educated guess about the type of the file. For example, if you are trying to execute an ASCII file that does not have execute permissions or to execute an empty file, displaying the file type tells you whether the system recognizes the file as a command. In the following example, the file is empty.
anastasia% file junk1
junk1: empty file
anastasia%
In the following example, the file is an ASCII text file.
anastasia% file junk2
junk2: ascii text
anastasia%
In the following example, the file is a text file with executable permissions, so the file command reports that the file contains commands and is text. anastasia% chmod 777 junk3 anastasia% file junk3 junk: commands text anastasia%
NOTE. You can, of course, determine if the command has execute permissions with the ls -l command. To show the file type for all files in a directory, type file * and press Return. The files are listed in alphabetical order followed by the file type.
$ file *
coterie:      directory
course:       ascii text
dead.letter   ascii text
ksyms         English text
people:       directory
personal:     directory
showrev:      ascii text
status:       directory
text:         directory
todo:         ascii text
$
Finding Information in Files (grep, egrep)You can use the grep and egrep commands to search files and command output for specific information. Searching Files for Text StringsTo search files for a specific text string, type grep search-string filename and press Return. Lines in the files containing the string are displayed. In the following example, the passwd file is searched for lines containing csh.
oak% grep csh /etc/passwd
ignatz::6693:10:Iggy Ignatz 64607:/home/ignatz:/bin/csh
fred::14072:10:Fred Lux:/home/fred:/bin/csh
oak%
You can search more than one file by specifying a series of file names separated by spaces or by using metacharacters such as the asterisk (*) or question mark (?) together with (or in place of) the file name. To print lines that do not contain the specified string, type grep -v search-string filename and press Return. Lines in the file that do not contain the string are displayed. Searching Input for Lines with a Given PatternYou can use the grep command with pipes in combination with many administrative commands. For example, if you want to find all of a user's current processes, pipe the output of the ps command to grep and search for the user name, type ps -e | grep name and press Return. The listing for the name you specify is displayed. See "Combining Commands (|)" on page 122 for more information. The following example finds the OpenWindows process.
oak% ps -e | grep openwin
PID TTY      TIME COMD
2212 pts/0    0:00 openwin
oak%
Looking at FilesYou undoubtedly will spend lots of time looking at the content of files. When you need to look at the entire file, use the more command. When the information you need is at the end of the file (for example, in a log file), use the tail command to display the last lines (10 by default) of the file. When important information is at the beginning of the file, use the head command to display the first lines (10 by default) of the file. Viewing a File (more)To view a file, type more filename and press Return. The file is displayed one screen at a time. Press Return to display the next line. Press space to view the next screen. To search for a specific string in a file you are viewing with more, type /search-string and press Return. The text scrolls to display the place in the file that contains the text of the search-string variable and displays the search string and the message . . . skipping at the top of the window. If no match is found, the message Pattern not found is displayed at the bottom of the window and the text does not scroll. For example, to find the words Local aliases in the /etc/mail/aliases file, type /Local aliases and press Return. /Local aliases ...skipping ####################### # Local aliases below # #######################
NOTE. You must use exact capitalization in the search string for the more command. If you type /local aliases in the previous example, the pattern is not found. To search for the next occurrence of the search string, type n. To quit more, type q. The shell prompt is redisplayed. Another way to quit more, if Control-C is set as your shell kill character, is to press Control-C. The shell prompt is redisplayed. To display the shell intr (interrupt) character, type stty -a and press Return. A list of the stty settings is displayed. In the following example, ^c is the shell intr character.
castle% stty -a
ispeed 88840 baud; ospeed 88824 baud;
rows = 36; columns = 113; ypixels = 478; xpixels = 801;
eucw 1:0:0:0, scrw 1:0:0:0
intr = ^c; quit = <undef>; erase = ^h; kill = ^u;
eof = ^d; eol = <undef>; eol2 = <undef>; swtch = <undef>;
start = ^q; stop = ^s; susp = ^z; dsusp = ^y;
rprnt = ^r; flush = ^o; werase = ^w; lnext = ^v;
-parenb parodd cs8 cstopb hupcl cread -clocal loblk crtscts crtsxoff parext
-ignbrk -brkint -ignpar -parmrk -inpck -istrip -inlcr -igncr icrnl -iuclc
ixon -ixany ixoff -imaxbel
isig icanon -xcase echo echoe echok -echonl -noflsh
-tostop echoctl -echoprt echoke -defecho -flusho -pendin iexten
opost -olcuc onlcr -ocrnl -onocr -onlret -ofill -ofdel
castle%
Looking at the End of a File (tail)To look at the end of a file, type tail filename and press Return. The last 10 lines of the file are displayed. The following example shows the tail of the /etc/lp/Systems file. Because the file contains only seven lines, the entire file is displayed.
castle% /usr/bin/tail /etc/lp/Systems
#
#ident  ''@(#)Systems   1.8   97/06/09 SMI''   /* SVr4.0 1.2   */
# This file previously contained an LP private interface. It's
# contents are no longer used by the printing system and therefore
# obsolete. Expect the file to be removed in a subsequent release
# of Solaris, along with the lpsystem(1M) command.
+:x:-:bsd:-:n:10:-:-:Allow all connections
castle%
By default, the head and tail commands display 10 lines. You can change the number of lines displayed by using the -n option. Substitute the number of lines you want to display for the letter n. For example, to display the last 20 lines of a file, type tail -20 filename and press Return.
NOTE: tail shows a maximum of 4096 bytes (about 400 lines). Looking at the Beginning of a File (head)To look at the beginning of a file, type head filename and press Return. The first 10 lines of the file are displayed. The following example shows the head of the /etc/passwd file.
paperbark% head /etc/passwd
root:x:0:1:Super-User:/:/sbin/sh
daemon:x:1:1::/:
bin:x:2:2::/usr/bin:
sys:x:3:3::/:
adm:x:4:4:Admin:/var/adm:
lp:x:71:8:Line Printer Admin:/usr/spool/lp:
uucp:x:5:5:uucp Admin:/usr/lib/uucp:
nuucp:x:9:9:uucp Admin:/var/spool/uucppublic:/usr/lib/uucp/uucico
listen:x:37:4:Network Admin:/usr/net/nls:
nobody:x:60001:60001:Nobody:/:
paperbark%
Changing File Ownership or Permissions (chown, chmod, chgrp)Many user problems can be traced to file ownership or permissions problems. Use the ls command to check the permissions and ownership on a file. If you need to change one or both, use the chown, chmod, and chgrp commands. Changing File OwnershipYou must own a file or directory (or have root permission) to be able to change its owner. The operating system has a configuration option, {_POSIX_CHOWN_RESTRICTED}, to restrict ownership changes. When this option is in effect, even the owner of the file cannot change the owner ID of the file. Only superuser can arbitrarily change owner IDs regardless of whether this option is in effect. To set the {_POSIX_CHOWN_RESTRICTED} configuration option, include the following line in the /etc/system file. set rstchown = 1 To disable the {_POSIX_CHOWN_RESTRICTED} option, include the following line in /etc/system. set rstchown = 0 {_POSIX_CHOWN_RESTRICTED} is enabled by default. See system(4) and fpathconf(2). Use the following steps to change the ownership of a file.
oak% ls -l quest
-rw-r--r-- 1 fred staff 6023 Aug 5 12:06 quest
oak% su
Password:
# chown ignatz quest
# ls -l quest
-rw-r--r-- 1 ignatz staff 6023 Aug 5 12:06 quest
#
See Chapter 12, "Recognizing File Access Problems," for more information. Changing File PermissionsYou can change file permissions by using the symbolic values r, w, x, and -. You can also change file permissions by using a set of octal numbers. Table 19 shows the octal values for setting file permissions. You use these numbers in sets of three to set permissions for owner, group, and other. For example, the value 644 sets read/write permissions for owner and read-only permissions for group and other.
NOTE. You can change permissions on groups of files or on all files in a directory by using metacharacters such as * and ? in place of file names or in combination with them. The following example changes the permissions of a file from 666 (read/write, read/write, read/write) to 644 (read/write, read-only, read-only). oak% ls -l quest -rw-rw-rw- 1 ignatz staff 6023 Aug 5 12:06 quest oak% chmod 644 quest oak% ls -l -rw-r--r-- 1 ignatz staff 6023 Aug 5 12:06 quest oak% Changing File Group Ownership (chgrp)To change the group ownership of a file, type chgrp gid filename and press Return. The group ID for the file you specify is changed. $ ls -lg junk -rw-r--r-- 1 other 0 Oct 31 14:49 junk $ chgrp 10 junk $ ls -lg junk -rw-r--r-- 1 staff 0 Oct 31 14:49 junk $ Group IDs are defined in the nameservice group database or the local /etc/group file. See Chapter 5, "Administering User Accounts and Groups," for more information about groups. Setting or Displaying the System EnvironmentThe shell maintains an environment with a set of specifications that it gets from the shell initialization files. Users can also modify the shell environment for a session by issuing commands directly to the shell. The shell receives its information about the environment from environment variables. See "Setting Aliases, Paths, and Environment Variables" on page 116 for more information. CDE Environment VariablesThe Common Desktop Environment (CDE) has its own set of environment variables. Desktop search paths are created at login by the desktop command dtsearchpath. The dtsearchpath command uses a combination of environment variables and built-in locations to create the search paths. The environment variables that dtsearchpath reads are called input variables. These are variables set by the system administrator or end user. The input variables use the naming convention DTSP *, which is an abbreviation for desktop search path. When dtsearchpath runs at login, it assembles the values assigned to these variables, adds built-in locations, and creates values for output variables. Each search path has an output variable, as shown in Table 20.
CDE components use the values of the output variables. For example, Application Manager uses the value of the application search path (DTAPPSEARCHPATH) to locate application groups. For more information about CDE, refer to Solaris Common Desktop Environment: Advanced User's and System Administrator's Guide. Tools in the Solaris Management ConsoleThe Solaris Management Console (SMC)introduced in the Solaris 8 Update 3 (1/01) releaseis your access point for system administration tools. SMC software provides a consistent, easy-to-use interface for managing and administering a Solaris server, the clients of the server, and the applications running on the server. With SMC, you can manage a Solaris server from almost anywherefrom a browser, from any Solaris workstation or server, from an NT server, or as a stand-alone system. You can also plug SMC into other systems' consoles. By default, SMC manages accounts on the local system. You can create a nameservice domain toolbox to manage accounts in the LDAP, DNS, NIS+, or NIS nameservices. Refer to the Solaris Management Console Tools book available from Sun Microsystems Press and Prentice Hall for instructions on how to create a nameservice domain toolbox. Refer to the Solaris Management Console Tools book, published by Sun Microsystems Press and Prentice Hall, for complete information about SMC 2.0, including how to create or edit an SMC toolbox, create a toolbox that is shared by other toolboxes, or create a toolbox that includes all tools on a number of servers for a particular functionality.
NOTE. This book focuses on basic system administration tasks and refers to the Solaris Management Console Tools book for detailed instructions on the tools available in SMC 2.0. The upcoming second edition of the Solaris Management Console Tools book will include information about the new tools available in the Solaris 9 SMC 2.1 release. SMC Tools Available in SMC 2.1Table 21 describes the tools available in SMC 2.1, available in the Solaris 9 release.
Starting SMCYou can start SMC in any one of the following ways.
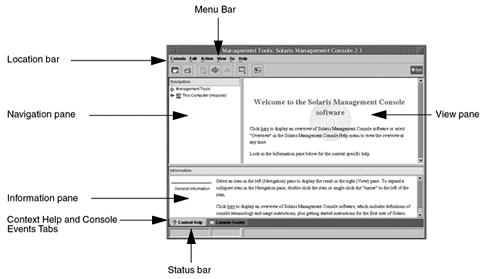
NOTE. You can start SMC as a normal user, but some tools or applications may not load unless you log in as root, have Primary Administrator rights, or assume a role during SMC server login. Figure 1 shows the elements of the default console. Figure 1. Elements of the Default SMC Console
Refer to the Solaris Management Console Tools book by Janice Winsor, published by Sun Microsystems Press and Prentice Hall, for complete information about SMC, including how to create or edit an SMC toolbox, create a toolbox that is shared by other toolboxes, or create a toolbox that includes all tools on a number of servers for a particular functionality. | |||||||||||||||||||||||||||||||||||||||||||||||||||||||||||||||||||||||||||||||||||||||||||||||||||||||||||||||||||||||||||||||||||||||||||||||||||||||||||||||||||||||||||||||||||||||||||||||||||||||||||||||
| [ Team LiB ] |
|