Setting Up Printing Services
You need to decide which systems have local printers directly cabled to them and which systems connect to printers over the network. The system that has the printer connected to it and makes the printer available to other systems is called a print server. The system that has its printing needs met by a print server is called a print client.
Setting up printing services comprises three basic tasks.
Setting up local printers. Setting up print servers. Setting up print clients.
You can have the following client/server combinations, as illustrated in Figure 25.
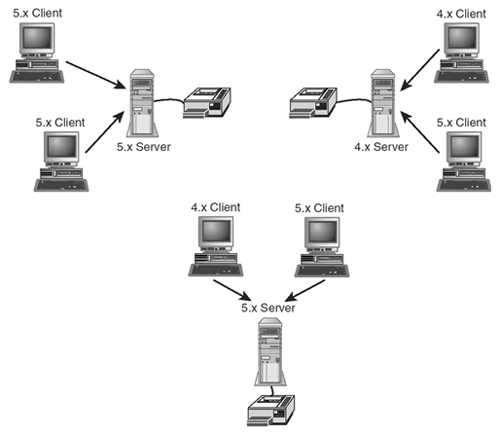
SunOS 5.0 print clients with a SunOS 5.0 print server. SunOS 5.0 and SunOS 4.1 print clients with a SunOS 5.0 print server. SunOS 5.0 and SunOS 4.1 print clients with a SunOS 4.1 print server. This section describes how to set up a Solaris print client.
Introducing Solaris Print Manager
In the Solaris 8 release, the Solaris Print Manager is the preferred method for managing printers because this Java-based graphical user interface centralizes printing information when used in conjunction with a nameservice. Using a nameservice to store printer configuration information centralizes printer information and makes printer information available to all systems on the network.
You can use Print Manager in the following nameservice environments.
You can use the Solaris Print Manager to manage printer configuration information in the NIS+ nameservice without the underlying xfn application layer. Eliminating the underlying xfn application layer provides better performance when accessing printer configuration information. See "Converting Printer Configuration in NIS+ (xfn) to NIS+ Format" on page 420 for more information
You must be superuser or belong to a role that enables you to manage printing functions to use the Solaris Print Manager. See Chapter 6, "Administering Rights and Roles," for more information about roles.
Solaris Print Manager recognizes existing printer information on the printer servers, print clients, and in the nameservice databases. You do not need to convert print clients to use the new Solaris Print Manager as long as the print clients are running either the Solaris 2.6 release or compatible versions.
Using Solaris Print Manager to perform printer-related tasks automatically updates the appropriate printer databases. Solaris Print Manager also includes a command-line console that displays the lp command line for the add, modify, and delete printer operations. Errors and warnings are also displayed when Printer Manager operations are performed.
You can run Solaris Print Manager on a remote system with the display sent to the local system. See "Managing Printing Services" in System Administration Guide, Volume II, for instructions on setting the DISPLAY environment variable.
See printmgr(1M) for more information.
Starting Solaris Print Manager
The command to start Solaris Print Manager is /usr/sadm/admin/bin/printmgr&. If you use Solaris Print Manager frequently, you may want to add /usr/sadm/admin/bin to your path.
Use the following steps to access the Print Manager.
Become superuser.
Type /usr/sadm/admin/bin/printmgr& and press Return to start the Print Manager.
The window that is displayed asks you to choose the naming service, as shown in Figure 26.
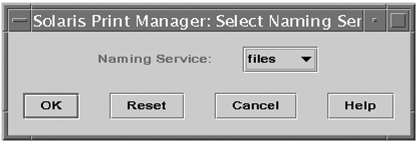
Choose the appropriate nameservice from the Naming Service menu and click on the OK button.
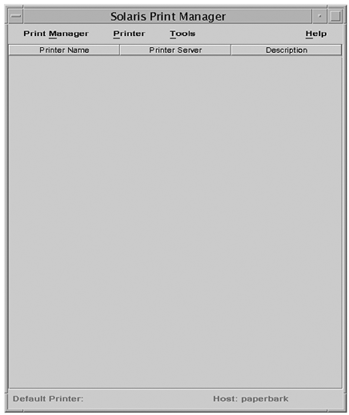
The Print Manager window is displayed, as shown in Figure 27.
Adding Access to a Printer with the Print Manager
To add access to a printer, you need the following information.
Use the following steps to add access to a printer.
Start the Print Manager (if necessary).
See "Starting Solaris Print Manager" on page 413 for more information.
From the Printer menu, choose Add Access to Printer, as shown in Figure 28.
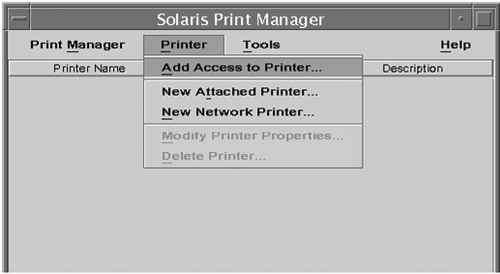
The Solaris Print Manager Add Access to Printer window is displayed, as shown in Figure 29.
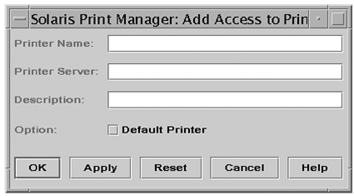
Type the printer name, name of the printer server, and description in the text fields. If you want this printer to be the default printer, click on the Default Printer check box.
Click on the OK button.
The printer is configured, the printer information is added to the list in the Solaris Print Manager window, and the relevant files are updated. The name of the default printer is displayed at the bottom of the window, as shown in Figure 30.
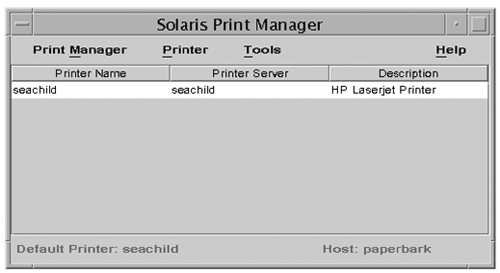
Adding a New Attached Printer with Print Manager
To add a new printer attached to a print server, you need the following information.
Printer name. Description. Printer port. Printer type. File contents. Fault notification policy. Whether this printer is the default. Whether to always print banners. User access list.
Once you have physically attached the printer to the computer, use the following steps to make the printer available to the local computer.
Start the Print Manager (if necessary). See "Starting Solaris Print Manager" on page 413 for more information.
From the Print menu, choose New Attached Printer, as shown in Figure 31.
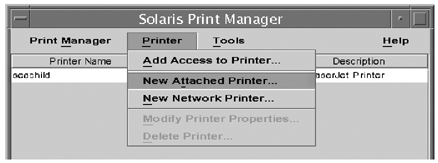
The New Attached Printer window is displayed, as shown in Figure 32.
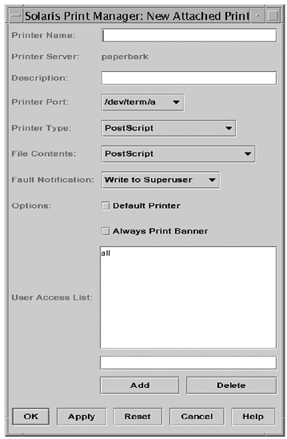
Click on the Help button if you need help with details about values that are required for the text fields.
Fill in the form and click on the OK button.
The printer is added to the Print Manager, and the appropriate databases and files are updated.
Adding a New Network Printer with Print Manager
To add a new network printer, you need the following information.
Printer name. Description. Printer type. File contents. Fault notification policy. Destination. Protocol. Whether this printer is the default. Whether to always print banners. User access list.
Use the following steps to add a new network printer.
Start the Print Manager (if necessary).
See "Starting Solaris Print Manager" on page 413 for more information.
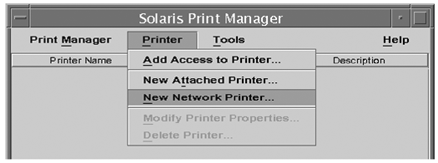
From the Printer menu, choose New Network Printer, as shown in Figure 33.
The New Network Printer window is displayed, as shown in Figure 34.
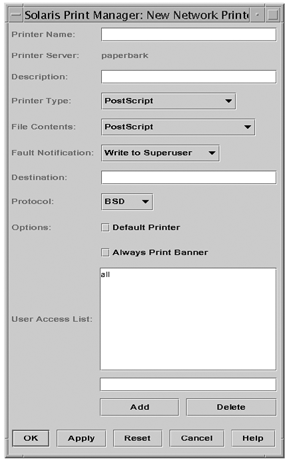
Click on the Help button if you need help with details about values that are required for the text fields.
Fill in the form and click on the OK button.
The printer is added to the Print Manager, and the appropriate databases and files are updated.
Converting Printer Configuration in NIS+ (xfn) to NIS+ Format
This section describes how to convert printer configuration information in NIS+ (xfn) format to NIS+ format. You can run the following conversion script only on a system running the Solaris 8 Operating Environment.
Log in as superuser on the NIS+ master.
Copy the following conversion script and name it something like /tmp/convert.
#!/bin/sh
        #
        # Copyright (C) 1999 by Sun Microsystems, Inc.
        # All Rights Reserved
        #
        PRINTER=""
        for LINE in `lpget -n xfn list | tr "\t " "Control A Control B?"` ; do
         LINE=`echo ${LINE} | tr "Control A Control B" "\t " | sed -e 's/^
\t//g'`
         case "${LINE}" in
           *:)
            PRINTER=`echo ${LINE} | sed -e 's/://g'`
            ;;
           *=*)
            lpset -n nisplus -a "${LINE}" ${PRINTER}
            ;;
          esac
         done
Type chmod 755 /tmp/convert and press Return.
The script is executable.
Type /tmp/convert and press Return.
Setting Up a Print Server (Solaris Operating Environment)
This section describes how to add a network printer by using LP commands.
You need the following information to set up a Solaris print server.
Printer name. Server name. Network printer access name, sometimes qualified by a port name. IP address for the printer. Protocol. The print subsystem uses the BSD print protocol and raw TCP to communicate with the printer. In general, the TCP protocol is more generic. The printer vendor documentation provides the information about which protocol to use. Time-out value. The timeout option specifies the amount of time in seconds to wait between successive attempts to connect to the printer. The default is 10 seconds. Some printers have a long warm-up time, so a longer time-out is advised. Printer type. The default is PostScript. File content type. The default is PostScript. Fault notification policy for this print server. The default is write to superuser.
Use the following steps to set up a print server.
Set switches and ensure appropriate cabling. Consult the printer vendor installation documentation for information about hardware switches and cabling requirements.
Connect the printer to the network and turn on the power to the printer.
Get an IP address and select a name for the printer node.
These procedures are equivalent to those for adding any new node to the network.
Become superuser.
Type lpadmin -p printer-name -v /dev/null and press Return.
This step defines the printer name and the port device the printer uses. The device to use is /dev/null.
All on one line, type lpadmin -p printer-name -i /usr/lib/lp/model/netstandard and press Return.
This step defines the interface script the printer uses.
All on one line, type lpadmin -p printer-name -o dest= access-name:port -o protocol= protocol -o timeout= value and press Return.
This step sets the printer destination, protocol, and time-out values.
All on one line, type lpadmin -p printer-name- I content-type - T printer-type and press Return.
This step specifies the file content type and the printer type.
Type cd /etc/lp/fd and press Return.
The current working directory is in the filter directory.
Type for filter in *.fd;do and press Return.
At the > prompt, type name='basename $filter .fd' and press Return.
At the > prompt, type lpfilter -f $name -F $filter and press Return.
At the > prompt, type done and press Return.
You have installed filters.
Type accept printer-name and press Return.
The printer is able to accept requests.
Type enable printer-name and press Return.
The printer is able to print the requests.
Type lpstat -p printer-name and press Return.
This step verifies that the printer is configured correctly.
Set up any print clients that should have access to this printer.
The following example sets up a print server by supplying the following information.
Printer name: seachild Network printer access name: nimquat:9100 Protocol: tcp Time-out: 5 Interface: /usr/lib/lp/model/netstandard Printer type: PS Content types: postscript Device: /dev/null
# lpadmin -p seachild -v /dev/null
# lpadmin -p seachild -i /usr/lib/lp/model/netstandard
# lpadmin -p seachild -o dest:nimquat:9100 -o protocol=tcp -o timeout=5
# lpadmin -p seachild -I postscript -T PS
# cd /etc/lp/fd
# for filter in *.fd;do
  > name='basename $filter .fd'
  > lpfilter -f $name -F $filter
  > done
# accept castle
destination ' 'castle' ' now accepting requests
# enable castle
printer ' 'castle' ' now enabled
# lpadmin -p castle -D "PostScript printer"
# lpstat -p castle
  printer castle is idle. enabled since Thu Sep 15 08:45 1997.
available
#
Controlling the Printing of Banner Pages
A banner page identifies the person who submitted the print request, the print request ID, and the date and time the request was printed. Banner pages also have a modifiable title to help users identify their printouts.
By default, the print service forces banner pages to be printed. However, starting with the Solaris 8 Operating Environment, by using the new -o banner= option to the lpadmin command, you can specify whether a banner is always printed, never printed, or is optional. Behavior of banner page printing is summarized in Table 96.
Table 96. Behavior of Banner Page Printing|
lpadmin -p printer-o banner
or
lpadmin -p printer -o banner=always
| Required and printed. | If you are root or lp, the nobanner argument is honored. The nobanner argument is ignored for all other users. | lpadmin -p printer -o nobanner
lpadmin -p printer -o banner=optional | On by default but can be disabled for each print request with the lp -o nobanner command. | N/A. | lpadmin -p printer -o banner=never | Disabled. | No. |
Making Banner Pages Optional
When you specify optional, the banner is printed by default but users can disable banner printing with the lp -o banner command.
Use the following steps to make banner pages optional.
Become superuser or lp on the print server.
Type lpadmin -p printer -o banner=optional and press Return.
The banner page setting is entered in the /etc/lp/printers/ printer/configuration file on the print server.
Type lpstat -o printer -l and press Return.
Review the output to verify that the Banner not printed line is displayed.
The following example makes banner pages optional for the printer seachild.
seachild% su
# lpadmin -p seachild -o banner=optional
# lpstat -p seachild -l
printer seachild is idle. enabled since Thu Jan 3 18:20:22 PST 2000.
 available.
       Content types: PS
       Printer types: PS
       Description:
       Users allowed:
               (all)
       Forms allowed:
               (none)
       Banner not required
       Character sets:
               (none)
       Default pitch:
       Default page size:
#
Turning Off Banner Pages
Use the following steps to turn off the printing of banner pages.
Become superuser or lp on the print server.
Type lpadmin -p printer -o banner=never and press Return.
The banner page setting is entered in the /etc/lp/printers/ printer/configuration file on the print server.
Type lpstat -o printer -l and press Return.
Review the output to verify that the Banner not required line is displayed.
The following example turns off banner pages for the printer seachild.
seachild% su
# lpadmin -p seachild -o banner=never
# lpstat -p seachild -l printer seachild is idle. enabled since Thu Jan 3 18:20:22 PST 2000.
 available.
       Content types: PS
       Printer types: PS
       Description:
       Users allowed:
               (all)
       Forms allowed:
               (none)
       Banner not printed
       Character sets:
               (none)
       Default pitch:
       Default page size:
#
Setting Up a PostScript Print Client with LP Commands
This section describes how to set up a Solaris print client to print on a SunOS 4.x print server that has a PostScript printer installed. You must complete the following tasks so the print client can use the printer connected to the print server.
Identify the printer and server system to which the printer is connected. Define the characteristics of the printer. Set up the print filters.
You must have a network that enables access between systems to set up print clients. If your network is running NIS or NIS+, follow the appropriate procedures for enabling access between systems. If your network is not running NIS or NIS+, you must include the Internet address and system name for each print client in the /etc/hosts file on the print server. You must also include the Internet address and system name of the print server in the /etc/hosts file of each print client system.
Before you start, you need superuser privileges on the print client system. You also need the name of the printer and the name of the print server system. You do not need to specify a printer type or file content type for a printer client. If no printer type is specified, the default is unknown. If no file content type is specified, the default is any, which allows both PostScript and ASCII files to be printed on a PostScript printer.
Use the following steps to set up a PostScript print client.
Become superuser on the print client system.
Type lpsystem -t bsd server-system-name and press Return.
The print server system is identified as a BSD (SunOS 4.x) system.
Type lpadmin -p printer-name -s server-system-name and press Return. The printer and the server system name are registered with the client LP print service.
Type cd /etc/lp/fd and press Return.
Type lpfilter -f download -F download.fd and press Return.
Type lpfilter -f dpost -F dpost.fd and press Return.
Type lpfilter -f postio -F postio.fd and press Return.
Type lpfilter -f postior -F postior.fd and press Return.
Type lpfilter -f postprint -F postprint.fd and press Return.
Type lpfilter -f postreverse -F postreverse.fd and press Return.
The PostScript filters are installed.
Type accept printer-name and press Return.
The printer is now ready to begin accepting (queuing) print requests.
Type enable printer-name and press Return.
The printer is now ready to process print requests in the print queue.
(This step is optional but recommended.) Type lpadmin -d printer-name and press Return.
The printer you specify is established as the default printer for the system. You should define a default printer even if only one printer is configured for a system.
Type lpstat -t and press Return. Check the messages displayed to verify that the printer is accepted and enabled.
Type lp filename and press Return. If you have not specified a default printer, type lp -d printer-name filename and press Return.
The file you choose is sent to the printer.
If you want to set up Solaris print clients and print servers in addition to setting up the LP print system, you must also configure the port monitors by using the Service Access Facility. See "Understanding the Service Access Facility" on page 312 for information on how to set up the port monitors. If you use the Solaris Print Manager, the port monitors are configured for you automatically. To set up a Solaris print client, in place of step 2 in the procedure described above, type lpsystem server-system-name and press Return. The print server system is identified as a Solaris system.
|