While it is important to know the manufacturer and model number of your video card when you set out to troubleshoot it, the key item you need to know to get the X driver working is the video chipset being used on the card. The XFree86 project organizes its support information based on these chipsets.
| Note |
Information on the latest XFree86 version can be found at www.xfree86.org/current. Follow the Driver Status link to look up information on your particular card. Fedora Core 1 includes XFree86 version 4.3.0-42. The troubleshooting issues described in this section are based on that version. If you upgrade to a later version of XFree86, some of the information in this section may not apply. |
While XFree86 version 3.3.6 had several different X servers available (with the one you were using linked to/usr/X11R6/bin/X), in version 4.3.0 there is only one X server (linked to XFree86), which loads the appropriate driver modules when X starts up.
If you have gone through the basic X setup procedures at the beginning of this chapter, you should have a working GUI. (If that is not the case, go to the Video Troubleshooting Tips section for further direction.) The following sections step through procedures for determining which video driver to use and tuning and testing your card.
Follow this procedure to determine which chipset is used with your video card and to look for ways of tuning that card:
With the X desktop running, start the Hardware Browser from the Red Hat menu by clicking System Tools⇨Hardware Browser (or by typing hwbrowser from a Terminal window).
Click Video Cards in the left column. Information about your video card should appear on the right side of the window. Note the manufacturer and driver that are displayed for the card.
Open a Web browser and go to the Driver Status for XFree86 page for the current release of XFree86 (www.xfree86.org/current/Status.html).
Select the manufacturer's chipset for your card. Driver information for cards made from that chipset is displayed.
Look to see whether your card is shown as supported for the current release of XFree86. If it is, note which driver should be used for that chipset.
| Note |
Check the Fedora Core Release Notes for a list of video cards for which support was added to Fedora after the latest XFree86 release. By default, opening your Web browser in Fedora will show those Release Notes from this address in your file system: file://user/share/doc/HTML/index html. In particular, the radeon driver has been updated to provide support for many new ATI video cards. |
Check your /etc/X11/XF86Config file to make sure that the proper video driver is being used. It should have been autodetected and added to this file for you. For example, for my S3 ProSavage KM133 video card, the Device section for Videocard0 shows savage as the driver.
Once you have determined your driver, there are a few ways you can look up the options available for that driver:
Check the XF86Config man page-Type man XF86Config or go to www.xfree86.org/current/XF86Corfig.5.html. The Device Section part of the page lists options that can be used with many X video card drivers. Because most of these options should be autodetected, in most cases you will only use them to override the defaults.
Check the driver's man page-Each driver has its own specific man page that lists options specific to that driver. From the XFree86 Documentation page (www.xfree86.org/current), select Section 4 under the Manual Pages heading. Then choose your specific driver from the list. Options that are specific to that driver are listed there.
Check the /var/log/XFree86.0.1og file (the 0 in the file name represents the first video card on your computer). This is a critical file for tuning and debugging your video card! As your X server starts up, details of what it is doing are sent to this file. By looking through this file, you can see what modules are being loaded and which options are being set.
There are hundreds of lines in this file, so I've whittled it down to a handful of lines related to the video driver for my particular video card (in this case, an S1 ProSavage8 KM266 video device):
(II) LoadModule: "savage"
(II) Loading /usr/X11R6/lib/modules/drivers/savage_drv .o
(II) Module savage: vendor="The XFree86 Project"
     compiled for 4.3.0, module version = 1.1.27
     Module class: XFree86 Video Driver
     ABI class: XFree86 Video Driver, version 0.6
(II) SAVAGE: driver (version 1.1.27mh)   for S3 Savage
     chipsets: Savage4,
Savage3D, Savage3D-MV, Savage2000, Savage/MX-MV, Savage/MX,
Savage/IX-MV, Savage/IX, ProSavage PM133, ProSavage KM133,
Twister PN133, Twister KN133, SuperSavage/MX 128,
SuperSavage/MX 64,
SuperSavage/MX 64C, SuperSavage/IX 128, SuperSavage/IX 128,
SuperSavage/IX 64, SuperSavage/IX 64, SuperSavage/IXC  64,
SuperSavage/IXC 64, ProSavage DDR, ProSavage DDR-K
Because the driver is set to "savage" in the XF86Config file, the savage driver is loaded from the directory shown. Note the module version (you'll need this if you go to a mailing list to ask questions about X). Following that is a list of Savage chipsets that the driver supports:
(II) Primary Device is: PCI 01:00:0
(--) Chipset ProSavage found
(**) SAVAGE(0): Depth 16, (--) framebuffer bpp 16
(==) SAVAGE(0): RGB weight 565
(==) SAVAGE(0): Default visual is TrueColor
(**) SAVAGE(0): Option "HWCursor" "false"
(**) SAVAGE(0): Using SW cursor
(--) SAVAGE(0): Chip: id 8d04, "ProSavage DDR-K"
(--) SAVAGE(0): Engine: "ProSavage"
(II) SAVAGE(0): Monitor0: Using hsync range of 31.50-57.00kHz
(II) SAVAGE(0): Monitor0:   Using vrefresh range 50.00-70.00Hz
(II) SAVAGE(0): Not using default mode "1152x768" (width too
     large for virtual size)(--) SAVAGE(0):   Found 13 modes at
     this depth:
     [13c] 1400 X 1050, 60Hz, 75Hz
     [122] 1600 X 1200, 60Hz
(--) SAVAGE(0): Virtual size is 1024x768 (pitch 1024)
(**) SAVAGF(0): *Default mode "1024x768": 75.0 MHz, 56.5 kHz,
     70.1 Hz
(II) SAVAGE(0): Modeline "1024x768" 75.00 1024 1048 1184
     1328 768 771 777 806 -hsync -vsync
(**) SAVAGE(0): *Default mode "800x600": 40.0 MHz, 37.9 kHz,
     60.3 Hz
(==) SAVAGE(0): DPI set to (75, 75)
The actual chipset found on the device (PCI 01:00:0) was the ProSavage chipset. At this point, X goes about further identifying the driver (id 8d04, ProSavage DDR-K with ProSavage Engine) and setting the options used for the chipset. Some of the options set here are based on default values, while others can be explicitly set in the XF86Config file.
The next section describes how to change options to help debug or improve performance of your video card.
To tune and test the basic operation of your video card, follow this procedure. It will let you change options for your driver, quickly turn the X server on and off, and then run some performance tests to see how well each of the options you use performs.
Close any applications that are open on your desktop.
As root user from a Terminal window, shut down the GUI by typing:
# init 3
If the desktop is still active, from the Red Hat menu click Log Out and log out of your current session. If you see a login prompt, log in as root user. Otherwise, obtain root privilege (su-) and just continue to work at the shell.
Change your default desktop (if you like) to a simple X plus TWM window manager. This will make it quicker to test your changes. Type the following:
# Switchdesk TWM
Make a backup copy of your XF86Config file as follows:
# cd /etc/X11
# cp XF86Config XF86Config.bkup
Using your favorite character-based text editor (typically vi or emacs), open the XF8GConfig file.
| Note |
Most UNIX and Linux experts use vi or emacs as text editors. The joe editor is a bit easier to use, if you don't know vi or emacs. Type joe filename to start. Then press Ctrl+K, H to see the help screen as you work. Use the Ctrl key, followed by a letter in the Help screen to move around, change, save, and exit the file. If you get stuck, press Ctrl+C to get out. |
Make changes to your XF86Config file, based on suggestions in the Understanding the XF86Config File section of this chapter.
Type startx to start up the X desktop. Hopefully, X comes up on a blank desktop with the TWM window manager running.
Click on the desktop and open an Xterm window (Terminal window).
Next, you can run some performance tests to see how the changes you made impact your basic X server performance. You can use the x11perf command with various options to check (and recheck) the performance of your X server in different activities. Here's an example:
# x11perf -repeat 3 -reps 10 -subs 10 100 -circulate
x11perf - X11 performance program, version 1.5
The XFree86 Project, Inc server version 40300000 on :0.0
from toys.example.com
Sat Jan 24 22:00:51 2004
Sync time adjustment is 0.0000 msecs.
100 reps @ 0.0282 msec ( 35400.0/sec): Circulate window (10 kids)
100 reps @ 0.0276 msec ( 36300.0/sec): Circulate window (10 kids)
100 reps @ 0.0283 msec ( 35300.0/sec): Circulate window (10 kids)
300 trep @ 0.0280 msec ( 35700.0/sec): Circulate window (10 kids)
1000 reps @ 0.0336 msec ( 29700.0/sec): Circulate window (100 kids)
1000 reps @ 0.0333 msec ( 30000.0/sec): Circulate window (100 kids)
1000 reps @ 0.0334 msec ( 29900.0/sec): Circulate window (100 kids)
3000 trep @ 0.0335 msec ( 29900.0/sec): Circulate window (100 kids)
The x11perf command in this example circulates a set of windows from the lowest to the top. Here, the circulate action is repeated three times, first with a group of ten windows circulated ten times (100 repetitions). Then it is repeated with a group of 100 windows, again circulated ten times (1000 times each). At the end of each group the total number of repetitions and average amount of time it took to complete the set of actions are displayed.
There are many other activities you can run to test the performance of your X server. Here are some examples:
# xllperf -repeat 2 -reps 1000 -ftext
# xllperf -repeat 2 -reps 500 -copywinwin500
# xllperf -repeat 2 -reps 800 -scroll500
# xllperf -repeat 2 -reps 10 -subs 10 100 -destroy
# xllperf -repeat 2 -reps 10 -subs 10 100 -resize
With each of these command lines, you can set how many times the action is repeated before noting the time and how many repetitions make up each action. The subs option can be used when you want to set how many subwindows are used in the action (when appropriate).
There are dozens of options available with x11perf that can be used to test the performance of your X server. Available options are listed on the x11perf man page. The options shown in the examples above are:
Send 1000 80-character lines of text to the display (-ftext).
Copy a 500 × 500-pixel square from one window to another (-copywinwin500).
Vertically scroll a 500 × 500-pixel box 800 times.
Destroy a set of windows ten times, first with 10 subwindows, and then with 100 (-destroy).
Repeatedly resize sets of 10 windows, followed by sets of 100 windows (-resize).
Run each of those commands separately from a command line. Or, better yet, put them into a shell script and direct the output to a file. Save the output to a file.
Run glxgears (as described earlier in this chapter) to test the performance of 3D OpenGL too.
Try different options in your XF86Config file. Then repeat the previous few steps (restart the server, re-run the performance tools, and compare the results). Again, read through the troubleshooting tips sections to help you find ways of changing options on your X server.
When you are clone, you can change your desktop environment back to GNOME or KDE. You can also return your system to runlevel 5, so you will see a graphical login. Here's how:
# switchdesk GNOME
# init  5
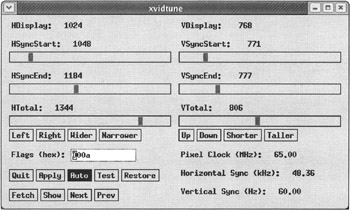
Using the xvidtune command, you can refine some of the settings on your video display, and then save those settings to use them permanently. Here's the procedure for using xvidtune:
From a Terminal window on the display you want to adjust, type:
# xvidtune
Vendor: Monitor Vendor, Model: LCD Panel 1024x768
Num hsync: 1, Num vsync: 1
hsync range 0: 31.50 - 48.50
vsync range 0: 40.00 - 70.00
Information about your monitor, screen resolution, and horizontal and vertical sync ranges are displayed. Then the xvidtune window opens, as shown in Figure 7-2.
| Note |
A window will appear at this point, warning you that xvidtune can damage your monitor and/or video card. While this is unlikely, you should keep in mind that you use this utility at your own risk. |
Select the Auto button, so that any resizing of the screen (up, down, right, left, wider, narrower, shorter, or taller) occurs in real time.
Change the display vertically by clicking Up, Down, Shorter, and Taller buttons.
Change the display horizontally by clicking Left, Right, Wider, and Narrower buttons.
Click the Show button. A line will appear that shows the line to put in your XF86Config file. Here's an example:
You can make the settings permanent by copying and pasting the line shown into a Modes line in your XF86Config file.
Click Quit to quit the window when you are done.