If you decide that you need more features, or that TCP wrappers can't handle all the services you want to restrict, iptables is probably the best solution for you. In this section, we show you how to configure iptables for a stand-alone server. Later in the chapter, you'll learn how to set up iptables for a full-blown, dual-homed network firewall.
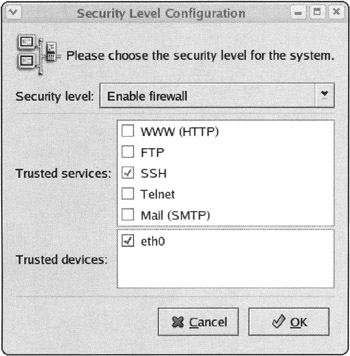
Under Red Hat Linux and related distributions, such as Fedora Core, iptables is controlled at boot time by the /etc/sysconfig/iptables file. If you turned on firewalling at installation, this file is created by default. To ensure that your firewall rules are persistent across reboots, all changes to iptables need to be saved back to this file. There are several ways to do this: You can edit this file by hand and restart iptables to make your changes live, make live run time changes with the iptables command directly and then use /etc/init.d/iptables save to save your changes back out to /etc/sysconfig/iptables, or for very basic changes, you can use the Red Hat security level graphical administration tool. To open the tool, click the Red Hat icon in the toolbar and select System Settings⇨Security Level, or issue the command redhat-config-securitylevel at a command prompt. The GUI tool will appear, as shown in Figure 11-4. If you're not running X windows, use the ncurses (text-user interface) version redhat-config-securitylevel-tui.
| Caution |
You must run this tool as root. Because the operating system can hold on to the root password for up to 5 minutes, be sure that you click the Forget Authorization button when you are finished with iptables configuration. If you plan to leave the machine before 5 minutes are up, log out of everything and lock it down. Firewalls can't enforce physical security. |
The graphical interface is a basic tool that lets you enable/disable firewall (iptable) settings, and if enabled, customize the iptables for trusted network interfaces, services, and custom ports.
| Caution |
When you use this tool, it totally overwrites all existing configurations in /etc/sysconfig/iptables. If you tell it to disable the firewall, it deletes the file all together! Use the tool only if you have not already configured iptables by hand, or if you want to erase your previous settings and start over with a default iptables configuration. |
Be sure to back up your iptables configuration files on a regular basis. You can do this with a simple command:
   # cp -a /etc/sysconfig/iptables
   /etc/sysconfig/iptables-$(date +%Y-%m-%d)_BAK
This command saves a date-stamped version of the configuration file. Back up the file every time you want to make changes to the configuration. If you make a mistake, it will be easy to restore settings that work.
The graphical security tool is a good way to get started with iptables configuration. It creates a basic /etc/sysconfig/iptables file, and lets you get a simple-but operational-stand-alone server firewall configuration in place quickly. You can then poke around the /etc/sysconfig/iptables file it creates and get a feel for how iptables works. If you want to disable any of the settings created by the tool, simply go into the file and comment out the lines that you don't want to use, and restart iptables. For example, in this /etc/sysconfig/iptables file we have commented out a default line that, combined with the last two lines of the file, would normally keep the server from answering ICMP/pings (or answering with a Destination Unreachable message):
...
-A INPUT -j RH-Firewall-1-INPUT
-A FORWARD -j RH-Firewall-1-INPUT
-A RH-Firewall-1-INPUT -i To -j ACCEPT
#-A RH-Firewall-1-INPUT -p icmp --icmp-type any -j ACCEPT
-A RH-Firewall-1-INPUT -p 50 -j ACCEPT
-A RH-Firewall-1-INPUT -p 51 -j ACCEPT
...
-A RH-Firewall-1-INPUT -j REJECT --reject-with  icmp-host-prohibited
COMMIT
As you can see, rule ordering is very important here. Once you've made your changes, whether by hand, restart iptables so that the manual changes to the file will take effect:
# /etc/init.d/iptables restart
Flushing firewall rules:                         [ OK ]
Setting chains to policy ACCEPT: filter          [ OK ]
Unloading iptables modules:                      [ OK ]
Applying iptables firewall rules:                [ OK ]
| Caution |
Try not to work on iptables remotely if at all possible. If you must, be sure that you have a back door or other safeguard in place. Inevitably, the one time you forget this will be the one time you lock yourself out. |
Remember the server that we configured in the TCP Wrappers section? Only some of its services could be managed with wrappers. In this section, we will secure the Apache and sendmail services with iptables.
| Note |
Stand-alone server iptable configurations, or personal firewalls, are usually more simple to create than are network firewall configurations. With stand-alone server configurations, you're usually only concerned with service/packet filtering, rather than multiinterface NAT rules used in multihomed network firewall configurations. |
Before you begin making firewall rule changes, however, do a baseline port scan. You can compare the before and after scans to see how well your iptables configurations worked.
First, turn off iptables with this command:
# service iptables stop
Next, go to a different Linux box on your network and use the nmap program. nmap is a free portscanner; if it is not already installed on your network, you can download it from www.insecure.org/nmap/. Issue the command nmap x.x.x.x, where x.x.x.x is the IP address of the server you're creating iptable entries on. You will need to issue this command as root. The output will look like this:
Starting nmap V. 2.54BETA31 ( www.insecure.org/nmap/ )
Interesting ports on mydomain.com (10.1.1.1):
(The 1542 ports scanned but not shown below are in state: closed)
Port       State       Service
21/tcp     open        ftp
22/tcp     open        ssh
25/tcp     open        smtp
53/tcp     open        domain
79/tcp     open        finger
80/tcp     open        http
110/tcp    open        pop-3
143/tcp    open        imap2
443/tcp    open        https
515/tcp    open        printer
993/tcp    open        imaps
995/tcp    open        pop3s
Nmap run completed -- 1 IP address (1 host up) scanned in 0 seconds
Use the nmap usage nmap -vv x.x.x.x if you want a more verbose description.
Save this information or redirect it out to a file by appending >first-scan.txt to the command; after your stand-alone firewall configuration is up and running scan the system again to compare the effect your settings had.
| Tip |
If you only need to control access to services on a trusted network, then TCP wrappers may be sufficient to allow and disallow networks or groups of IP addresses to your system. From a security perspective, however, TCP wrappers allows attackers to "touch" your networking stack and, ultimately, some aspects of the services running on it, whether they're blocked with wrappers or not. If vulnerability, buffer overflows, and IP stack access are of concern to you, then look toward iptables and its kernel-level protection rather than the application/daemon level of control offered by TCP wrappers. |
Many security experts will argue that iptables is best managed from the command line if you have the time and expertise that it requires. The iptables command has a number of options that allow you to access the iptables subsystem in a variety of ways. Before you begin to issue iptables commands, however, make sure that the kernel modules are loaded:
   # lsmod | grep ^ip
   ipt_REJECT    4216   1   (autoclean)
   ipt_state       1080   3   (autoclean)
   ip_conntrack    27752  1   (autoclean) [ipt_state]
   iptable_filter  2444   1   (autoclean)
   ip_tables       14560  3 [ipt_REJECT    ipt_state iptable_filter]
This output shows that the base kernel module ip_tables is running, and that several related modules are loaded on top of it. This is roughly the default state on a Fedora Core system. If you see output similar to this, you can check the status of the iptables service with the following command:
#  /etc/init.d/iptables status
Table: filter
Chain INPUT (policy ACCEPT)
target prot opt source        destination
RH-Firewall-1-INPUT all -- anywhere               anywhere

Chain FORWARD (policy ACCEPT)
target prot opt source        destination
RH-Firewall-1-INPUT all -- anywhere               anywhere

Chain OUTPUT (policy ACCEPT)
target prot opt source        destination

Chain RH-1-Firewall-1-INPUT (2 references)
target prot opt source             destination
ACCEPT all -- anywhere             anywhere
ACCEPT icmp-- anywhere             anywhere  icmp any
ACCEPT ipv6-crypt-- anywhere           anywhere
ACCEPT ipv6-auth-- anywhere            anywhere
ACCEPT all -- anywhere             anywhere          state RELATED,ESTABLISHED
ACCEPT tcp -- anywhere             anywhere          state NEW tcp dpt:http
ACCEPT tcp -- anywhere             anywhere          state NEW tcp dpt:ssh
REJECT all -- anywhere             anywhere          reject-with icmp-host-
prohibited
This output shows that iptables is running, that you are looking (by default) at the table named "filter," and that there are several chains of rules in the "filter" table.
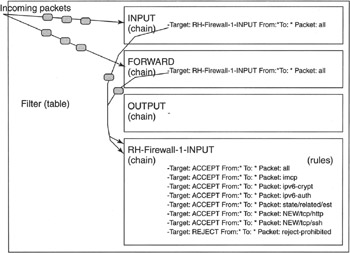
In a nutshell, iptables contains three base tables (nat, mangle, and filter), each of which contains various chains of rules. Some functions (such as INPUT, OUTPUT, RH-Firewall-1-INPUT, intrusion, portsentry, and so on) contain an ordered set of access control rules called a chain. Each chain is named for the associated function. A chain of rules determines the ACCEPT or REJECT ordering and behavior toward a given packet flowing through the chain. Figure 11-5 illustrates this concept.
| Note |
The status of iptables can be determined in several ways, using one of these commands: In the last command, if you do not specify a table to display, the default table is "filter," though there are two other tables of chains called "nat" and "mangle." The nat table is what allows you to set up a multihome network firewall. |
The "filter" table contains INPUT, FORWARD, and OUTPUT chains by default (as seen in Figure 11-5). In newer Red Hat Linux and Fedora Core systems, you will also see a custom chain in "filter" called RH-Firewall-1-INPUT. This custom chain is installed for you, and is configured at installation time based on the options you select. (Yours may appear slightly different from the one shown here depending on your installation selections.) Note that the INPUT and FORWARD chains pass control to the RH-Firewall-1-INPUT chain. Most of the ACCEPT and REJECT rules in this final chain control what is allowed into the server and what is not. For example, if you follow along Figure 11-5 or the previous iptable listing, in this particular setup it looks as if the first rule in the RH-Firewall-1-INPUT chain ACCEPTs "all" from "*" to "*". This is not for all interfaces on the server but actually just for the to (localhost) loopback device (the server itself), but it is just not identified as such in this type of listing. The second rule in the RH-Firewall-1-INPUT chain ACCEPTs icmp (for example, ping) packets, followed by IPv6 encryption and authentication packets, incoming traffic state related to already established sessions, incoming NEW web (http) and ssh requests, in that order. Everything else is caught by the last REJECT rule in that chain and rejected. Remember, order is important when setting up chains of rules (or ACLs) like this.
Querying iptables for its table listing is a good way to see what's currently running in your firewall configuration. If someone has added a new rule from the command line, you'll see it in the output of iptables -L. However, you can also examine the /etc/sysconfig/iptables configuration file to view the "filter" table and its boot time chains. Here's the /etc/sysconfig/iptables configuration file that produced the rule set we listed above:
# cat /etc/sysconfig/iptables
# Firewall configuration written by redhat-config-securitylevel
# Manual customization of this file is not recommended.
*filter
:INPUT ACCEPT [0:0]
:FORWARD ACCEPT [0:0]
:OUTPUT ACCEPT [0:0]
:RH-Firewall-1-INPUT - [0:0]
-A INPUT -j RH-Firewall-1-INPUT
-A FORWARD -j RH-Firewall-1-INPUT
-A RH-Firewall-1-INPUT -i lo -j ACCEPT
-A RH-Firewall-1-INPUT -p icmp -icmp-type any -j ACCEPT
-A RH-Firewall-1-INPUT -p 50 -j ACCEPT
-A RH-Firewall-1-INPUT -p 51 -j ACCEPT
-A RH-Firewall-1-INPUT -m state --state ESTABLISHED,RELATED -j ACCEPT
-A RH-Firewall-1-INPUT -m state --state NEW -m tcp -p tcp --dport 80-j ACCEPT
-A RH-Firewall-1-INPUT -m state --state NEW -m tcp -p tcp --dport 22-j ACCEPT
-A RH-Firewall-1-INPUT -j REJECT --reject-with icmp-host-prohibited
COMMIT
| Caution |
As with most ACL systems, order rules in chains is critical. If the last REJECT line were higher in the file or another -A append command was issued after iptables was reloaded, the rules after or below the REJECT would never be used since the REJECT would effectively block any additions from ever being used. If you want to add rules to /etc/ sysconfig/iptables, keep this in mind. If you like to add rules to your chains manually via the command line with the iptables command, options like iptables -L line-number, and the -I insert option can save you a lot of troubleshooting pain (instead of just using the regular -A append option). (More on this last method later.) |
If you're having problems thus far, don't worry. In this section we'll step through each rule in our filter table here.
The settings in this example RH-Firewall-1-INPUT chain are fairly basic. The first entries are the rules that tell the INPUT and FORWARD chains to jump (-j), or send, their output on to the RH-Firewall-1-INPUT chain:
   -A INPUT -j RH-Firewall-1-INPUT
   -A FORWARD -j RH-Firewall-1-INPUT
These settings are actually not a part of the RH-Firewall-1-INPUT chain itself (they belong to the INPUT and FORWARD chains), but without them the RH-Firewall-1-INPUT chain would never be referenced since all incoming requests come through either the INPUT or the FILTER chain.
The first rule of the RH-Firewall-1-INPUT chain is actually
This rule tells iptables to automatically ACCEPT all packets coming in from lo (the loopback device). Remember this line from the iptables - L output shown earlier?
ACCEPT all -- anywhere anywhere
Although all from anywhere is allowed, the first rule in the RH-Firewall-1-INPUT chain shows that this actually happens only for the lo or the loopback or localhost interface (127.0.0.1), as defined by the -i lo component of the rule.
The next line of the chain contains the first all-interface rule:
-A RH-Firewall-1-INPUT -p icmp --icmp-type any -j ACCEPT
This line shows that the firewall is appending (the -A switch) a new rule to the chain and that the protocol type ICMP (-p icmp) will jump to the target ACCEPT. The location to which these requests jump is called the target, and it defines how this type of incoming data will be handled. Since ping uses ICMP (Internet Control Management Protocol), this rule says that the firewall will ACCEPT and react normally to ping requests, as well as other ICMP packet types.
If you've never used iptables before, or don't have a good feel for it, it is critical that you get a feel for how this all works. For those readers who aren't functionally familiar with iptables, let's stop for a moment and test some of what I've been showing you.
To test the aforementioned set-up with ICMP and just get a better feel for iptables usage and behavior, work through this minilab to familiarize yourself with iptables on a Red Hat Linux or Fedora Core systems.
If you're fine so far and you've done this kind of thing before, feel free to just skim through this section and move on to the RH-Firewall-I-INPUT chain (continued) section that follows.
In this exercise, you remove the ICMP ACCEPT rule, restart iptables, and see what happens, and then follow up with a few more modifications of our default ICMP rule. But first, just follow the following steps to get a feel for how you make changes to and do testing of iptables.
On your Fedora Core or Red Hat Linux server, which we'll call Machine 1, open /etc/sysconfig/iptables with your favorite text editor. Save a backup copy with the name /etc/sysconfig/iptables-BAK.
Comment out the line that controls ICMP requests:
#-A RH-Firewall-1-INPUT -p icmp --icmp-type any -j ACCEPT
Save the file with the original name, /etc/sysconfig/iptables, and exit the text editor.
Go to another machine on the network and ping Machine 1:
# ping 10.1.1.1
PING 10.1.1.1 (10.1.1.1) 56(84) bytes of data.
64 bytes from 10.1.1.1: icmp_seq=0 ttl=64 time=0.086 ms
64 bytes from 10.1.1.1: icmp_seq=1 ttl=64 time=0.060 ms
...
If you are pinging from a Windows box, be sure to issue the command as ping-t so that it will ping continuously. Otherwise, it will ping only five times before ending the command.
While the ping from the second machine is active, go back to Machine 1 and restart iptables. This will load your change into the active iptable system:
# /etc/init.d/iptables restart
Flushing firewall rules:                      [ OK ]
Setting chains to policy ACCEPT: filter       [ OK ]
Unloading iptables modules:                   [ OK ]
Applying iptables firewall rules:             [ OK ]
Return to the second machine and notice what the ping process is now reporting:
64 bytes from 10.1.1.1: icmp_seq=0 ttl=64 time=0.086 ms
64 bytes from 10.1.1.1: icmp_seq=1 ttl=64 time=0.060 ms
...
From 10.1.1.1 icmp_seq=28 Dest Unreachable, Bad Code: 10
From 10.1.1.1 icmp_seq=29 Dest Unreachable, Bad Code: 10
From 10.1.1.1 icmp_seq=30 Dest Unreachable, Bad Code: 10
From 10.1.1.1 icmp_seq=31 Dest Unreachable, Bad Code: 10
Stop the ping on the second machine with Ctrl+C and return to Machine 1.
Does this give you a feel for how to work with iptables settings on a live server? Don't forget to remove the hashmark that you used to comment out the line in /etc/sysconfig/iptables,or you won't have ping service! Re-save the configuration file and restart iptables to get everything back to normal.
You may be wondering why, if the rule ACCEPTed ICMP traffic and we commented it out, the ICMP traffic would stop. After all, the target action, ACCEPT, should only happen if there is a match; removing the rule alone should not stop ICMP itself. So, what happened when we removed the rule? Look back at the bottom of the /etc/sysconfig/iptables file and remember how packets flow through chains. Can you find the REJECT rule that triggered the behavior?
If you want to change the jump action, or target behavior, to actively DROP ICMP packets immediately rather than relying on a REJECT rule later in the file, try this rule instead of the default ICMP line:
-A CHAIN-NAME -p icmp --icmp-type any -j DROP
DROPping a packet is the most secure way to not accept traffic. To the machines on the outside, it looks like the packet just goes away.
You may configure this rule to affect only the networking interface eth1 with (if you have a second network card)
-A CHAIN-NAME -p icmp --icmp-type any -i eth1 -j DROP
What about stopping this type of traffic only from outside networks?
-A CHAIN-NAME -p icmp --icmp-type any -s ! 10.1.1.0/24 --j DROP
Target values can be set to ACCEPT, QUEUE, RETURN, or DROP. The target QUEUE is little used, but can pass a specified packet from the kernel into user program space. RETURN is another uncommon target that simply passes a packet back to the previous chain.
The DROP target is an excellent security solution as nothing at all is returned to the requesting client. From the client's perspective, it looks like the machine isn't there at all. The machine does not appear to be on the network, which can be very useful.
| Note |
What happened to REJECT? REJECT is what's called a target extension. A target extension is a target that has been added to the core iptables system, but which comes with most base distributions of iptables, like an add-on option, if you will. There are over a dozen of these target extensions; see the man page for iptables for more information on this subject. |
However, depending on the type of reject message you want to return to the client, you may want to use REJECT instead of dropping the packet cold. There are several types of REJECT messages that send specific ICMP information. Search the iptables man page for "reject-with" to learn more.
| Tip |
When testing iptables configurations from another machine, always use REJECT before going to DROP. Only add DROP to harden a firewall rule after you're sure the rule is working properly, and something on the network isn't at fault. |
Now that you are familiar with more of the inner workings and functionality of iptables in action, we can return to the RH-Firewall-1-INPUT chain.
We've seen the first couple of rules in this chain (accept lo and accept icmp); the next two rules in our RH-Firewall-1-INPUT chain are
   -A RH-Firewall-1-INPUT -p 50 -j ACCEPT
   -A RH-Firewall-1-INPUT -p 51 -j ACCEPT
to append the acceptance of IPv6-Crypt and IPv6-Auth protocols. These are the encryption and authentication protocols defined in /etc/protocols for initiative IPv6-based connections.
Next, the entry
-A RH-Firewall-1-INPUT -m state --state ESTABLISHED,RELATED -j ACCEPT
triggers stateful inspection. The -m, or MATCH, extension allows you to load specialized packet-matching modules for specific packet types and uses. The -m state component tells iptables to load the special state-tracking kernel module called state. (The actual module name is ipt_state, and it requires ipt_conntrack to run properly.)
With this stateful inspection and conntrack in place, iptables can use state tables to track which incoming and outgoing packets are associated with each other over time. In essence, the system will know that incoming packet X is associated with the existing two-way session Y using protocol Z; the state of the session is known and tracked over time. The aforementioned rule allows ESTABLISHED bidirectional continuing packets to come in if they are associated with a known connection, and RELATED for new packets if they are associated with a known connection, even if the session is on a different port or spread over multiple ports (such as NFS or FTP).
You can even enable custom kernel modules to track other special bidirectional multiport applications like active FTP, IRC, and SNMP. This type of stateful firewalling is what allows iptables to handle, for example, active (nonpassive) FTP sessions started from your machine's ftp client, connecting to another FTP server, and allowing that server to establish the data channel (port 20) back to your machine. Older firewalls that don't use stateful tracking have serious problems letting external boxes establish anything "back in" through not-so-intelligent firewall software, and as such require passive FTP connections.
| Note |
This level of application-aware state tracking comes from additional iptable kernel modules such as ipt_state, ip_conntrack, ip_conntrack_ftp, and so on. To learn more, issue the command locate netfilter/ip_|grep modules/$(uname -r)\/. |
The next two rules from our RH-Firewall-1-INPUT chain are something new:
-A RH-Firewall-1-INPUT -m state --state NEW -m tcp -p tcp --dport 80 -j
  ACCEPT
-A RH-Firewall-1-INPUT -m state --state NEW -m tcp -p tcp --dport 22 -j
  ACCEPT
These are rule matches for client requests on ports 80 and 22. These two rules are holes that have been punched in the firewall to allow new sessions (anyone who wants to try), or clients with the state NEW, on these ports, which happen to allow us to serve HTTP and SSH respectively. These holes were probably punched at installation when we enabled WWW and SSH traffic in the firewall for the example server we've been building, or from running the redhat-config-securitylevel tool.
| Tip |
Keep in mind that when you poke a hole in a firewall for a protocol such as HTTP or SSH, you have just decreased your overall system security by exposing two of your daemons to the outside world. You have to do this to be able to serve content (without running some type of proxy service), but by doing so you're also assuming that both daemons are secured, correctly configured, and fully up to date with the latest security patches applied. This is the weak area of firewalls. For a firewall to do its job with service holes punched in it, you are assuming that it is allowing access to services that are fully secure and up to date. If this assumption is not correct, then a firewall, even a big expensive unit, will not keep you from getting cracked or hacked. To stay safe when opening holes for your services, follow the foundational security elements outlined in the paper "Internet Server Security" (www.datacenterhub.com/features/1205_Rackspace_Weeks.shtm). |
The final rule is probably the most important from a security perspective:
-A RH-Firewall-1-INPUT -j REJECT --reject-with icmp-host-prohibited
This REJECT-all rule ensures that if a packet has gotten this far without matching any ACCEPT rules, it will match and be rejected here. Such packets won't make it past iptables into any daemons or applications, not even TCP wrappers. This function is usually managed with either a REJECT or a DROP rule. In this case, we're being network-friendly and returning a message that says icmp-host-prohibited.
Finally, you must be sure that this /etc/sysconfig/iptbales file-specific command ends your iptables config file:
COMMIT
Without this, there is no firewall.
After making any changes you need in /etc/sysconfig/iptables, save the file, and exit the text editor. Restart iptables with the /etc/init.d/iptables restart command.
You might wonder how we figured out the various state triggers to use in our rules, such as NEW, RELATED, and ESTABLISHED. Luckily, the match module itself can help you out. Once you've loaded the module into iptables from the command line, you can ask it for help at the command line. The module will append its own help file onto the regular iptables help output. For example, to get help on the match module named state, issue this command:
   # iptables -m state-help
   iptables v1.2.8
   Usage: iptables -[AD] chain rule-specification [options]
        iptables -[RI] chain rulenum rule-specification [options]
        iptables -D chain rulenum [options]
   ...
     --set-counters PKTS BYTES   set counter during insert/append
     --version   -V              print package version.


   state v1.2.8 options:
     --state [INVALID | ESTABLISHED | NEW | RELATED][,...]
                          State(s) to match
In the next to last line, the module prints all the valid states that can be used in your firewall. Try this with other match modules-but, you may ask, how do I know what other match modules I've got? Issue these commands:
   #  export LC_ALL=C
   #  locate netfilter/ipt_|grep \/$(uname -r)\/.*[a-z].o$

   There you go-enough iptables black magic to consume your time for the next year
   (and potentially double your salary in the process!).
Now that you've seen the rules in /etc/sysconfig/iptables and determined the settings for your basic firewall, we can return to the example server shown earlier in this chapter. Remember that we wanted to lock clown the Apache web server so that only our 172.16.1.* remote office network can access these web resources. Do that by changing the port 80 web server line from
to
   -A RH-Firewall-1-INPUT -m state --state NEW -m tcp -p
      tcp -s 172.16.1.0/24 --dport 80 -j ACCEPT
This will only match all of our criteria when the source IP address is from the 172.16.1.* network. Save the file, exit the editor, and restart iptables.
| Tip |
Your should always test such configurations before going live. If you need to test something like this, here are two useful tips: First, simply use a ! (logical not) symbol in front of the IP range like this ! 172.16.1.0/24 while you're testing. Second, you can even use the IP of another desktop PC combined with the ! test to verify it works before changing the network address back. |
Once the stand-alone server's iptables firewall is set up and restarted, you can rescan your system with the nmap program to see how the new firewall looks from the outside. The scan will take much longer this time, since you've locked down a whole range of ports. Go to another Linux machine on your network and issue this command:
# nmap 192.168.128.25
Starting nmap V. 2.54BETA31 ( www.insecure.org/nmap/ )
Interesting ports on mydomain.com (192.168.128.25):
(The 1552 ports scanned but not shown below are in state: filtered)
Port       State       Service
22/tcp     open        ssh
80/tcp     open        http
Nmap run completed -- 1 IP address (1 host up) scanned in 680 seconds
This network profile looks a lot better than the first time we scanned the server. All those old services are still running, but no one but the people we want can get to them now. The fewer doors and windows you leave open to curious passersby, the more secure your house. Notice how long this scan took, as well. Most script kiddies will get bored and move on long before a scan this lengthy is complete.
| Note |
With this iptable configuration, not even our mail services (SMTP, POP3) or FTP service previously configured with TCP wrappers will be able to get through. If you want TCP wrappers to be able to control them, you may need to open up iptables to universally let those ports through. Just be sure that you track which services you're controlling through wrappers and which ones you're controlling through iptables, or future troubleshooting will be very frustrating indeed. |