Using the Solaris Batch-Processing FacilityA way to divide processes on a busy system is to schedule jobs so that they run at different times. A large job, for example, could be scheduled to run at 2:00 a.m., when the system would normally be idle. Solaris supports two methods of batch processing: the crontab and at commands. The crontab command schedules multiple system events at regular intervals, and the at command schedules a single system event. Configuring crontabObjective: Explain how to schedule the automatic recurring execution of a command. cron is a Unix utility named after Chronos ("time"), the ancient Greek god of time. It enables you to execute commands automatically according to a schedule you define. The cron daemon schedules system events according to commands found in each crontab file. A crontab file consists of commands, one per line, that will be executed at regular intervals. The beginning of each line contains five date and time fields that tell the cron daemon when to execute the command. The sixth field is the full pathname of the program you want to run. These fields, described in Table 5.14, are separated by spaces.
Follow these guidelines when making entries in the crontab file:
The following sample crontab command entry displays a reminder in the user's console window at 5:00 p.m. on the 1st and 15th of every month: 0 17 1,15 * * echo Hand in Timesheet > /dev/console crontab files are found in the /var/spool/cron/crontabs directory. Several crontab files besides root are provided during the SunOS software installation process; they are also located in this directory. Other crontab files are named after the user accounts for which they are created, such as bill, glenda, miguel, or nicole. They also are located in the /var/spool/cron/crontabs directory. For example, a crontab file named root is supplied during software installation. Its contents include these command lines: 10 3 * * * /usr/sbin/logadm 15 3 * * 0 /usr/lib/fs/nfs/nfsfind 30 3 * * * [ -x /usr/lib/gss/gsscred_clean ] && /usr/lib/gss/gsscred_clean #10 3 * * * /usr/lib/krb5/kprop_script ___slave_kdcs___ The first command line instructs the system to run logchecker at 3:10 a.m. on Sunday and Thursday. The second command line orders the system to execute nfsfind on Sunday at 3:15 a.m. The third command line runs each night at 3:30 a.m. and executes the gsscred command. The fourth command is commented out. The cron daemon never exits and is started via the svc:/system/cron:default service. The /etc/cron.d/FIFO file is used as a lock file to prevent running more than one instance of cron. Creating and Editing a crontab FileCreating an entry in the crontab file is as easy as editing a text file using your favorite editor. Use the steps described next to edit this file; otherwise, your changes are not recognized until the next time the cron daemon starts up. cron examines crontab configuration files only during its own process-initialization phase or when the crontab command is run. This reduces the overhead of checking for new or changed files at regularly scheduled intervals. Step by Step 5.2 tells you how to create or edit a crontab file.
Controlling Access to crontabYou can control access to crontab by modifying two files in the /etc/cron.d directory: cron.deny and cron.allow. These files permit only specified users to perform crontab tasks such as creating, editing, displaying, and removing their own crontab files. The cron.deny and cron.allow files consist of a list of usernames, one per line. These access control files work together in the following manner:
Superuser privileges are required to edit or create cron.deny and cron.allow. During the Solaris software installation process, a default /etc/cron.d/cron.deny file is provided. It contains the following entries:
None of the users listed in the cron.deny file can access crontab commands. The system administrator can edit this file to add other users who are denied access to the crontab command. No default cron.allow file is supplied. This means that, after the Solaris software installation, all users (except the ones listed in the default cron.deny file) can access crontab. If you create a cron.allow file, only those users can access crontab commands. Scheduling a Single System Event (at)Objective: Explain how to schedule an automatic one-time execution of a command. The at command is used to schedule jobs for execution at a later time. Unlike crontab, which schedules a job to happen at regular intervals, a job submitted with at executes once, at the designated time. To submit an at job, type at. Then specify an execution time and a program to run, as shown in the following example: at 07:45am today at> who > /tmp/log at> <Press Control-d> job 912687240.a at Thu Jun 6 07:14:00 When you submit an at job, it is assigned a job identification number, which becomes its filename along with the .a extension. The file is stored in the /var/spool/cron/atjobs directory. In much the same way as it schedules crontab jobs, the cron daemon controls the scheduling of at files. The command syntax for at is shown here: at -m <time> <date> The at command is described in Table 5.15.
You can set up a file to control access to the at command, permitting only specified users to create, remove, or display queue information about their at jobs. The file that controls access to at is /etc/cron.d/at.deny. It consists of a list of usernames, one per line. The users listed in this file cannot access at commands. The default at.deny file, created during the SunOS software installation, contains the following usernames:
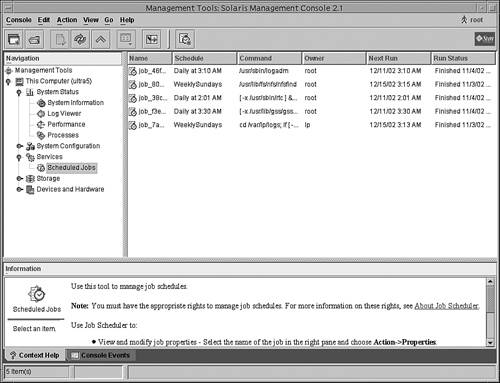
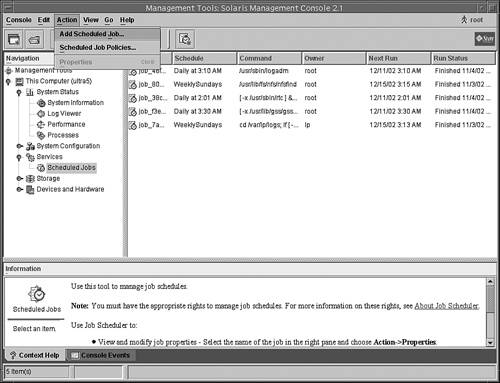
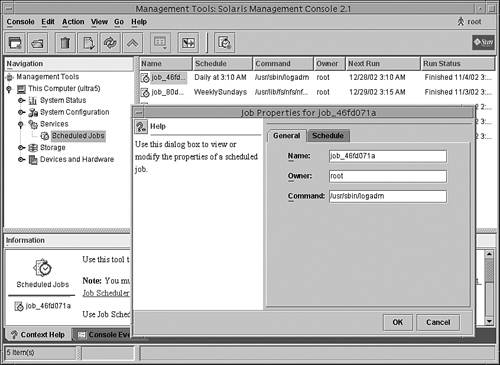
With superuser privileges, you can edit this file to add other usernames whose at access you want to restrict. Checking Jobs in Queue (atq and at -1)To check your jobs that are waiting in the at queue, use the atq command. This command displays status information about the at jobs you created. Use the atq command to verify that you have created an at job. The atq command confirms that at jobs have been submitted to the queue, as shown in the following example: atq The system responds with this: Rank Execution Date Owner Job Queue Job Name 1st Jun 6, 08:00 root 912690000.a a stdin 2nd Jun 6, 08:05 root 912690300.a a stdin Another way to check an at job is to issue the at -1 command. This command shows the status information on all jobs submitted by a user, as shown in this example: at -1 The system responds with this: user = root 912690000.a Thu Jun 6 08:00:00 user = root 912690300.a Thu Jun 6 08:05:00 Removing and Verifying Removal of at JobsTo remove the at job from the queue before it is executed, type this: at -r [job-id]job-id is the identification number of the job you want to remove. Verify that the at job has been removed by using the at -1 (or atq) command to display the jobs remaining in the at queue. The job whose identification number you specified should not appear. In the following example, you'll remove an at job that was scheduled to execute at 8:00 a.m. on June 6. First, check the at queue to locate the job identification number: at -1 The system responds with this: user = root 912690000.a Thu Jun 6 08:00:00 user = root 912690300.a Thu Jun 6 08:05:00 Next, remove the job from the at queue: at -r 912690000.a Finally, verify that this job has been removed from the queue: at -1 The system responds with this: user = root 912690300.a Thu Jun 6 08:05:00 Job SchedulerThe Solaris Management Console (SMC) includes a graphical tool to create and schedule jobs on your system. You can use the Job Scheduler Tool to
To open the Job Scheduler, follow the steps described in the "SMC Process Tool" section to start up the SMC using the smc command.
|