The root user is the primary user account used for Linux system administration. Despite file ownership and group assignment, the root user always has the ability to change, add, or delete any file or directory on a Linux system (provided that the device itself is not a read-only device).
Troubleshooting and administering any standard Linux or UNIX systems begins with the root user. While regular user accounts may be able to display information about your system and even modify selected features, the root user is expected (in fact, is the only user allowed) to do most system-wide configuration changes to a Linux system. This section goes through ways of accessing and sharing root privilege in Linux.
Troubleshooting system-wide features almost always means acting as root user. The most common ways to obtain root privilege from a shell are as follows:
Login as root-Whether you login to a computer over the network using ssh (described later in this chapter) or from a login prompt, you can simply login with root as the username and, when prompted, the root user's password. By default, the prompt will end in a pound sign (#) and all subsequent commands run from the login will be run as the root user.
su (new shell)-By using the su command while you are logged in as another user, you can effectively become the root user for all subsequent commands from the current shell. It is most common to run the su command followed by a dash (-) as shown here.
$ su -
Password:
#
The dash causes the su command to open a new shell for the root user, as a login shell. So all configuration files read during an initial login (such as the /etc/profile file) are read before starting the new shell you just opened with su.
If you forget to use the dash after the su command, the most common failure you will experience is that your shell will not find common administrative commands that are in /sbin, /usr/sbin, and /usr/local/sbin directories. This is because the /etc/profile file is not examined to include these directories in the root user's PATH. The common annoyance you will experience is that you are changed to the /root directory as your current directory, so you might need to return to the directory you were in if you want to do some work there.
| Note |
The su command, though commonly used to become the root user, can be used to change to any user that has a valid shell account on your system. (You can't su to a user that has /sbin/nologin or /bin/false as its default shell.) |
su (single command)-If you just want to execute a single command as root user, you can use su with the -c option. Simply follow the su command with -c and the command you want to run (along with any arguments), and then provide the root password when prompted. For example, if you want to create a directory in a location that is restricted to root-only access while you are logged in as another user, you could run the following.
$ su - -c "mkdir /root/tmp"
Password:
In this case, the -c tells the su command to run the command in quotes as the root user. After entering the root password you have full root privilege to create, in this case, a directory that requires root privilege to do so. As soon as the command completes, you return to your original shell (which was presumably owned by a non-root user).
sudo-As an alternative to logging in as root or using su to get to root, you can configure the /etc/sudoers file to allow selected users to have limited (or unlimited) root access on your Linux system via the sudo command. To change the /etc/sudoers file, run the following command.
#visudo
The visudo command locks the /etc/sudoers command while you edit it with the vi command. The following are some ways of configuring the sudoers files, most of which are based on entries that you can activate from within the default sudoers file itself.
# User privileges
root      ALL=(ALL) ALL
sandy     ALL=/usr/bin/lprm, /usr/sbin/lpc

# Group privileges
%wheel    ALL=(ALL) ALL
%wheel    ALL=(ALL) NOPASSWD: ALL
%users    ALL=/sbin/mount /mnt/cdrom,/sbin/umount /mnt/cdrom
%users    localhost=/sbin/shutdown -h now
The privilege specification for the root user allows root to have complete access to the Linux system as it relates to the sudo command (ALL). The second line shows the user sandy being given the privilege to remove printer jobs (lprm) and control printers (lpc). This indicates how you can give one person the privilege to do a certain task (such as manage printers), without giving the person full control of the Linux system.
The first wheel line gives complete access to all users in the wheel group (as listed in the /etc/group file). To gain that access, users in the wheel group have to use the sudo command and (when prompted) enter their own password (not the root user password). The second wheel line gives users in the wheel group the same access as the previous line, except that they can do so without entering a password.
The two %users lines shown in the example represent what functions those who belong to the users group can do that are typically restricted to root user privilege. Presumably you would add all regular user accounts (by default, UID 500 and higher) to the users line in the /etc/group file. In the first case, these users would be able to mount a CD (/sbin/mount /mnt/cdrom) and unmount a CD (/sbin/umount/mnt/cdrom). In the second case, anyone in the users group on the localhost will be able to shutdown the computer (using the /sbin/shutdown -h now command).
| Caution |
As a Linux troubleshooter, on a multiuser system it may be tempting to provide limited administrative capability to other people on that system. However, be warned that some commands (such as the vieditor) include features that let the user escape to a shell. That will effectively give the user full access to your system and undermine the intention of providing limited access to the user. |
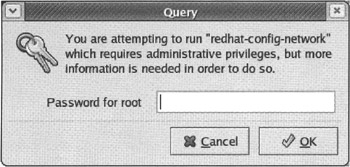
A nice feature of the Red Hat graphical administrative tools that come with Fedora and other Red Hat systems is that they can be run from any user's desktop. If a regular user launches an administrative window, either from the main menu or by running a redhat-config-* command, the user is prompted for the root password before being allowed to continue.
Figure 6-2 shows an example of the Query window prompting for the root password before allowing the user to access the Network Configuration window.
After you have entered the root password, look at the panel at the bottom of the desktop. A pair of keys should appear, indicating that you continue to be authorized to run applications that require a root password. Click on those keys to choose to keep that authorization, or forget about it.